GitHub AppsでGitHubのREST APIを実行してみる
CI/CDの改善、効果測定のためにGitHubの情報を分析したり、ボットを作る機会があると思います。
今回は、Personal Access Tokenではなく、GitHub Appsを使ってREST APIを実行するところまでやってみます。
使用する言語はPythonです。
はじめてGitHub Appsを触るので、1つずつ確認します。
| バージョン | |
|---|---|
| Python | 3.10.9 |
GitHub Appsを作成する
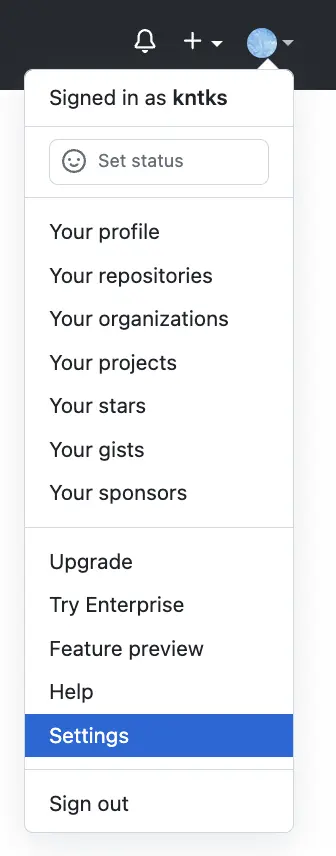
Section titled “GitHub Appsを作成する”GitHubにログイン後、画面右上にある自分のアイコンをクリックします。そこにSettingsがあるので、クリックして移動します。
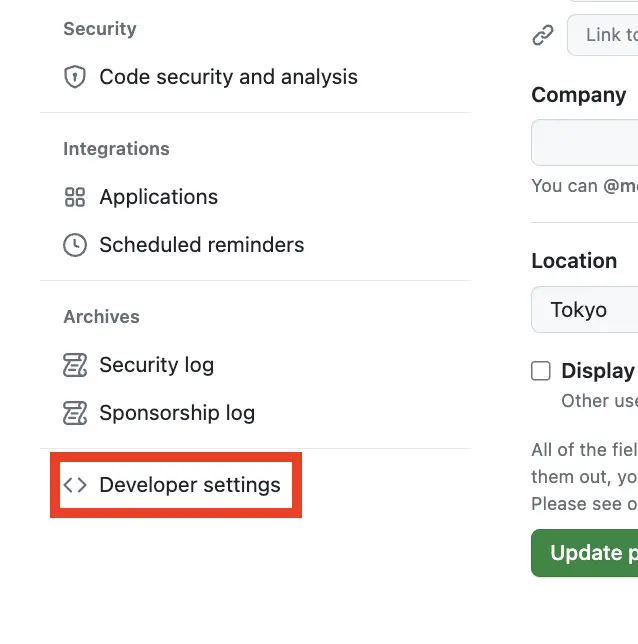
画面左にナビゲーションがあるので、一番下のDeveloper settingsをクリックします。
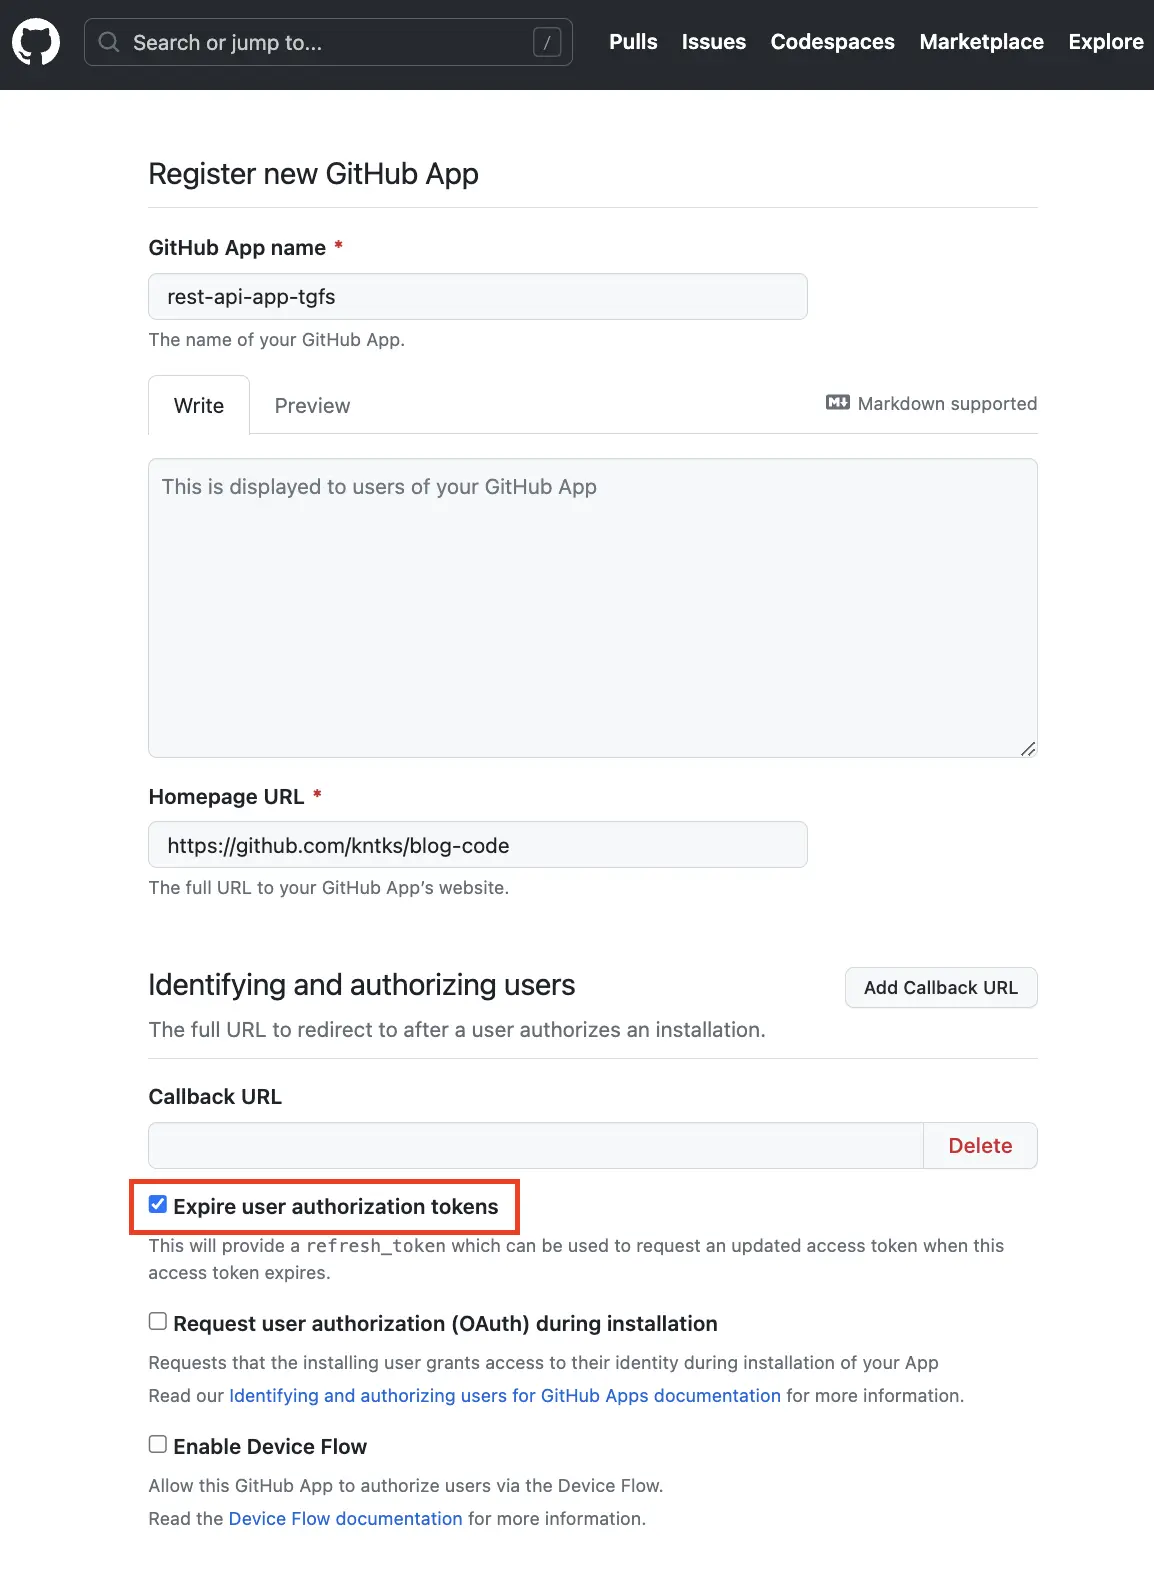
するとNew GitHub Appというボタンが出てくるので、このボタンをクリックします。

GitHub App nameなどの赤いアスタリスク*がついている必須項目を入力します。
このとき、赤枠で囲ったExpipre user authorization tokensにチェックを入れます。
GitHub App nameは一意でないといけないので、今回は名前のサフィックスに雑に文字を入れています。
名前は GitHub 全体で一意である必要があります。 既存の GitHub アカウントと同じ名前を使用することはできません。
https://docs.github.com/ja/apps/creating-github-apps/creating-github-apps/creating-a-github-app
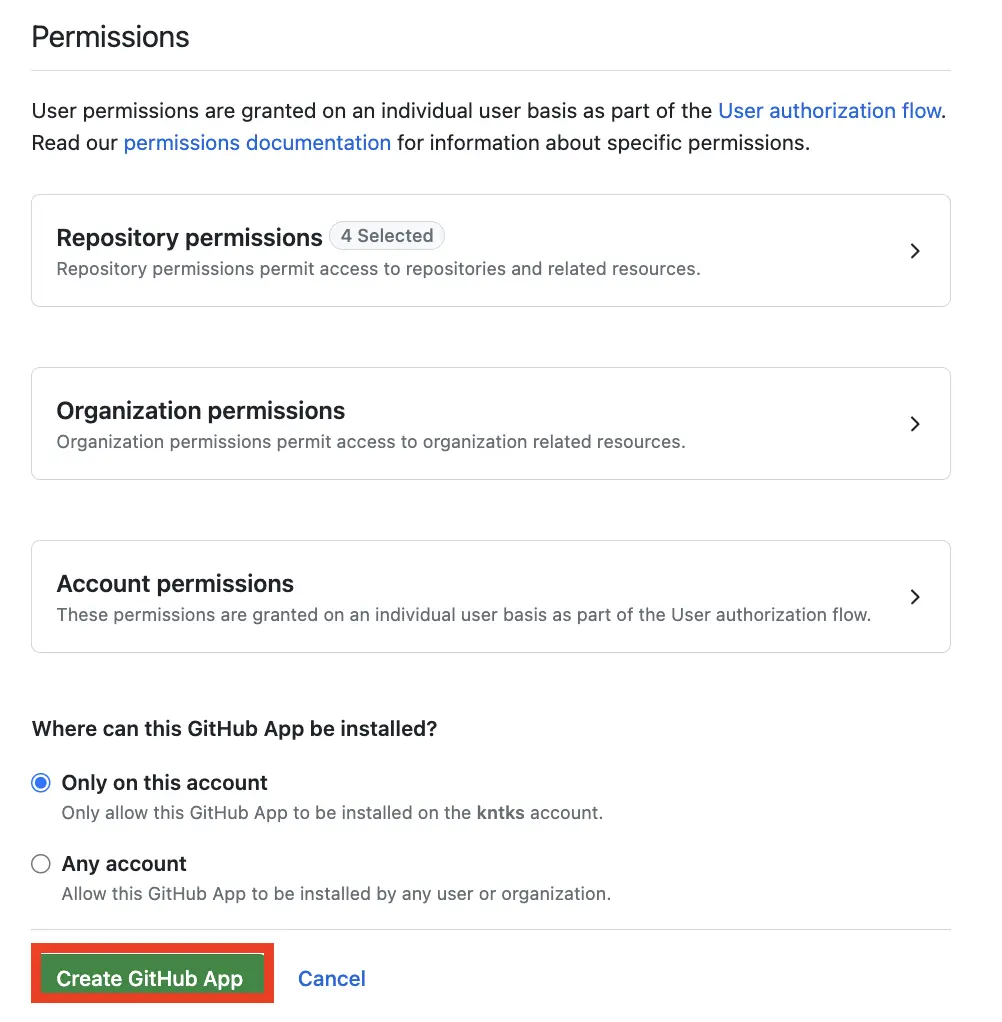
Permissionは Organization permissionsやAccount permissionsがありますが、今回はRepository permissionsの以下の表にあるpermissionを付けます。(App作成後も変更ができるので、必要に応じて後から追加できます。)
| name | permission |
|---|---|
| Actions | Read-only |
| Contents | Read and write |
| Metadata | Read-only |
| Pull requests | Read-only |
permissionの設定が終わったらCreate GitHub Appをクリックして作成します。
作成が完了すると、 https://github.com/settings/apps/{app-name} のURLに行けるようになります。
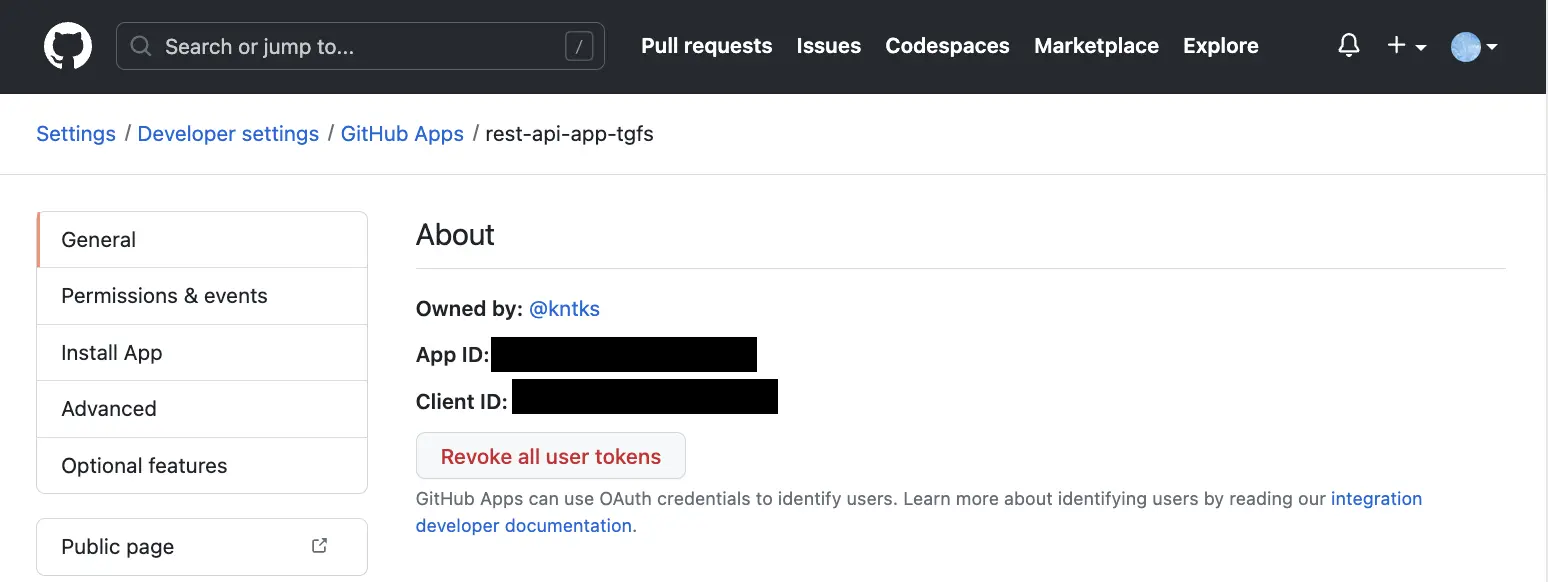
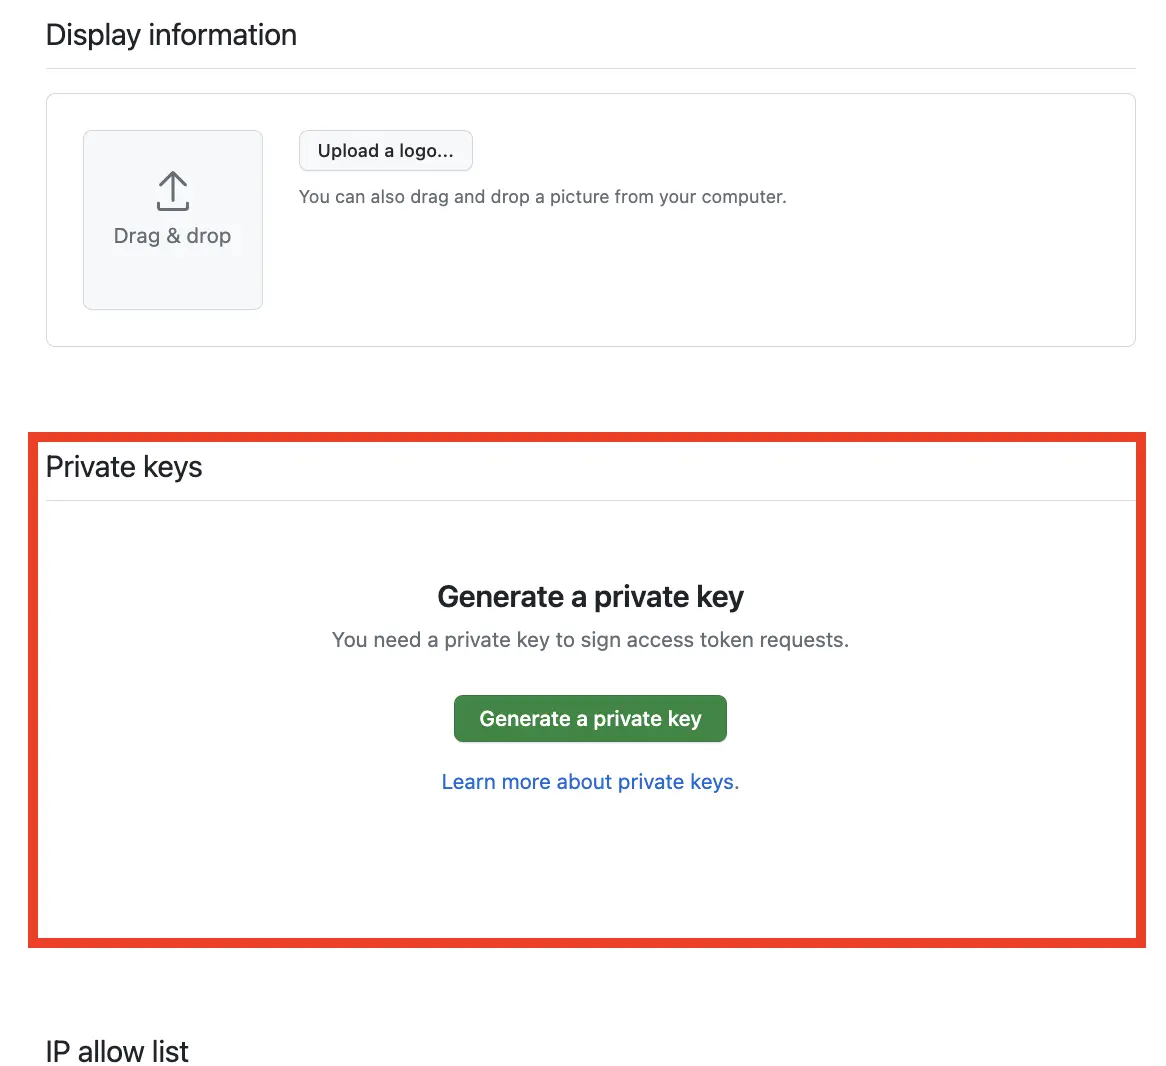
https://github.com/settings/apps/{app-name} から下にスクロールするとPrivate keyを作成できます。
Generate a private keyのボタンを押します。
続いてInstall Appに移動し、Installのボタンをクリックします。

Appの作成と準備はここで終わりです。
参考: GitHub App を作成する
jwtを生成する
Section titled “jwtを生成する”GitHub アプリの JSON Web トークン (JWT) の生成を参考にjwtを生成します。
import timeimport jwt
pem="./rest-api-app-tgfs.2023-04-17.private-key.pem"app_id =
with open(pem, 'rb') as pem_file:    signing_key = jwt.jwk_from_pem(pem_file.read())
payload = {    # Issued at time    'iat': int(time.time()),    # JWT expiration time (10 minutes maximum)    'exp': int(time.time()) + 600,    # GitHub App's identifier    'iss': app_id}
encoded_jwt = jwt.JWT().encode(payload, signing_key, alg='RS256')print(encoded_jwt)
installation_idを取得する
Section titled “installation_idを取得する”トークンを作成するためにinstallation_idが必要なので、installationの一覧を取得します。
ハイライトした行を追加します。
import timeimport requestsimport jwt
pem = "./rest-api-app-tgfs.2023-04-17.private-key.pem"app_id =
with open(pem, "rb") as pem_file:    signing_key = jwt.jwk_from_pem(pem_file.read())
payload = {    # Issued at time    "iat": int(time.time()),    # JWT expiration time (10 minutes maximum)    "exp": int(time.time()) + 600,    # GitHub App's identifier    "iss": app_id,}
encoded_jwt = jwt.JWT().encode(payload, signing_key, alg="RS256")
headers = {    "Authorization": f"Bearer {encoded_jwt}",    "Accept": "application/vnd.github+json",    "X-GitHub-Api-Version": "2022-11-28",}r = requests.get(f"https://api.github.com/app/installations", headers=headers)
for app in r.json(): print(f'slug: {app["app_slug"]}, installation_id: {app["id"]}, app_id: {app["app_id"]}')$ python main.pyslug: rest-api-app-tgfs, installation_id: xxxxxx, app_id: xxxxxxList installations for the authenticated app
installation_idが取れたので、次にトークンを発行します。
アクセストークンを発行する
Section titled “アクセストークンを発行する”URLを変更してアクセストークンを発行します。
import timeimport requestsimport jwt
pem = "./rest-api-app-tgfs.2023-04-17.private-key.pem"app_id =
with open(pem, "rb") as pem_file:    signing_key = jwt.jwk_from_pem(pem_file.read())
payload = {    # Issued at time    "iat": int(time.time()),    # JWT expiration time (10 minutes maximum)    "exp": int(time.time()) + 600,    # GitHub App's identifier    "iss": app_id,}
encoded_jwt = jwt.JWT().encode(payload, signing_key, alg="RS256")
headers = {    "Authorization": f"Bearer {encoded_jwt}",    "Accept": "application/vnd.github+json",    "X-GitHub-Api-Version": "2022-11-28",}
installation_id =r = requests.post(    f"https://api.github.com/app/installations/{installation_id}/access_tokens",    headers=headers,)
print(json.dumps(r.json()))
無事 tokenが取れました。
$ python main.py | jq{ "token": "ghs_xxxxxxxxxxxxx", "expires_at": "2023-04-23T05:54:38Z", "permissions": { "actions": "read", "contents": "write", "metadata": "read", "pull_requests": "read" }, "repository_selection": "all"}Create an installation access token for an app
プライベートリポジトリの情報を取得する
Section titled “プライベートリポジトリの情報を取得する”tokenが取れるようになったので、プライベートリポジトリの情報を取得してみます。
import timeimport requestsimport jwtimport json
pem = "./rest-api-app-tgfs.2023-04-17.private-key.pem"app_id =
with open(pem, "rb") as pem_file:    signing_key = jwt.jwk_from_pem(pem_file.read())
payload = {    # Issued at time    "iat": int(time.time()),    # JWT expiration time (10 minutes maximum)    "exp": int(time.time()) + 600,    # GitHub App's identifier    "iss": app_id,}
encoded_jwt = jwt.JWT().encode(payload, signing_key, alg="RS256")
installation_id =
headers = {    "Authorization": f"Bearer {encoded_jwt}",    "Accept": "application/vnd.github+json",    "X-GitHub-Api-Version": "2022-11-28",}r = requests.post(    f"https://api.github.com/app/installations/{installation_id}/access_tokens",    headers=headers,)
token = r.json().get("token","")
headers = {    "Authorization": f"Bearer {token}",    "Accept": "application/vnd.github+json",    "X-GitHub-Api-Version": "2022-11-28",}repo_name = ""r = requests.get(f"https://api.github.com/repos/kntks/{repo_name}", headers=headers)
print(json.dumps(r.json()))$ python main.py | jq '{ full_name: .full_name, private: .private }'{ "full_name": "kntks/xxxx", "private": true}イメージしやすいように、あえてリファクタをせず、少しずつコードを付け足す形で実行してみました。
REST APIのドキュメントはGitHub APIについてにあるので、このページを見ながらGitHubを操作することができるようになりました。
APIのURLと権限の関係はGitHub Appに必要な権限を見ながら確認するといいと思います。
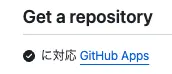
もし権限を正しく渡しているにもかかわらずResource not accessible by integrationが返ってくる場合は、APIがGitHub Appに対応しているかドキュメントを見て確認した方が良いです。
{"message": "Resource not accessible by integration"}対応しているAPIは以下の画像のようにチェックマークが付いてます。
使ったコードは、blog-code/2023/04/github-rest-apiに置いています。