Keycloakを使ったパスキー(Passkey)の設定とTerraformでの自動化
2023年あたりからパスキーの話をよく聞くようになり、Google へのログインもパスワードの入力からパスキーに代わり便利になりました。Keycloakは v23.0.0 からパスキーをサポートしており、パスワードレス認証を実装できます。
今回は、Keycloak のパスキーを使ったパスワードレス認証やパスキーの概要から実際の設定手順、さらにTerraformを使った自動化まで学習したので、そのときの学習内容をまとめました。
パスキーとは
Section titled “パスキーとは”パスキーは、パスワードに代わる新しい認証手段で、デバイス(スマホ、PC)に保存された公開鍵や生体認証情報を使って認証します。そのためユーザーがパスワードを入力することなく、認証を簡略化できます。“パスワード”と同じように、日常会話や体験の中で使う一般的な言葉として位置づけられています。
参考:
パスキーの利点
Section titled “パスキーの利点”- セキュリティの向上
- ユーザーエクスペリエンスの向上
- パスワードのリセットや管理の負担の軽減
学習の際、気になった単語を列挙します。
| FIDO アライアンス | 主に認証およびデバイス認証の標準の開発、使用、および準拠を促進する団体 |
| WebAuthn Relying Party (RP) | Web アプリケーションが Web Authentication API を利用してユーザを登録し、認証するエンティティ。 |
| WebAuthn | FIDOベースの認証を追加できるようにするウェブベースのAPI。FIDO2 の仕様の1部 |
https://github.com/kntks/blog-code/tree/main/2024/05/terraform-keycloak-authentication-flow
| バージョン | |
|---|---|
| Mac | Ventura 13.2.1 |
| Keycloak | 24.0.3 |
| Docker | 26.0.0 |
| Docker Compose | v2.24.5 |
| Terraform | 1.8.2 |
Keycloakのセットアップ
Section titled “Keycloakのセットアップ”Keycloak を docker compose で起動します。
services: keycloak: image: quay.io/keycloak/keycloak:24.0.3 ports: - target: 8080 published: 8080 protocol: tcp mode: host environment: - KEYCLOAK_ADMIN=admin - KEYCLOAK_ADMIN_PASSWORD=admin command: ["start-dev"]Terraform を使用するために Keycloak側のセットアップ が必要です。
client_id = "terraform"client_secret = "client secretをコピペ"url = "http://localhost:8080"terraform apply で Keycloak の設定を行います。
cd terraformterraform initterraform planterraform apply -auto-approveKeycloakのパスキー機能の概要と設定
Section titled “Keycloakのパスキー機能の概要と設定”Keycloak v23.0.0 から Authentication Flow を設定することで、パスキー機能を利用できます。 プレビュー機能として追加されたパスキーは、ユーザーがパスワードを入力する代わりに、メールや SMS などの方法で送られてくるパスコードを入力することで認証を行います。
W3C Web Authentication (WebAuthn) を読みながら、ログインフローを設定します。
デフォルトのログインフロー確認する
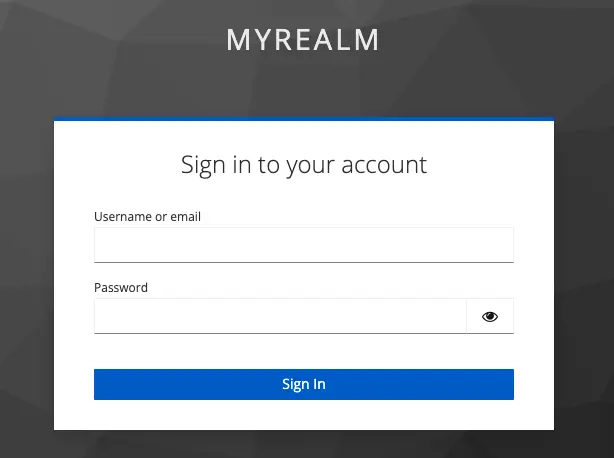
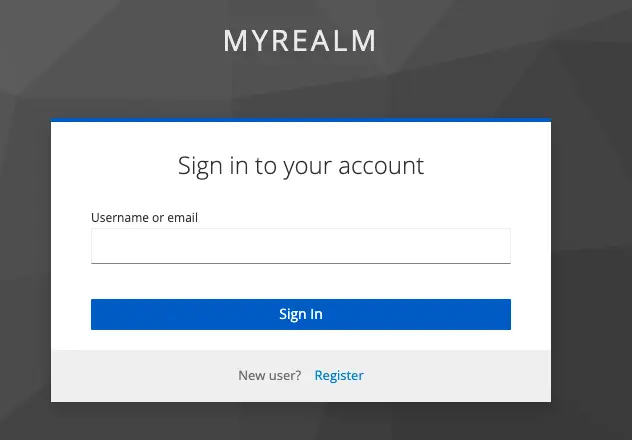
Section titled “デフォルトのログインフロー確認する”http://localhost:8080/realms/myrealm/account/ にアクセスするとユーザー名とパスワードを入れるログイン画面が表示されます。
先ほど Terraform を使ってユーザーアカウントを作成しました。ユーザー名とパスワードはともに myuser に設定しており、この認証情報を使えばアカウントコンソールにログインできます。
デフォルトの設定では、ユーザー名とパスワードで認証するフローです。デフォルトのログインフローを確認します。
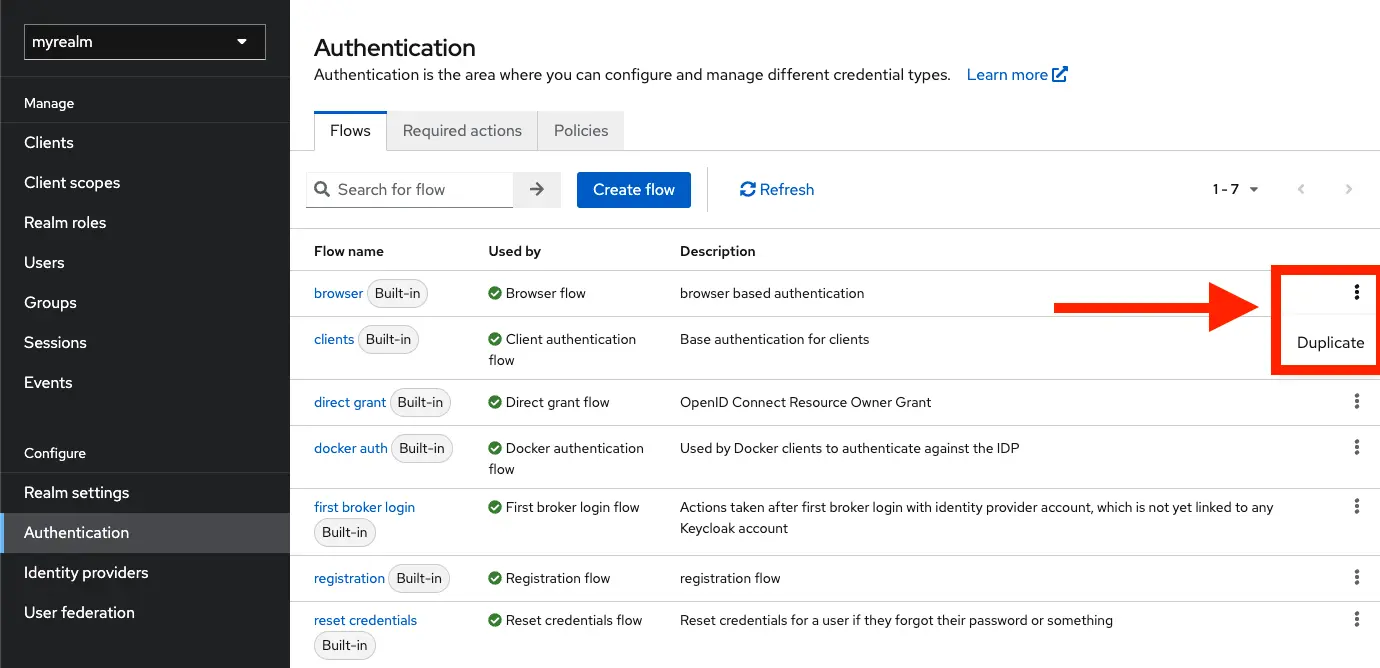
admin として Keycloak の管理画面にログインし、Authentication -> Flows から browser を選択します。
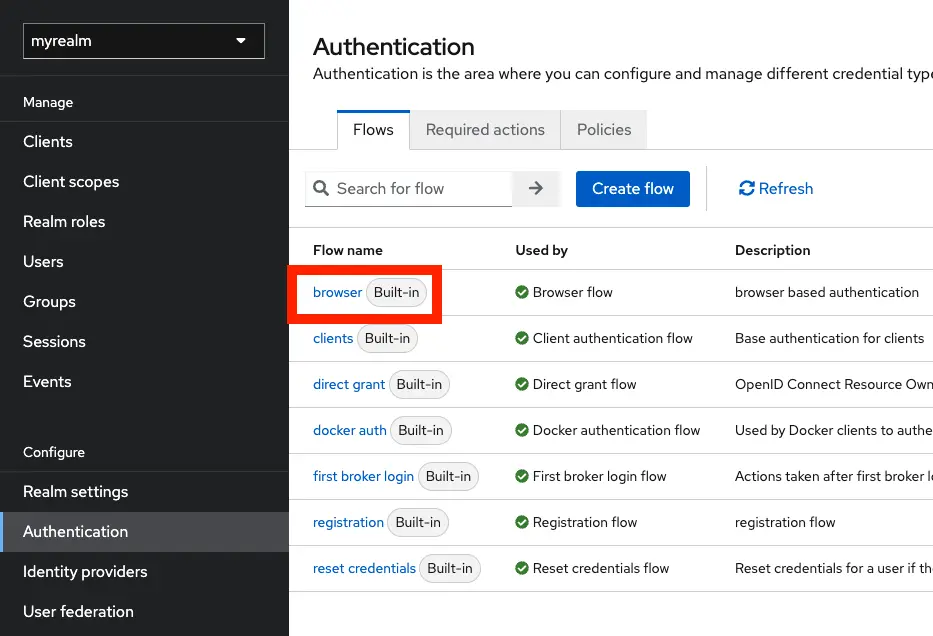
これがデフォルトのログインフローです。Username Password Form が選択されていることがわかります。
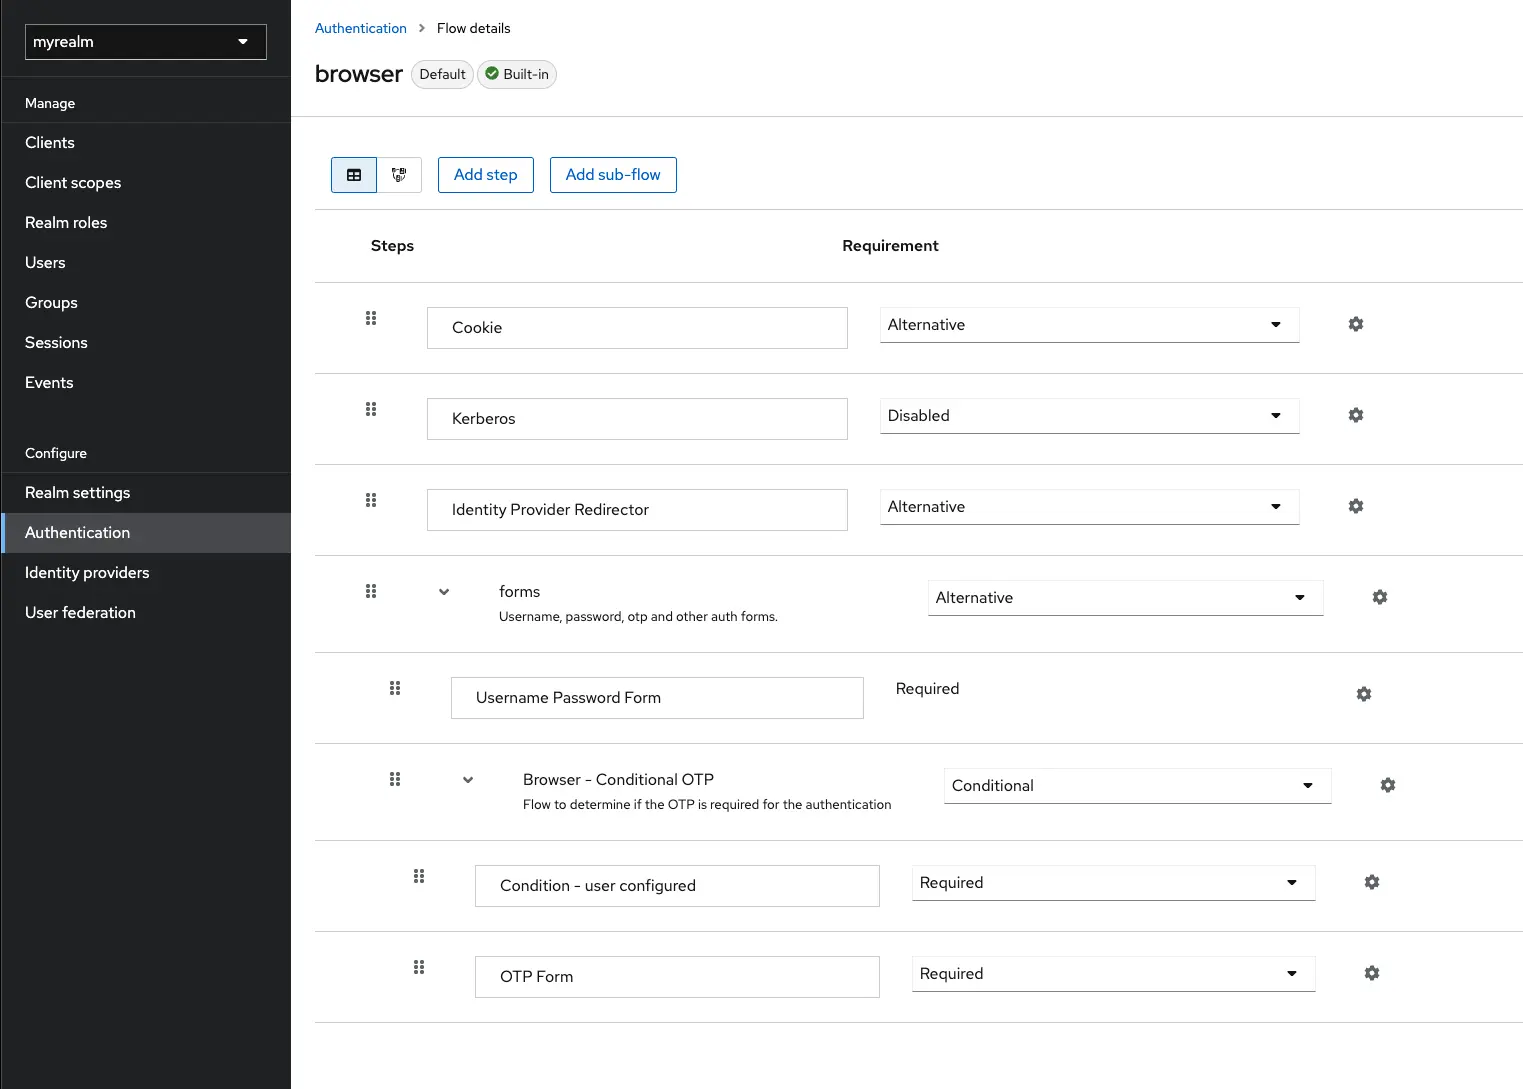
ログインフローをパスキーに変更する
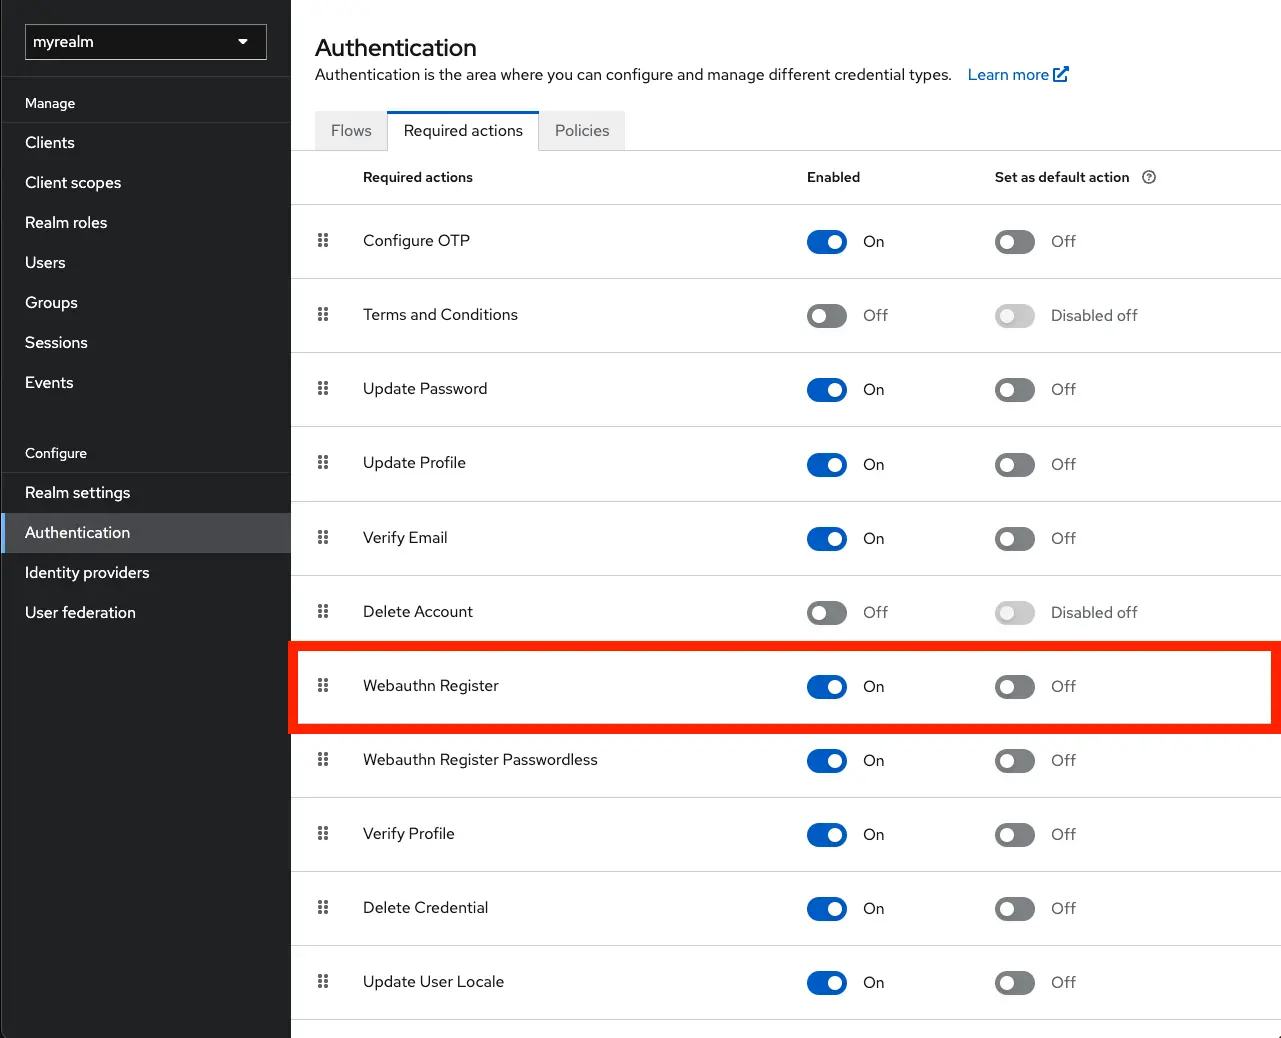
Section titled “ログインフローをパスキーに変更する”(デフォルトで On になっているはずですが)Authentication -> Required actions タブから Webauthn Register を有効にします。
Flow name が browser の右にある ︙ をクリックすると、Duplicate が表示されるので、選択します。
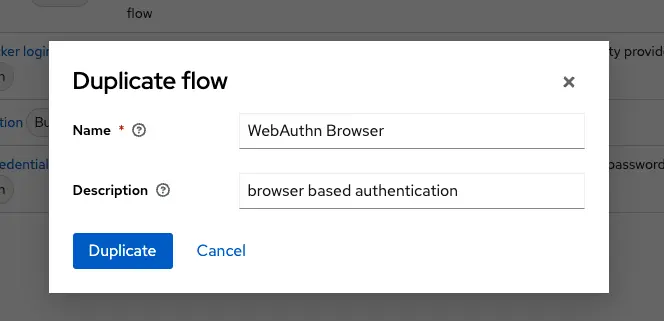
フローの名前は、WebAuthn Browser にして、Duplicate をクリックします。
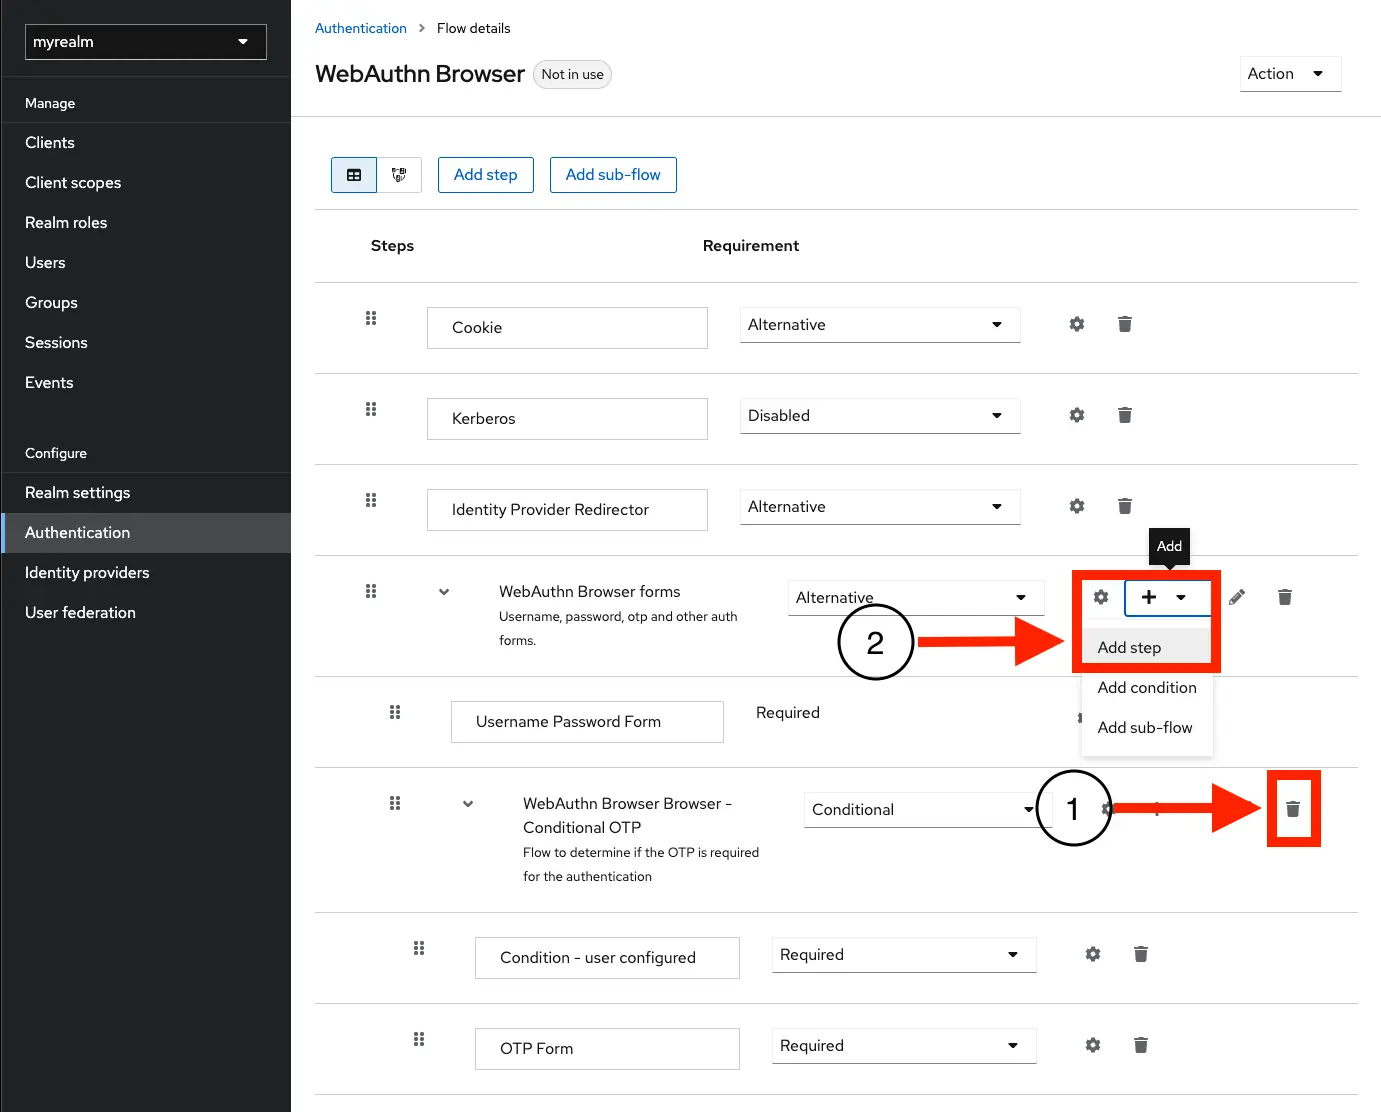
WebAuthn Browser Browser - Conditional OTP の右側にある、ゴミ箱アイコンをクリックして、このステップを削除します。
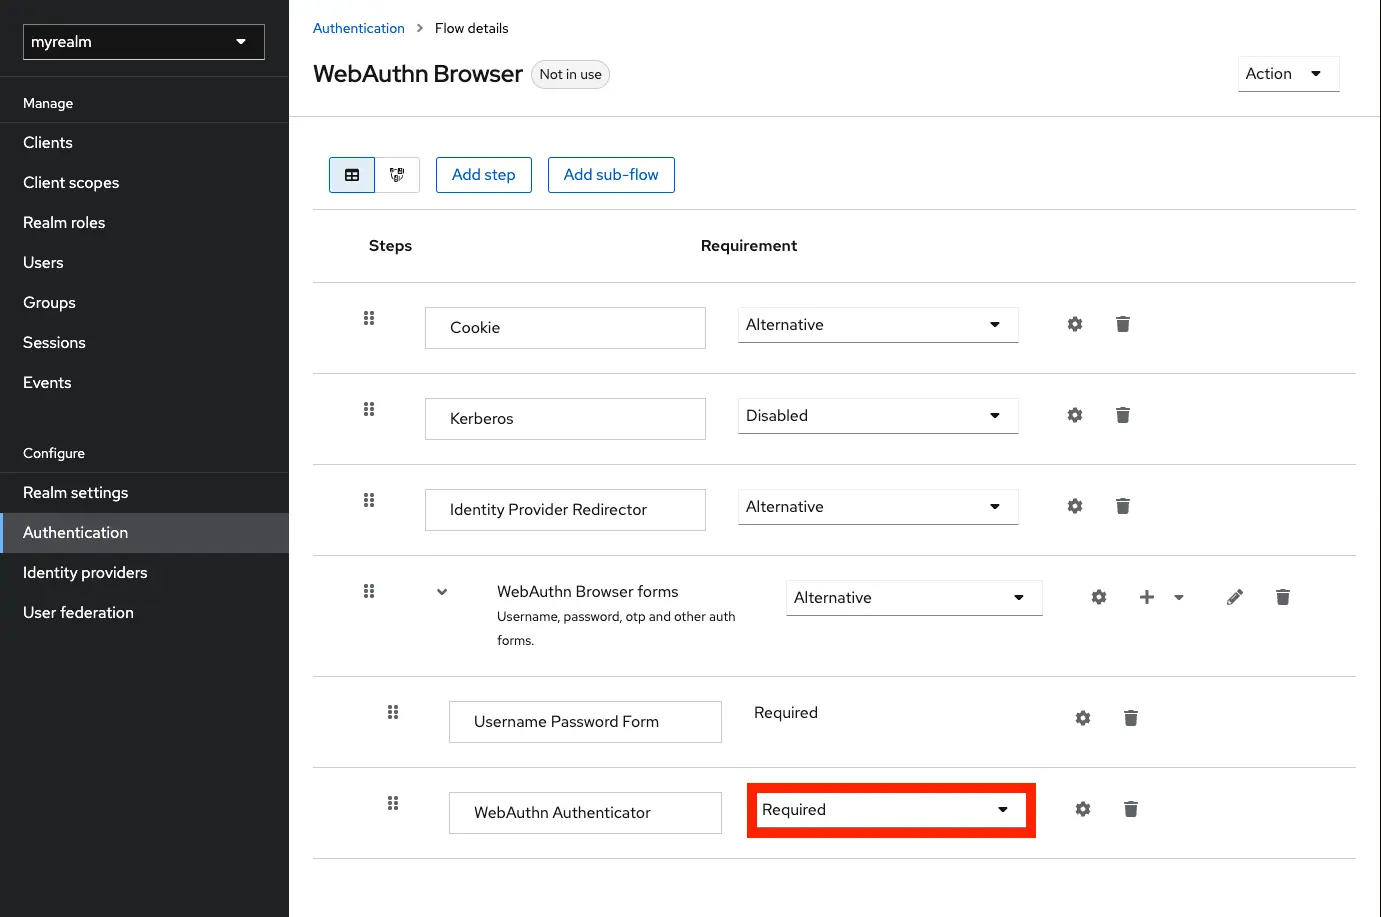
その後、WebAuthn Browser Forms の右側にある + アイコンをクリックして、Add step をクリックします。
webauthn で検索して、WebAuthn Authenticator を選択します。
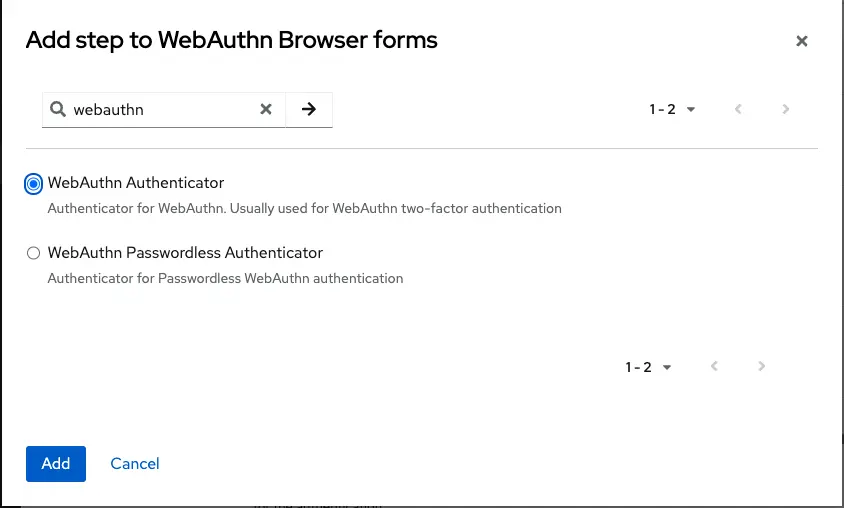
WebAuthn Authenticator の Requirement が Disabled になっている場合は、Requiredにします。
以下が完成したログインフローは以下のようになります。
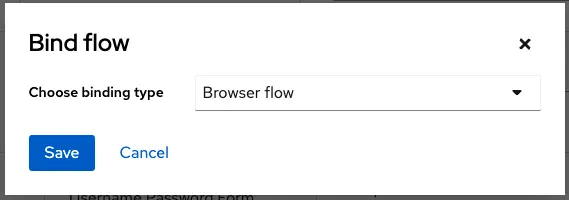
右上にある Action ボタンから Bind flow をクリックします。

Browser flow のまま Save をクリックします。
パスキー設定後のログイン
Section titled “パスキー設定後のログイン”これで設定は完了です。http://localhost:8080/realms/myrealm/account/ にアクセスするといつも通り、ユーザー名とパスワードを入れるログイン画面が表示されます。ユーザー名、パスワードともに myuser でログインしてみます。
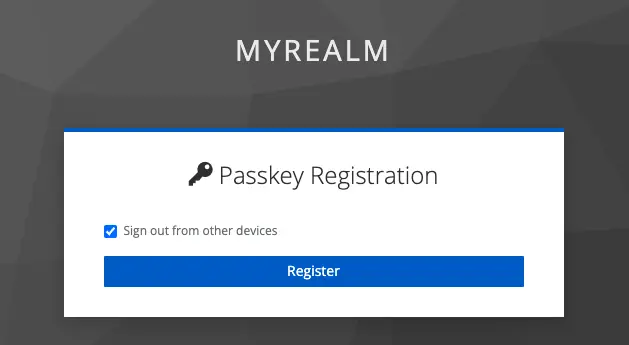
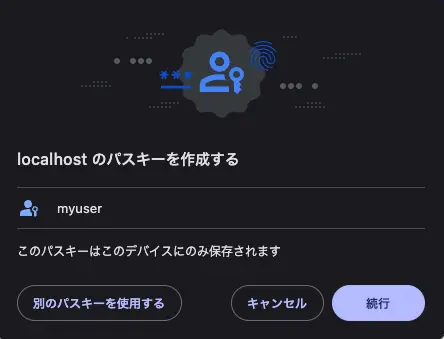
ログインに成功すると、パスキーの登録画面が表示されます。Register をクリックします。
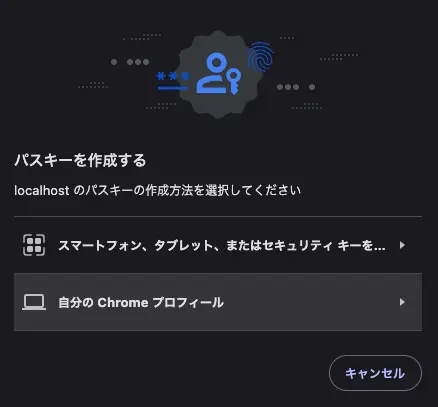
今、Chrome を使用しているので、自分の Chrome プロフィール を選択します。
続行 をクリックします。
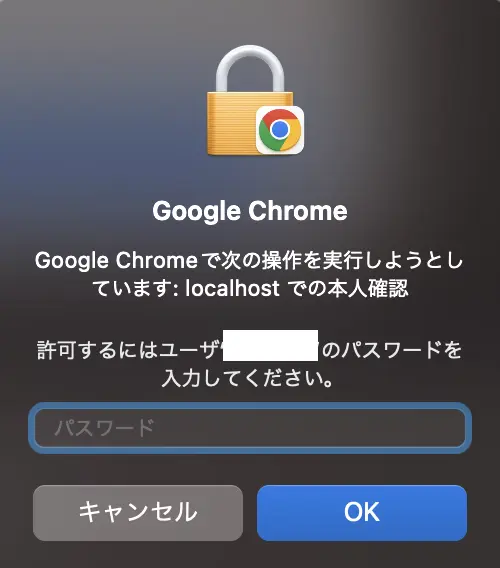
パスワードを使用 をクリックします。

macOS のパスワードを入力する画面が表示されます。パスワードを入力して OK をクリックします。
これで次回からパスキーでログインできるようになりました。
Chrome のパスキーを確認する
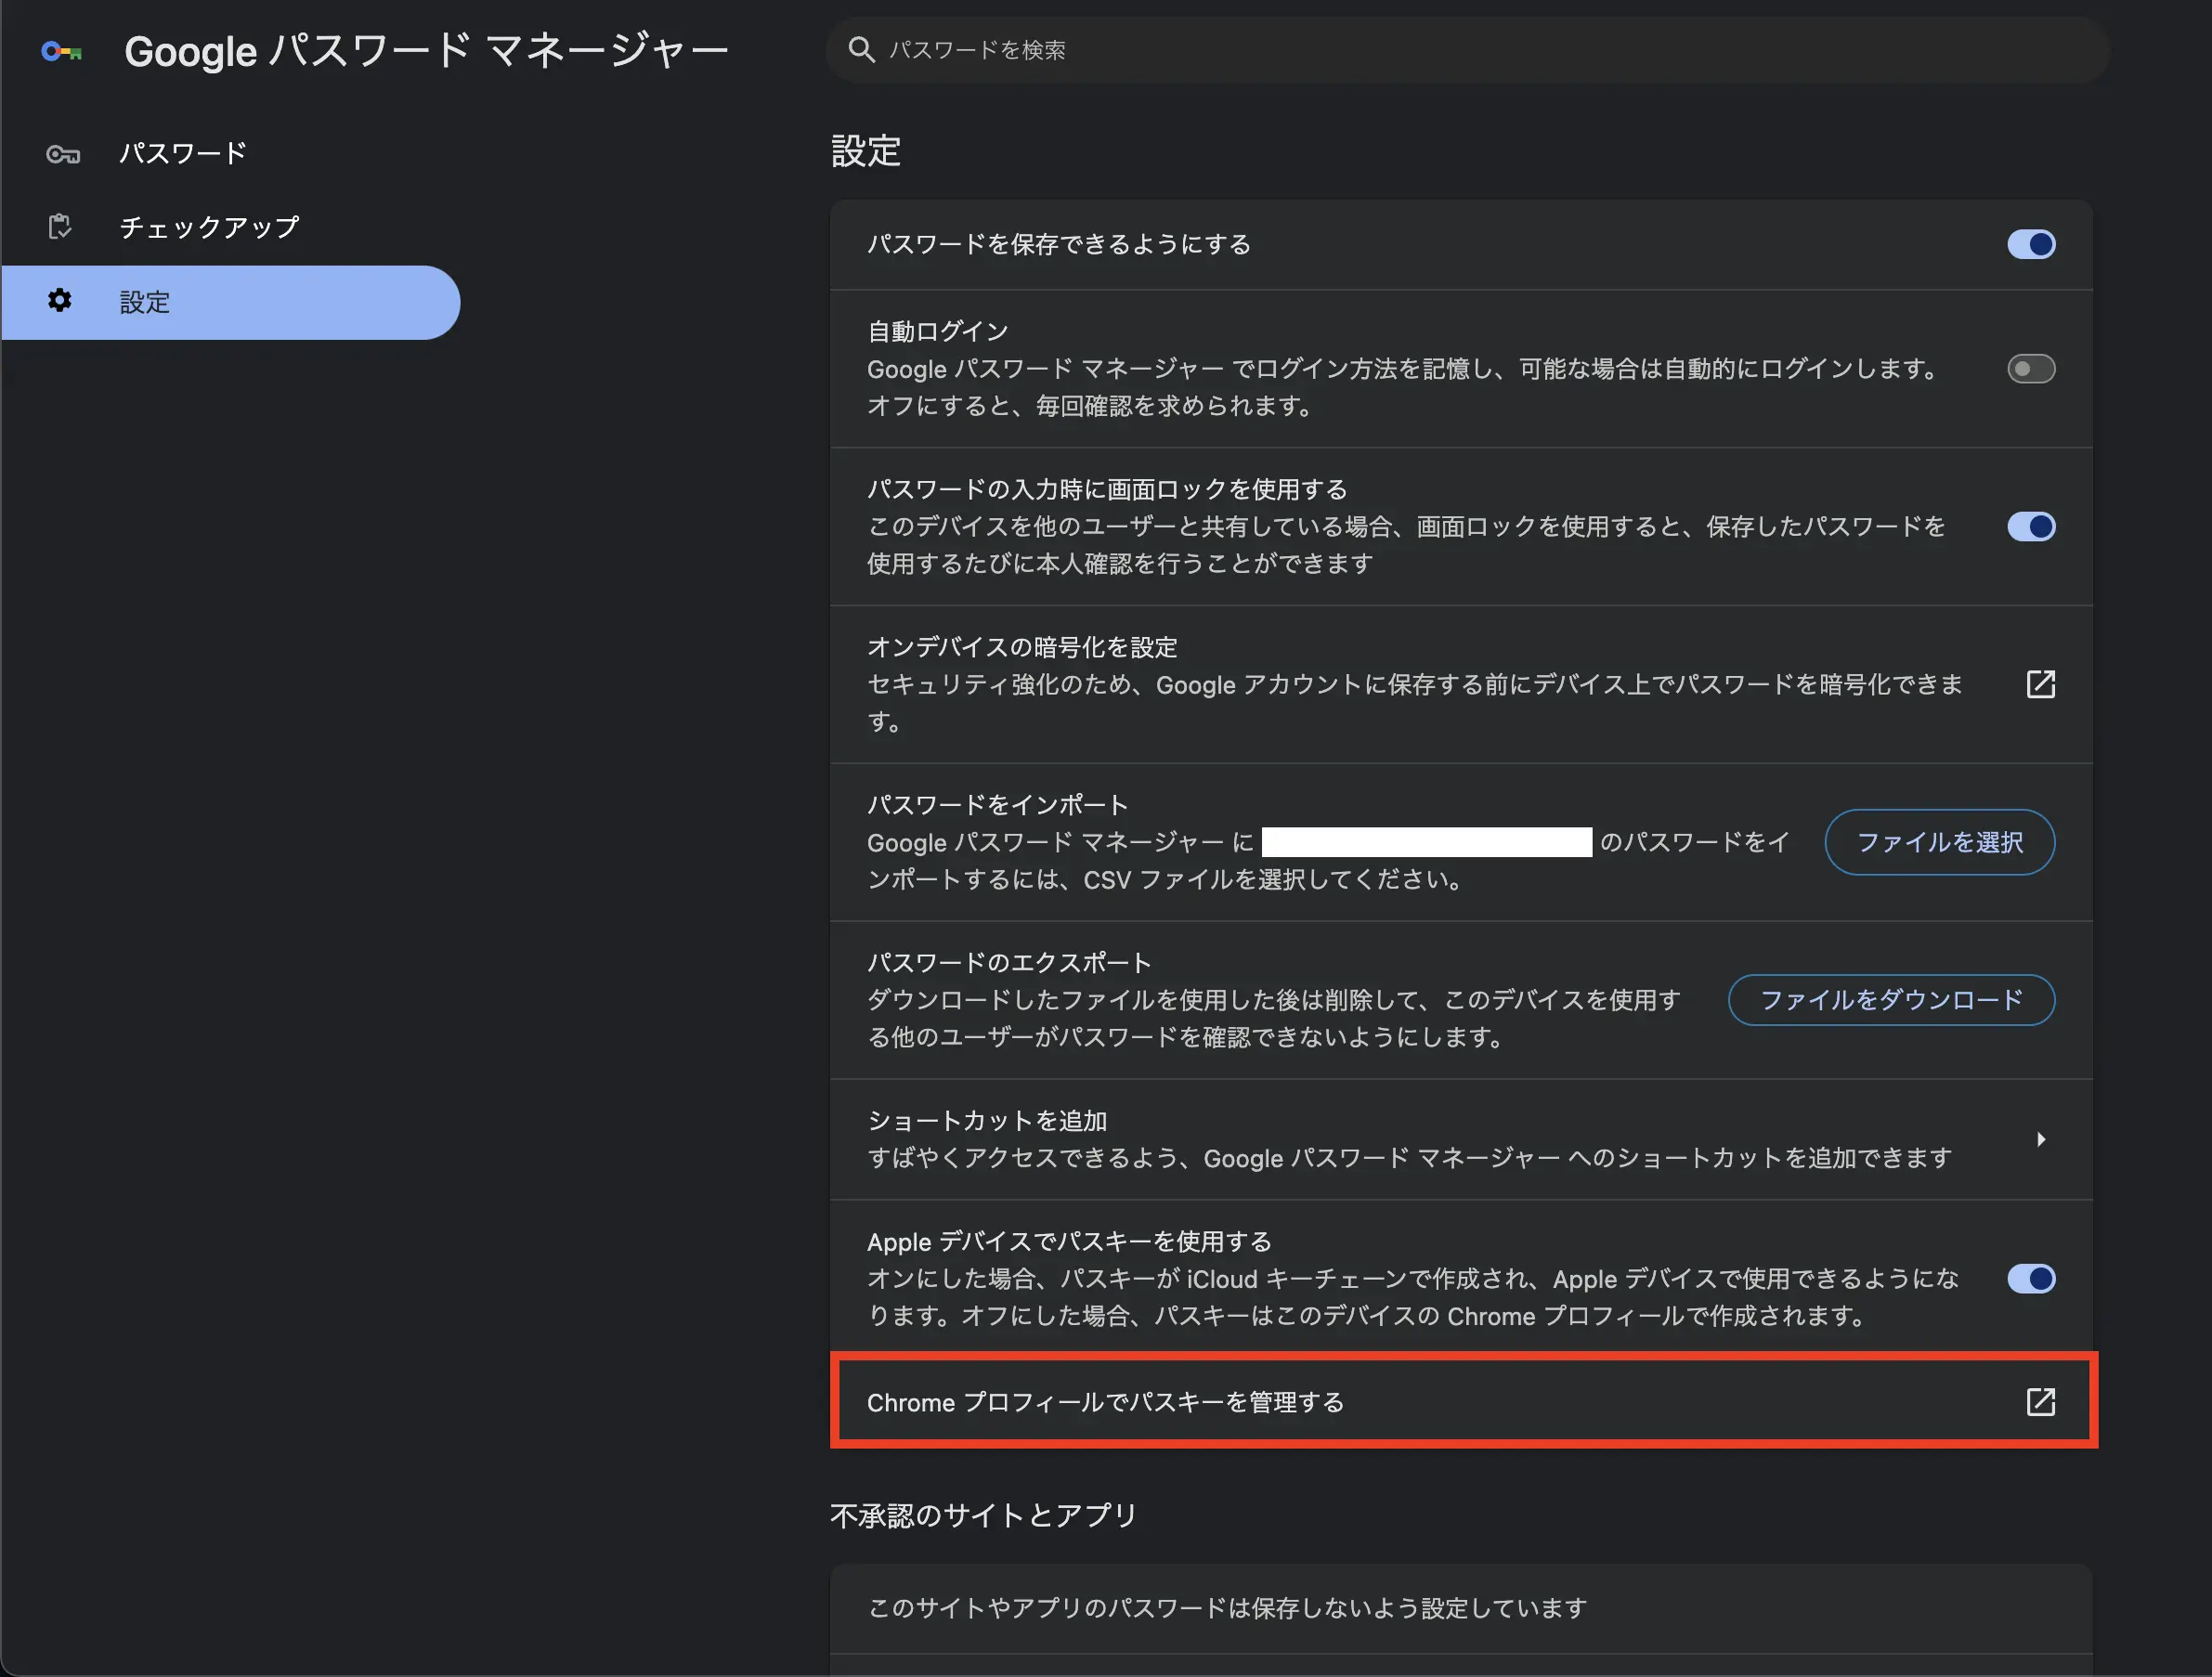
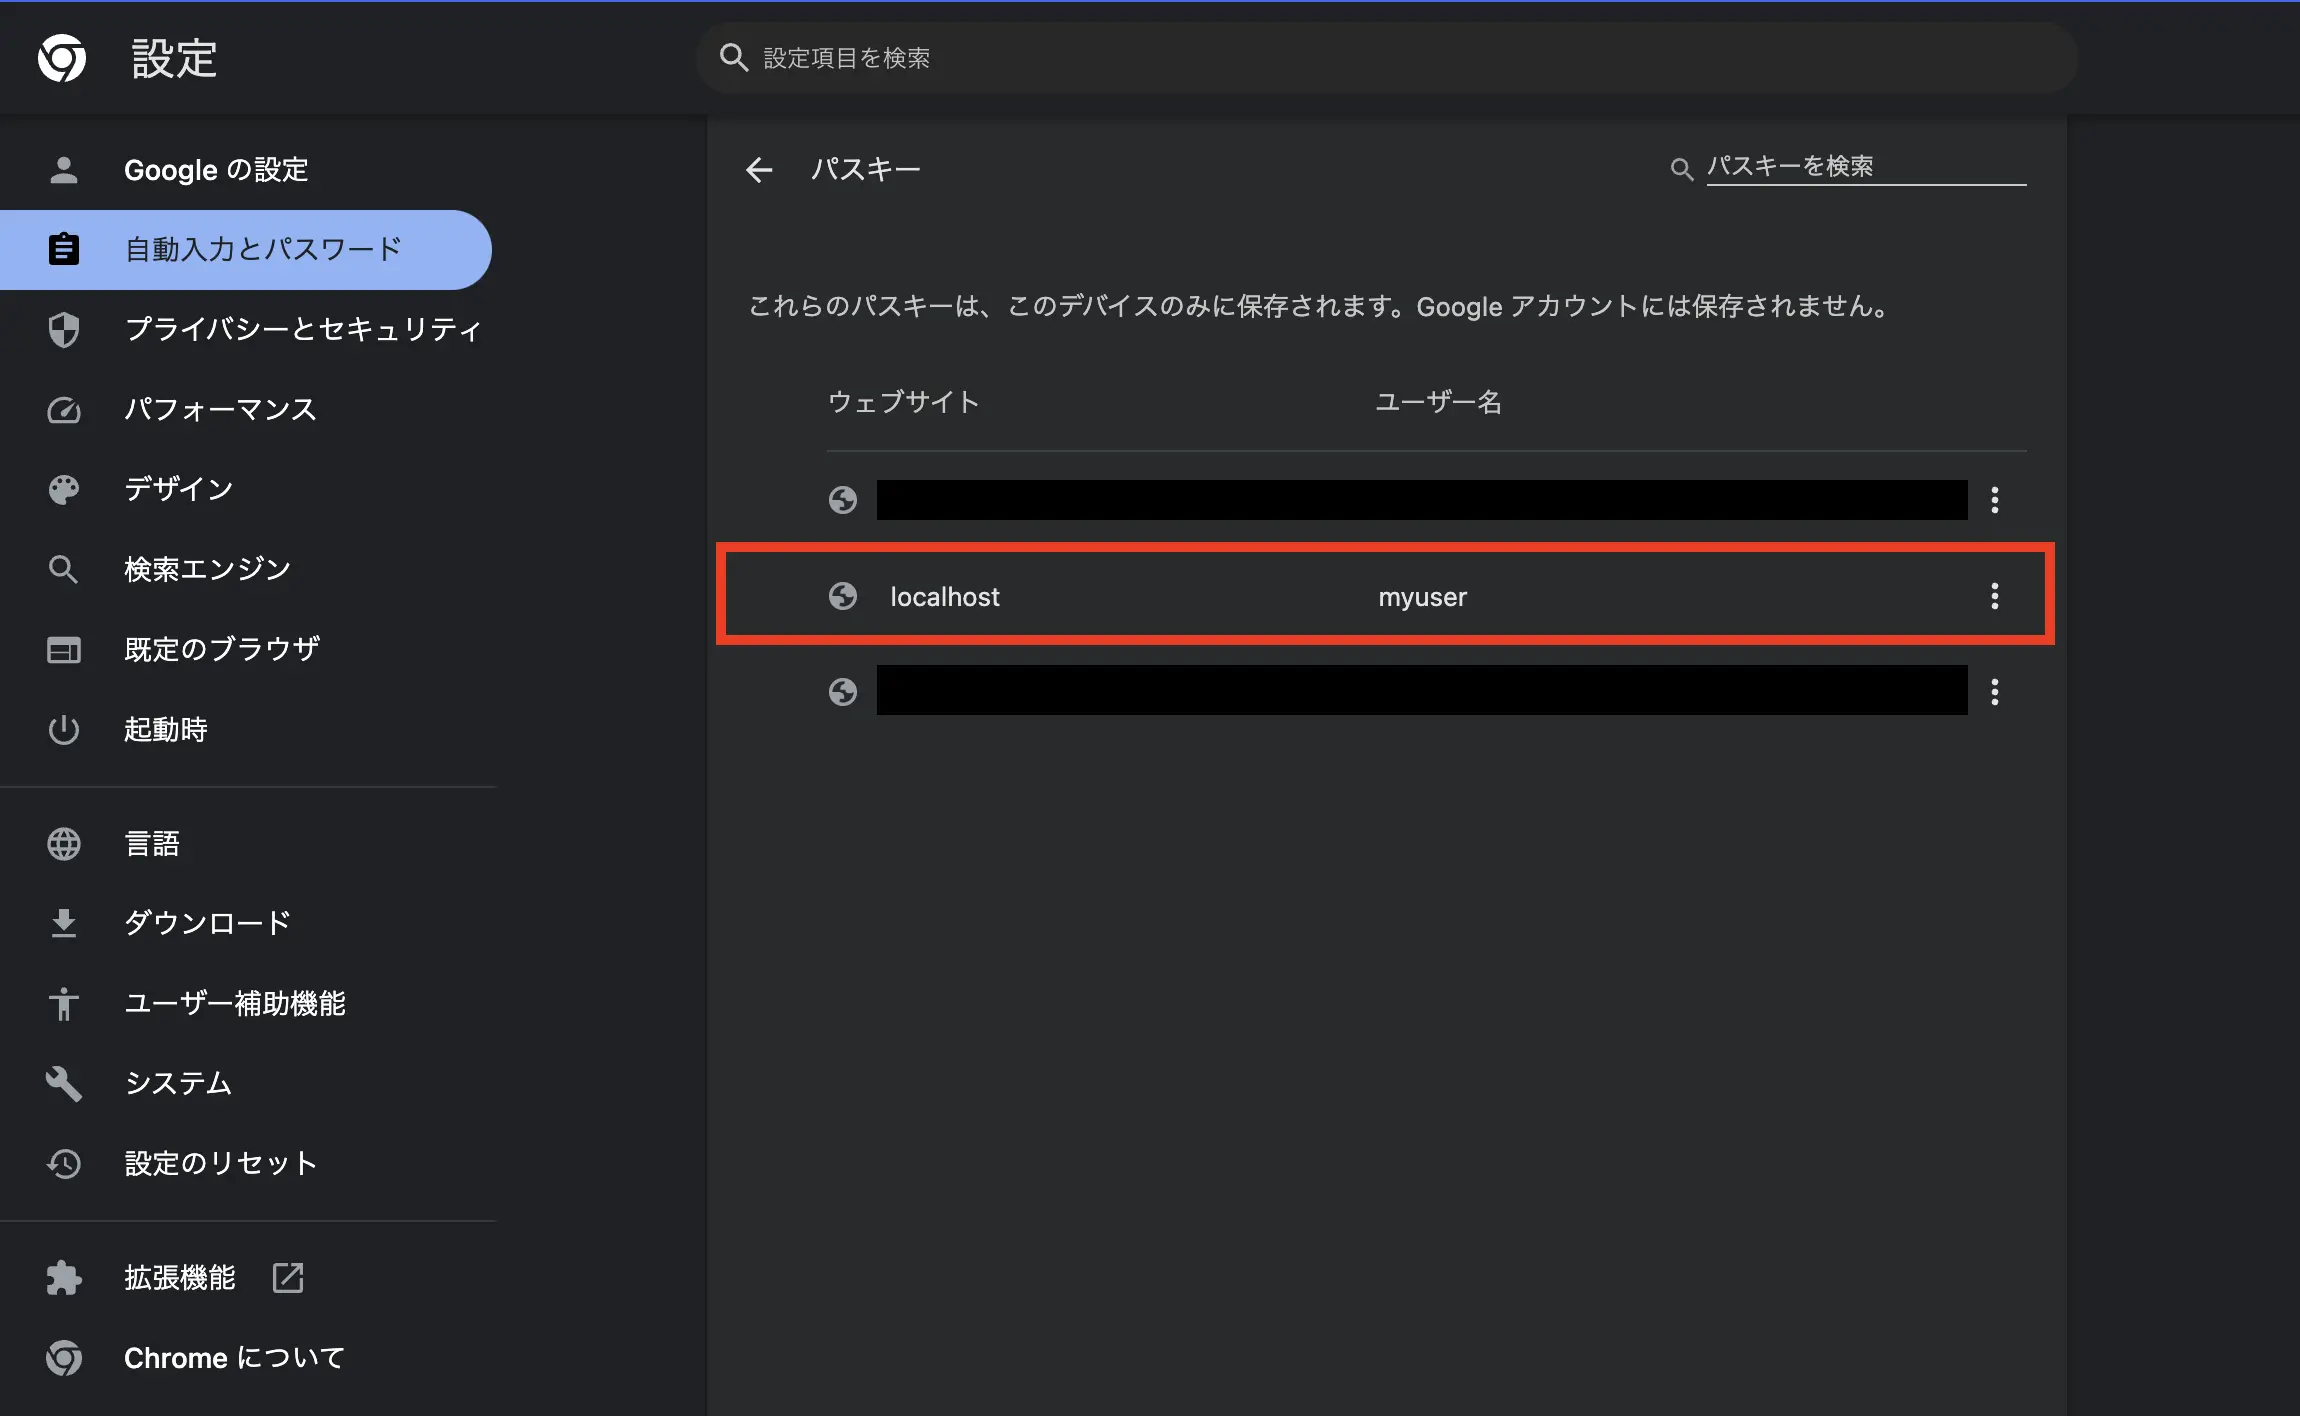
Section titled “Chrome のパスキーを確認する”Chrome を使っている場合、chrome://password-manager/settings にアクセスし Chrome プロフィールでパスキーを管理する をクリックするか、chrome://settings/passkeys に直接アクセスすることでパスキーを確認できます。
ログインフォームをユーザー名のみに変更する
Section titled “ログインフォームをユーザー名のみに変更する”さきほどのフローでは、ユーザー名とパスワードを入力した後、パスキーの登録画面が表示されました。次はユーザー名とパスキーのみでログインできるように Authentication Flow を変更します。
ドキュメント通りにフローを設定する
Section titled “ドキュメント通りにフローを設定する”Keycloak のドキュメントにある Passwordless WebAuthn together with Two-Factor を参考に前のセクションで設定した WebAuthn Browser フローを変更します。
http://localhost:8080/realms/myrealm/account/ にアクセスするとユーザー名を入れるログイン画面が表示されます。
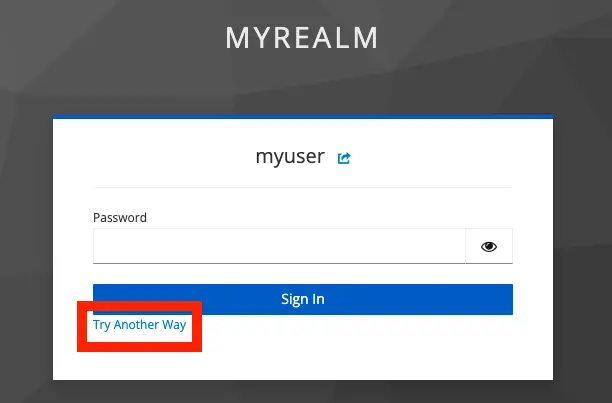
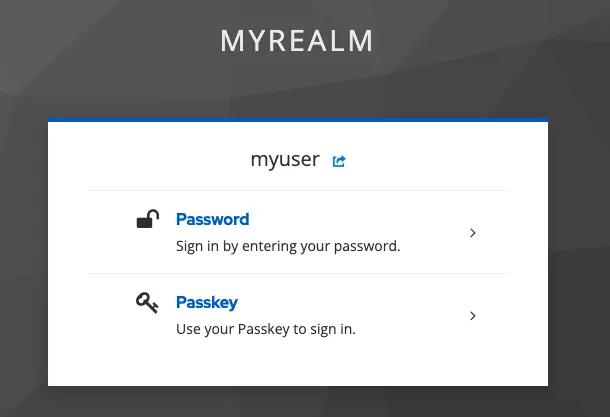
ユーザー名を入力後、パスワード入力画面が表示されますが、Try Another Way ボタンをクリックすると、パスキーでもログインできるようになります。
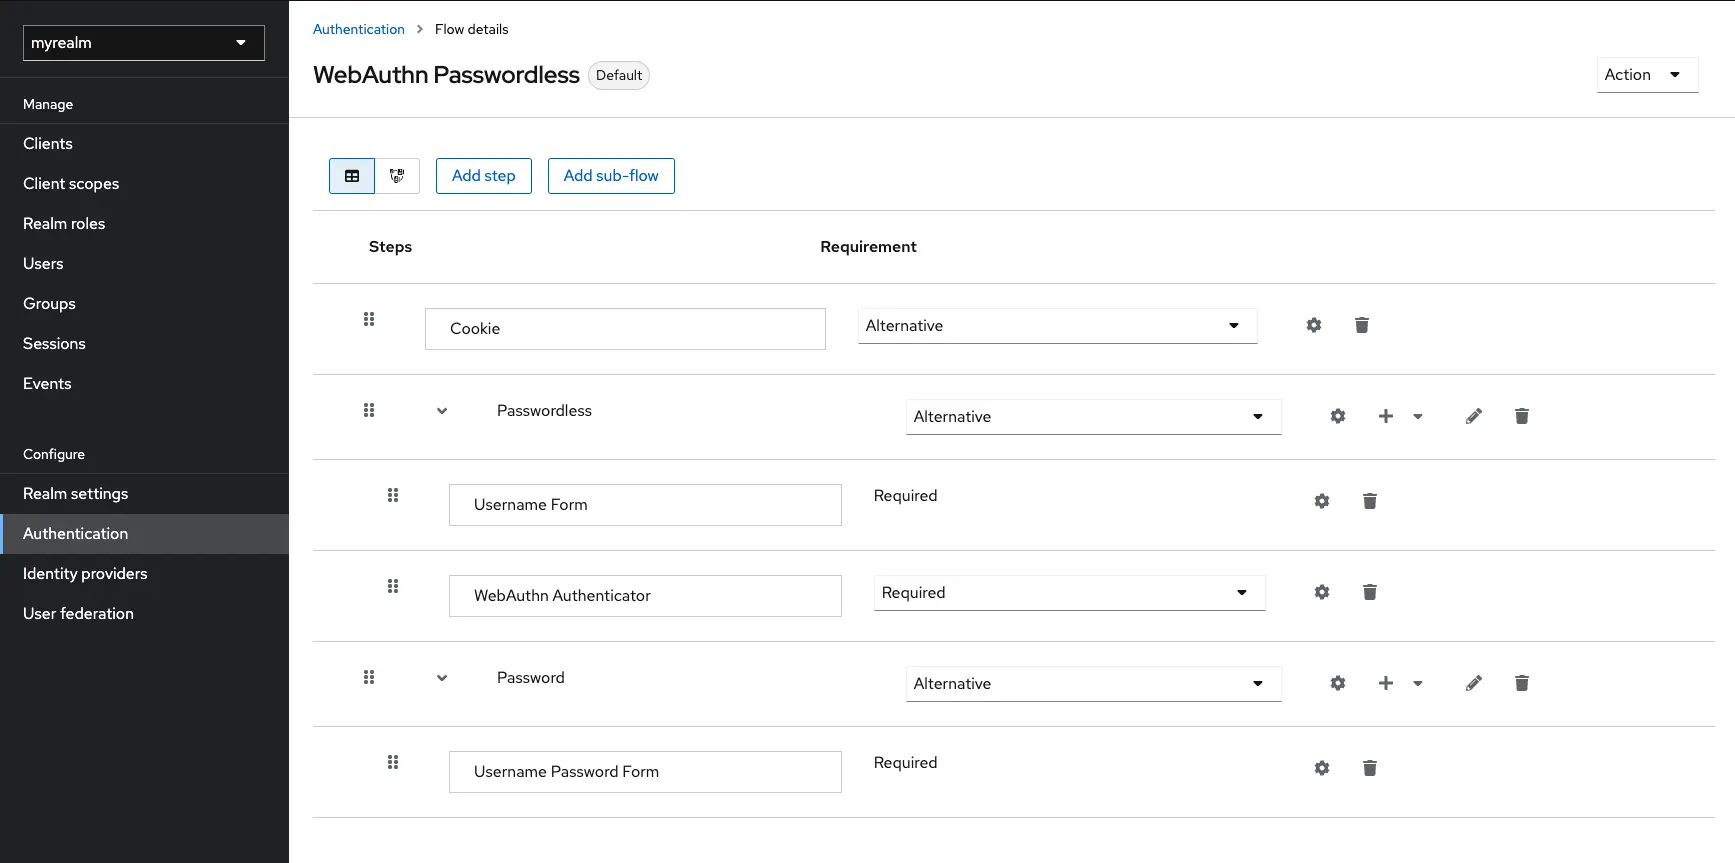
パスキーを使ったログインフローをカスタマイズする
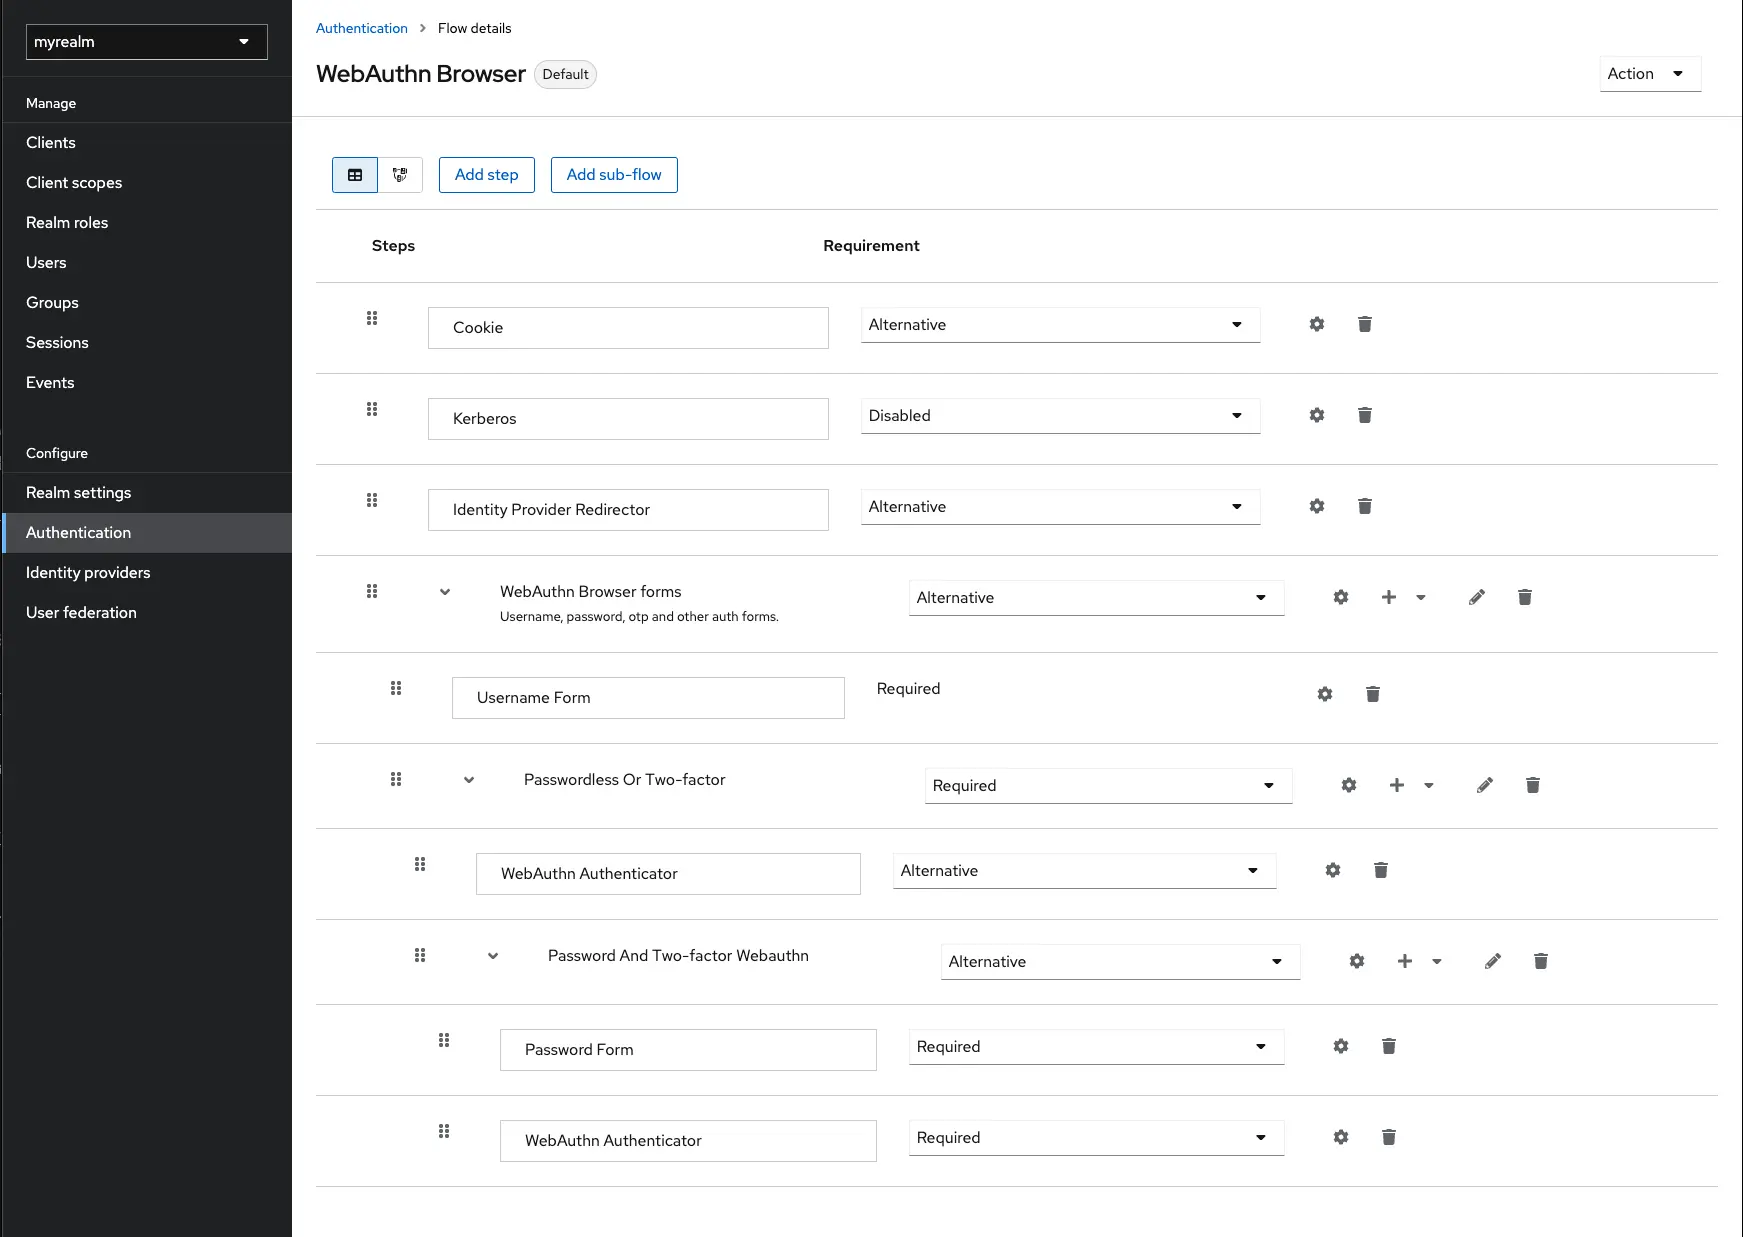
Section titled “パスキーを使ったログインフローをカスタマイズする”先ほどはドキュメント通りにフローを設定しましたが、パスキーを使うためには、ユーザー名を入力 -> Try Another Way ボタンをクリック -> パスキーを選択するという手順が必要です。この手順を省略して、ユーザー名を入力するとすぐにパスキーを使ってログインできるようにします。
フローは以下の画像のように設定します。このように設定することで、ユーザー名を入力するとすぐにパスキーを使ってログインできるようになります。
Password サブフローを作成することで、パスキーを設定していないユーザーも従来のパスワードでログインできます。
ユーザー名を入力すると、以下のように画面遷移します
| パスキー登録済み | パスキー未登録 |
|---|---|
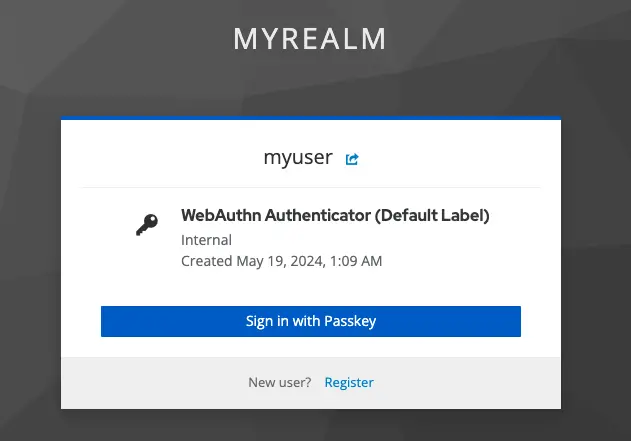 | 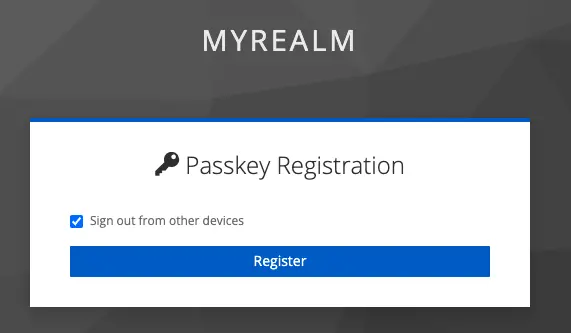 |
Terraformを使用したPasskeyの自動化
Section titled “Terraformを使用したPasskeyの自動化”このセクションでは、ひとつ前のセクションで手動で設定した認証フローを Terraform でコード化します。Terraform の import ブロックを使用して、先ほどカスタマイズした WebAuthn Passwordless フローをコード化します。
Admin API からリソース IDを取得する
Section titled “Admin API からリソース IDを取得する”import ブロックを使用して Authentication Flow のリソースを定義するためは、それぞれのリソースの ID を知る必要があります。
| リソース | import フォーマット |
|---|---|
| keycloak_authentication_flow | {{realmId}}/{{authenticationFlowId}} |
| keycloak_authentication_subflow | {{realmId}}/{{parentFlowAlias}}/{{authenticationSubflowId}} |
| keycloak_authentication_execution | {{realmId}}/{{parentFlowAlias}}/{{authenticationExecutionId}} |
Authentication Flow の ID は、管理画面の URL が http://localhost:8080/admin/master/console/#/myrealm/authentication/{{ authenticationFlowId }}/notInUse のようになっているためわかります。しかし、authentication_subflow や authentication_execution の ID は管理画面に表示されていないため、Admin Rest API から取得する必要があります。
まずアクセストークンを発行します。準備の段階で、master releam に terrform クライアントを作成しているので、そのクライアントを使ってアクセストークンを取得します。
ACCESS_TOKEN=$(curl \ -d "client_id=terraform" \ -d "client_secret=" \ -d "grant_type=client_credentials" \ http://localhost:8080/realms/master/protocol/openid-connect/token | jq -r .access_token)その後、/admin/realms/{realm}/authentication/flows/{flowAlias}/executions に GET リクエストを送ることで取得できます。
curl -H "Authorization: bearer $ACCESS_TOKEN" \ http://localhost:8080/admin/realms/myrealm/authentication/flows/WebAuthn%20Passwordless/executions | jqid が authenticationExecutionId になり、flowId が authenticationSubflowId になります。
[ { "id": "ed537e8e-f6ce-4d2d-88cd-be6577f6647d", "requirement": "ALTERNATIVE", "displayName": "Cookie", "requirementChoices": [ "REQUIRED", "ALTERNATIVE", "DISABLED" ], "configurable": false, "providerId": "auth-cookie", "level": 0, "index": 0 }, { "id": "b804adcd-ce1f-4f3f-ba69-1615057d58c4", "requirement": "ALTERNATIVE", "displayName": "Passwordless", "description": "", "requirementChoices": [ "REQUIRED", "ALTERNATIVE", "DISABLED", "CONDITIONAL" ], "configurable": false, "authenticationFlow": true, "flowId": "04c2525c-915b-457b-9b58-864595071645", "level": 0, "index": 1 }, ...]import ブロックからリソースを生成する
Section titled “import ブロックからリソースを生成する”以下のコードを import.tf に記述します。local ブロックを使用して、alias を定義します。alias は、フロー名である WebAuthn Passwordless です。import ブロックを使用して、keycloak_authentication_flow、keycloak_authentication_subflow、keycloak_authentication_execution リソースを定義します。
# main.tf# locals {#  realm_id = "myrealm"# }
locals {  alias = "WebAuthn Passwordless"}
import {  id = "${local.realm_id}/b24b39be-5287-4869-aac2-dcebb81df7fe"  to = keycloak_authentication_flow.passkey}
import {  id = "${local.realm_id}/${local.alias}/ed537e8e-f6ce-4d2d-88cd-be6577f6647d"  to = keycloak_authentication_execution.cookie}
import {  id = "${local.realm_id}/${local.alias}/04c2525c-915b-457b-9b58-864595071645"  to = keycloak_authentication_subflow.passwordless}
import {  id = "${local.realm_id}/${local.alias}/ad32d3d8-e2a9-40cb-927d-e458f4f9c5e5"  to = keycloak_authentication_execution.username_form}
import {  id = "${local.realm_id}/${local.alias}/0b464190-da0a-43a0-bb61-9f9f03bddfa9"  to = keycloak_authentication_execution.webauthn_authenticator}
import {  id = "${local.realm_id}/${local.alias}/62c3f78f-95d0-45b7-9503-f98fde0943d3"  to = keycloak_authentication_subflow.password}
import {  id = "${local.realm_id}/${local.alias}/27b810a9-07db-4fee-96f8-4acc49240633"  to = keycloak_authentication_execution.username_password_form}
コードを生成します。
terraform plan -generate-config-out=generated.tf以下は生成されたコードです。
generated.tf
# __generated__ by Terraform# Please review these resources and move them into your main configuration files.
# __generated__ by Terraform from "myrealm/WebAuthn Passwordless/81c06618-4d3b-4903-9d91-e6264cb1fd85"resource "keycloak_authentication_execution" "username_password_form" {  authenticator     = "auth-username-password-form"  parent_flow_alias = "WebAuthn Passwordless"  realm_id          = "myrealm"  requirement       = "REQUIRED"}
# __generated__ by Terraform from "myrealm/WebAuthn Passwordless/7f35dc08-71c5-47fa-96b9-3d7cb696c7bf"resource "keycloak_authentication_execution" "webauthn_authenticator" {  authenticator     = "webauthn-authenticator"  parent_flow_alias = "WebAuthn Passwordless"  realm_id          = "myrealm"  requirement       = "REQUIRED"}
# __generated__ by Terraform from "myrealm/WebAuthn Passwordless/bc18a6ea-5ede-401d-bb4d-16dee8d7e5a7"resource "keycloak_authentication_execution" "username_form" {  authenticator     = "auth-username-form"  parent_flow_alias = "WebAuthn Passwordless"  realm_id          = "myrealm"  requirement       = "REQUIRED"}
# __generated__ by Terraform from "myrealm/ab147574-8a30-4aa5-b402-b875cd7d9d94"resource "keycloak_authentication_flow" "passkey" {  alias       = "WebAuthn Passwordless"  description = null  provider_id = "basic-flow"  realm_id    = "myrealm"}
# __generated__ by Terraform from "myrealm/WebAuthn Passwordless/ea44fbd3-6146-41a3-a37d-10bed8ac5af9"resource "keycloak_authentication_execution" "cookie" {  authenticator     = "auth-cookie"  parent_flow_alias = "WebAuthn Passwordless"  realm_id          = "myrealm"  requirement       = "ALTERNATIVE"}
# __generated__ by Terraform from "myrealm/WebAuthn Passwordless/33e814b0-a231-4ddd-8d08-a9923485f124"resource "keycloak_authentication_subflow" "password" {  alias             = "Password"  authenticator     = null  description       = null  parent_flow_alias = "WebAuthn Passwordless"  provider_id       = "basic-flow"  realm_id          = "myrealm"  requirement       = "ALTERNATIVE"}
# __generated__ by Terraform from "myrealm/WebAuthn Passwordless/825d4c31-ae32-49e8-83fe-05f668958240"resource "keycloak_authentication_subflow" "passwordless" {  alias             = "Passwordless"  authenticator     = null  description       = null  parent_flow_alias = "WebAuthn Passwordless"  provider_id       = "basic-flow"  realm_id          = "myrealm"  requirement       = "ALTERNATIVE"}
Authentication Flow のモジュール化
Section titled “Authentication Flow のモジュール化”Terraform で plan, apply コマンドを実行するとき、ステップを含めたフローの作成や削除を繰り返すことがあります。そのため、フローをモジュール化して扱いやすくします。
ディレクトリ構造は以下のようになります。
$ tree modulesmodules└── webauthn-passwordless ├── main.tf ├── provider.tf └── variables.tfリファクタリングとモジュール化
Section titled “リファクタリングとモジュール化”terraform/generated.tf をリファクタリングして、webauthn-passwordless モジュールを作成します。
terraform { required_version = "~> 1.8.0" required_providers { keycloak = { source = "mrparkers/keycloak" version = ">= 4.4.0" } }}variable "realm_id" { type = string description = "value of the realm id"}
variable "flow_name" { type = string description = "value of the flow name"}
variable "name_suffix" { type = string description = "value of the subflow name sufix" default = ""}terraform/generated.tf -> terraform/modules/webauthn-passwordless/main.tf に移動します。
リファクタリングによる変更点は以下の通りです。
- いくつかの
keycloak_authentication_executionリソースのparent_flow_aliasには、keycloak_authentication_subflowリソースのaliasを指定する。- コード生成時は、
keycloak_authentication_flow.passkeyの alias 名だったため
- コード生成時は、
keycloak_authentication_subflowリソースのaliasは、keycloak_authentication_flowリソースのaliasとname_suffixを組み合わせて生成する。- subflow の alias は、全Authentication Flow で一意でないといけないため(バグか仕様かわからない)
- 各リソースの
depends_onには、依存するリソースを指定する。 keycloak_authentication_bindingsを作成し、レルムに認証フローをバインドする。
resource "keycloak_authentication_bindings" "browser_authentication_binding" {  realm_id     = var.realm_id  browser_flow = keycloak_authentication_flow.passkey.alias}
resource "keycloak_authentication_flow" "passkey" {  alias       = var.flow_name  description = null  provider_id = "basic-flow"  realm_id    = var.realm_id}
resource "keycloak_authentication_execution" "cookie" {  authenticator     = "auth-cookie"  parent_flow_alias = keycloak_authentication_flow.passkey.alias  realm_id          = var.realm_id  requirement       = "ALTERNATIVE"
  depends_on = [keycloak_authentication_flow.passkey]}
resource "keycloak_authentication_subflow" "passwordless" {  alias             = join("-", compact(["Passwordless", var.name_suffix]))  authenticator     = null  description       = null  parent_flow_alias = keycloak_authentication_flow.passkey.alias  provider_id       = "basic-flow"  realm_id          = var.realm_id  requirement       = "ALTERNATIVE"
  depends_on = [    keycloak_authentication_execution.cookie,    keycloak_authentication_flow.passkey  ]}
resource "keycloak_authentication_execution" "username_form" {  authenticator     = "auth-username-form"  parent_flow_alias = keycloak_authentication_subflow.passwordless.alias  realm_id          = var.realm_id  requirement       = "REQUIRED"
  depends_on = [keycloak_authentication_subflow.passwordless]}
resource "keycloak_authentication_execution" "webauthn_authenticator" {  authenticator     = "webauthn-authenticator"  parent_flow_alias = keycloak_authentication_subflow.passwordless.alias  realm_id          = var.realm_id  requirement       = "REQUIRED"
  depends_on = [    keycloak_authentication_subflow.passwordless,    keycloak_authentication_execution.username_form  ]}
resource "keycloak_authentication_subflow" "password" {  alias             = join("-", compact(["Password", var.name_suffix]))  authenticator     = null  description       = null  parent_flow_alias = keycloak_authentication_flow.passkey.alias  provider_id       = "basic-flow"  realm_id          = var.realm_id  requirement       = "ALTERNATIVE"
  depends_on = [    keycloak_authentication_flow.passkey,    keycloak_authentication_subflow.passwordless  ]}
resource "keycloak_authentication_execution" "username_password_form" {  authenticator     = "auth-username-password-form"  parent_flow_alias = keycloak_authentication_subflow.password.alias  realm_id          = var.realm_id  requirement       = "REQUIRED"
  depends_on = [keycloak_authentication_subflow.password]}
module を呼び出すために、terraform/main.tf に以下のコードを追加します。keycloak_realm リソースの browser_flow は削除します。
resource "keycloak_realm" "myrealm" {  ...  browser_flow                             = "browser"  ...}
module "webauthn_passwordless" {  source = "./modules/webauthn-passwordless"
  realm_id = keycloak_realm.myrealm.id  flow_name = "WebAuthn Passwordless"}
import ブロックを修正する
Section titled “import ブロックを修正する”import.tf に記述した import ブロックを以下のように修正することで、モジュールのリソースとしてインポートできるようにします。
locals {  alias = "WebAuthn Passwordless"}
import {  id = "${local.realm_id}/ab147574-8a30-4aa5-b402-b875cd7d9d94"  to = module.webauthn_passwordless.keycloak_authentication_flow.passkey}
import {  id = "${local.realm_id}/${local.alias}/ea44fbd3-6146-41a3-a37d-10bed8ac5af9"  to = module.webauthn_passwordless.keycloak_authentication_execution.cookie}
import {  id = "${local.realm_id}/${local.alias}/825d4c31-ae32-49e8-83fe-05f668958240"  to = module.webauthn_passwordless.keycloak_authentication_subflow.passwordless}
import {  id = "${local.realm_id}/${local.alias}/bc18a6ea-5ede-401d-bb4d-16dee8d7e5a7"  to = module.webauthn_passwordless.keycloak_authentication_execution.username_form}
import {  id = "${local.realm_id}/${local.alias}/7f35dc08-71c5-47fa-96b9-3d7cb696c7bf"  to = module.webauthn_passwordless.keycloak_authentication_execution.webauthn_authenticator}
import {  id = "${local.realm_id}/${local.alias}/33e814b0-a231-4ddd-8d08-a9923485f124"  to = module.webauthn_passwordless.keycloak_authentication_subflow.password}
import {  id = "${local.realm_id}/${local.alias}/81c06618-4d3b-4903-9d91-e6264cb1fd85"  to = module.webauthn_passwordless.keycloak_authentication_execution.username_password_form}
インポートします。
terraform apply -auto-approveモジュール化した Authentication Flow の完成です。
WebAuthn や FIDO に関する仕様は、まだまだ理解が追いついていません。しかし、Keycloak で簡単に設定できるので、実際に設定してみることで理解が深まりました。また、Terraform を使ってコード化することで、設定を繰り返す際にも便利です。