NICE DCV をインストールした EC2 インスタンスに Web ブラウザからアクセスする
前回は、“Mac から Ubuntu イメージを使用したEC2インスタンスに VNC で接続する” という記事を書き、EC2 インスタンスに TigerVNC を入れて Mac から接続し、リモートデスクトップを実現しました。
VNC 以外のリモートデスクトップについて調べていたところ AWS に NICE DCV (以下: DCV) というものを発見しました。
NICE DCV のドキュメントを読んでいると Web ブラウザからもアクセスができるらしいです。
なので、今回は実際に手を動かして確認してみようと思います。
NICE DCV とは?
Section titled “NICE DCV とは?”NICE DCV は、ハイパフォーマンスなリモートディスプレイプロトコル。データ転送に WebSocket ベースのプロトコルを使用するが、QUIC プロトコルに変更可能。
Ubuntu イメージで立ち上げた EC2 インスタンスに DCV サーバを立ち上げて、Web ブラウザからリモートデスクトップを実現する
クライアント
Section titled “クライアント”| バージョン | |
|---|---|
| Mac | M1 Ventura 13.2.1 |
| Chrome | 119.0.6045.199 |
| Terraform | 1.6.5 |
| バージョン | |
|---|---|
| Ubuntu | 22.04 |
EC2 構築
Section titled “EC2 構築”EC2 をバブリックサブネットに配置し、 SSM を使って EC2 にログインできるように設定します。
ディレクトリ構造
$ tree ..├── backend.tf├── main.tf└── provider.tfTerraform のコードは以下においています。
https://github.com/kntks/blog-code/tree/main/2023/12/ubuntu-ec2-dcv
$ terraform plan$ terraform apply -auto-approveAWS Systems Manager Session Manager を使って EC2に接続します。
# ec2のinstance idを確認する$ aws ec2 describe-instances --filter "Name=tag:Name,Values=ubuntu-ec2" "Name=instance-state-name,Values=running" --query "Reservations[].Instances[].InstanceId" --output text
# セッションをスタートさせる$ aws ssm start-session --target i-09a3d4293c80c0380
先に neetrestart の設定をしておきます。
# user を変更する$ sudo su
$ echo "\$nrconf{restart} = 'a';" | sudo tee /etc/needrestart/conf.d/50-autorestart.conf参考:needrestartで学ぶパッケージのフック処理 - gihyo.jp
ここからは Installing the NICE DCV Server on Linux の手順通りに進めていきます。
$ sudo apt update$ sudo apt install -y ubuntu-desktop gdm3$ cat /etc/X11/default-display-manager/usr/sbin/gdm3$ sudo apt upgrade -y$ sudo rebootセッションが切れると思うので、再度セッションを開始します。
$ aws ssm start-session --target i-09a3d4293c80c0380$ sudo suDCV は Wayland プロトコルに対応していないため /etc/gdm3/custom.confファイルに書かれてある #WaylandEnable=false の # を消して無効化の設定にします。
$ cat /etc/gdm3/custom.conf | grep Wayland#WaylandEnable=false$ sudo sed -i -e "s/^#WaylandEnable=false/WaylandEnable=false/g" /etc/gdm3/custom.conf$ cat /etc/gdm3/custom.conf | grep WaylandWaylandEnable=false
$ sudo systemctl restart gdm3今回はコンソールセッションで DCV を起動するので、X サーバーがあることを確認します。
$ sudo systemctl get-defaultgraphical.target
$ ps aux | grep X | grep -v greproot 920 0.2 2.2 2342160 87168 tty1 Sl+ 07:58 0:00 /usr/lib/xorg/Xorg vt1 -displayfd 3 -auth /run/user/133/gdm/Xauthority -nolisten tcp -background none -noreset -keeptty -novtswitch -verbose 3$ sudo apt install mesa-utils -y$ sudo DISPLAY=:0 XAUTHORITY=$(ps aux | grep "X.*\-auth" | grep -v grep | sed -n 's/.*-auth \([^ ]\+\).*/\1/p') glxinfo | grep -i "opengl.*version"OpenGL core profile version string: 4.5 (Core Profile) Mesa 23.0.4-0ubuntu1~22.04.1OpenGL core profile shading language version string: 4.50OpenGL version string: 4.5 (Compatibility Profile) Mesa 23.0.4-0ubuntu1~22.04.1OpenGL shading language version string: 4.50OpenGL ES profile version string: OpenGL ES 3.2 Mesa 23.0.4-0ubuntu1~22.04.1OpenGL ES profile shading language version string: OpenGL ES GLSL ES 3.20今回はコンソールセッションで DCV を起動するので、XDummyドライバーをインストールします。
$ sudo apt install -y xserver-xorg-video-dummy$ sudo vim /etc/X11/xorg.confSection "Device" Identifier "DummyDevice" Driver "dummy" Option "ConstantDPI" "true" Option "IgnoreEDID" "true" Option "NoDDC" "true" VideoRam 2048000EndSection
Section "Monitor" Identifier "DummyMonitor" HorizSync 5.0 - 1000.0 VertRefresh 5.0 - 200.0 Modeline "1920x1080" 23.53 1920 1952 2040 2072 1080 1106 1108 1135 Modeline "1600x900" 33.92 1600 1632 1760 1792 900 921 924 946 Modeline "1440x900" 30.66 1440 1472 1584 1616 900 921 924 946 ModeLine "1366x768" 72.00 1366 1414 1446 1494 768 771 777 803 Modeline "1280x800" 24.15 1280 1312 1400 1432 800 819 822 841 Modeline "1024x768" 18.71 1024 1056 1120 1152 768 786 789 807EndSection
Section "Screen" Identifier "DummyScreen" Device "DummyDevice" Monitor "DummyMonitor" DefaultDepth 24 SubSection "Display" Viewport 0 0 Depth 24 Modes "1920x1080" "1600x900" "1440x900" "1366x768" "1280x800" "1024x768" virtual 1920 1080 EndSubSectionEndSection$ sudo systemctl isolate multi-user.target$ sudo systemctl isolate graphical.target$ wget https://d1uj6qtbmh3dt5.cloudfront.net/NICE-GPG-KEY$ gpg --import NICE-GPG-KEY$ wget https://d1uj6qtbmh3dt5.cloudfront.net/2023.1/Servers/nice-dcv-2023.1-16220-ubuntu2204-x86_64.tgz$ tar -xvzf nice-dcv-2023.1-16220-ubuntu2204-x86_64.tgz && cd nice-dcv-2023.1-16220-ubuntu2204-x86_64$ sudo apt install -y ./nice-dcv-server_2023.1.16220-1_amd64.ubuntu2204.deb$ sudo apt install -y ./nice-dcv-web-viewer_2023.1.16220-1_amd64.ubuntu2204.deb$ sudo apt install -y ./nice-dcv-simple-external-authenticator_2023.1.228-1_amd64.ubuntu2204.deb$ sudo usermod -aG video dcv$ sudo systemctl isolate multi-user.target$ sudo systemctl isolate graphical.target今回はコンソールセッションなので、dcv ユーザがXサーバーにアクセスできることを確認します。
$ sudo DISPLAY=:0 XAUTHORITY=$(ps aux | grep "X.*\-auth" | grep -v grep | sed -n 's/.*-auth \([^ ]\+\).*/\1/p') xhost | grep "SI:localuser:dcv$"SI:localuser:dcvSI:localuser:dcv と出力されたので、問題なさそうです。
DCV サーバーが起動したとき、自動コンソールセッションを開始したいので create-session と owener を設定します。
$ cat /etc/dcv/dcv.conf | grep "create-session ="#create-session = true
$ cat /etc/dcv/dcv.conf | grep "owner ="#owner = ""
/etc/dcv/dcv.conf のデフォルト設定
################################################################################# Section "license" contains properties to configure the license management###############################################################################
[license]
# Property "license-file" specifies the path to a demo license file or the name# of the license server used by the rlm daemon, in the format port@host# (for example 5053@licserver).# The port number must be the same as that specified in the HOST line of the# license file.# If empty or not specified, a default path to a demo license file will be# used (e.g: /usr/share/dcv/license/license.lic). If the default file does not# exists a demo license will be used.#license-file = ""
################################################################################# Section "log" contains properties to configure the DCV logging system###############################################################################
[log]
# Property "level" contains the logging level used by DCV.# Can be set to ERROR, WARNING, INFO or DEBUG (in ascending level of verbosity).# If not specified, the default level is INFO#level = "INFO"
################################################################################# Section "session-management" contains the properties of DCV session creation###############################################################################
[session-management]
# Property "create-session" requests to automatically create a console session# (with ID "console") at DCV startup.# Can be set to true or false.# If not specified, no console session will be automatically created.#create-session = true
# Property "enable-gl-in-virtual-sessions" specifies whether to employ the# 'dcv-gl' feature (a specific license will be required).# Allowed values: 'always-on', 'always-off', 'default-on', 'default-off'.# If not specified, the default value is 'default-on'.#enable-gl-in-virtual-sessions = "default-on"
################################################################################# Section "session-management/defaults" contains the default properties of DCV sessions###############################################################################
[session-management/defaults]
# Property "permissions-file" specifies the path to the permissions file# automatically merged with the permissions selected by the user for each session.# If empty or absent, use the default file in /etc/dcv/default.perm.#permissions-file = ""
################################################################################# Section "session-management.automatic-console-session" contains the properties## to be applied ONLY to the "console" session automatically created at server startup## when the create-session setting of section 'session-management' is set to true.###############################################################################
[session-management/automatic-console-session]
# Property "owner" specifies the username of the owner of the automatically# created "console" session.#owner = ""
# Property "permissions-file" specifies the file that contains the permissions# to be used to check user access to DCV features.# If empty, only the owner will have full access to the session.#permissions-file = ""
# Property "max-concurrent-clients" specifies the maximum number of concurrent# clients per session.# If set to -1, no limit is enforced. Default value -1;#max-concurrent-clients = -1
# Property "storage-root" specifies the path to the folder that will be used# as root-folder for file storage operations.# The file storage will be disabled if the storage-root is empty or the folder# does not exist.#storage-root = ""
################################################################################# Section "display" contains the properties of the dcv remote display###############################################################################
[display]
# Property "target-fps" specifies the maximum allowed frames per second.# A value of 0 means no limit. If not specified, or if set to a negative value,# the target-fps value will be determined according to the server characteristics# and the session type#target-fps = 30
################################################################################# Section "connectivity" contains the properties of the dcv connection###############################################################################
[connectivity]
# Property "web-port" specifies on which TCP port the DCV server listens on.# It must be a number between 1024 and 65535 representing an# available TCP port on which the web server embedded in the DCV Server will# listen for connection requests to serve HTTP(S) pages and WebSocket# connections.# If not specified, DCV will use port 8443.#web-port=8444
# Property "web-url-path" specifies a URL path for the embedded web server.# The path must start with /. For instance setting it to "/test/foo" means the# web server will be reachable at https://host:port/test/foo.# This property is especially useful when setting up a gateway that then# routes each connection to a different DCV server.# If not specified DCV uses "/", which means it will be reachable at# https://host:port#web-url-path="/dcv"
# Property "enable-quic-frontend" specifies whether the DCV server# also enables the use of the QUIC transport for clients which support it.# If not specified, DCV will not enable QUIC.#enable-quic-frontend=true
# Property "quic-port" specifies on which UDP port the DCV server listens.# It must be a number between 1024 and 65535 representing an# available UDP port on which the QUIC server embedded in the DCV Server will# listen for requests connections by clients using the QUIC transport.# If not specified, DCV will use port 8443.#quic-port=8444
# Property "idle-timeout" specifies a timeout in minutes after which# a client that does not send keyboard or mouse events is considered idle# and hence disconnected.# By default it is set to 60 (1 hour). Set to 0 to never disconnect# idle clients.#idle-timeout=120
################################################################################# Section "security" contains the properties related to authentication and security###############################################################################
[security]
# Property "authentication" specifies the client authentication method used by# the DCV server. Use 'system' to delegate client authentication to the# underlying operating system. Use 'none' to disable client authentication and# grant access to all clients.#authentication="none"
# Property "pam-service-name" specifies the name of the PAM configuration file# used by DCV. The default PAM service name is 'dcv' and corresponds with# the /etc/pam.d/dcv configuration file. This parameter is only used if# the 'system' authentication method is used.#pam-service-name="dcv-custom"
# Property "auth-token-verifier" specifies an endpoint (URL) for an external# the authentication token verifier. If empty or not specified, the internal# authentication token verifier is used#auth-token-verifier="https://127.0.0.1:8444"$ sudo sed -i -e "s/^#create-session/create-session/g" /etc/dcv/dcv.conf$ sudo sed -i -e "s/^#owner = \"\"/owner = \"ubuntu\"/g" /etc/dcv/dcv.conf$ cat /etc/dcv/dcv.conf | grep "create-session ="create-session = true
$ cat /etc/dcv/dcv.conf | grep "owner ="owner = "ubuntu"ubuntuユーザにパスワードを設定する
Section titled “ubuntuユーザにパスワードを設定する”先ほど owner = ubuntu という設定をしました。後ほど DCV にログインするときのパスワードとして必要なので、ubuntu ユーザにパスワードを設定します。
$ sudo passwd ubuntuパスワードが設定されていれば、何も出力されません。
$ sudo awk -F":" '($2 == "!" || $2 == "*") {print $1}' /etc/shadow | grep ubuntudcvserver はまだ起動してないので、有効化 + 起動させます。
$ sudo systemctl status dcvserver○ dcvserver.service - NICE DCV server daemon Loaded: loaded (/lib/systemd/system/dcvserver.service; disabled; vendor preset: enabled) Active: inactive (dead)$ sudo systemctl enable dcvserver
$ sudo systemctl start dcvserver
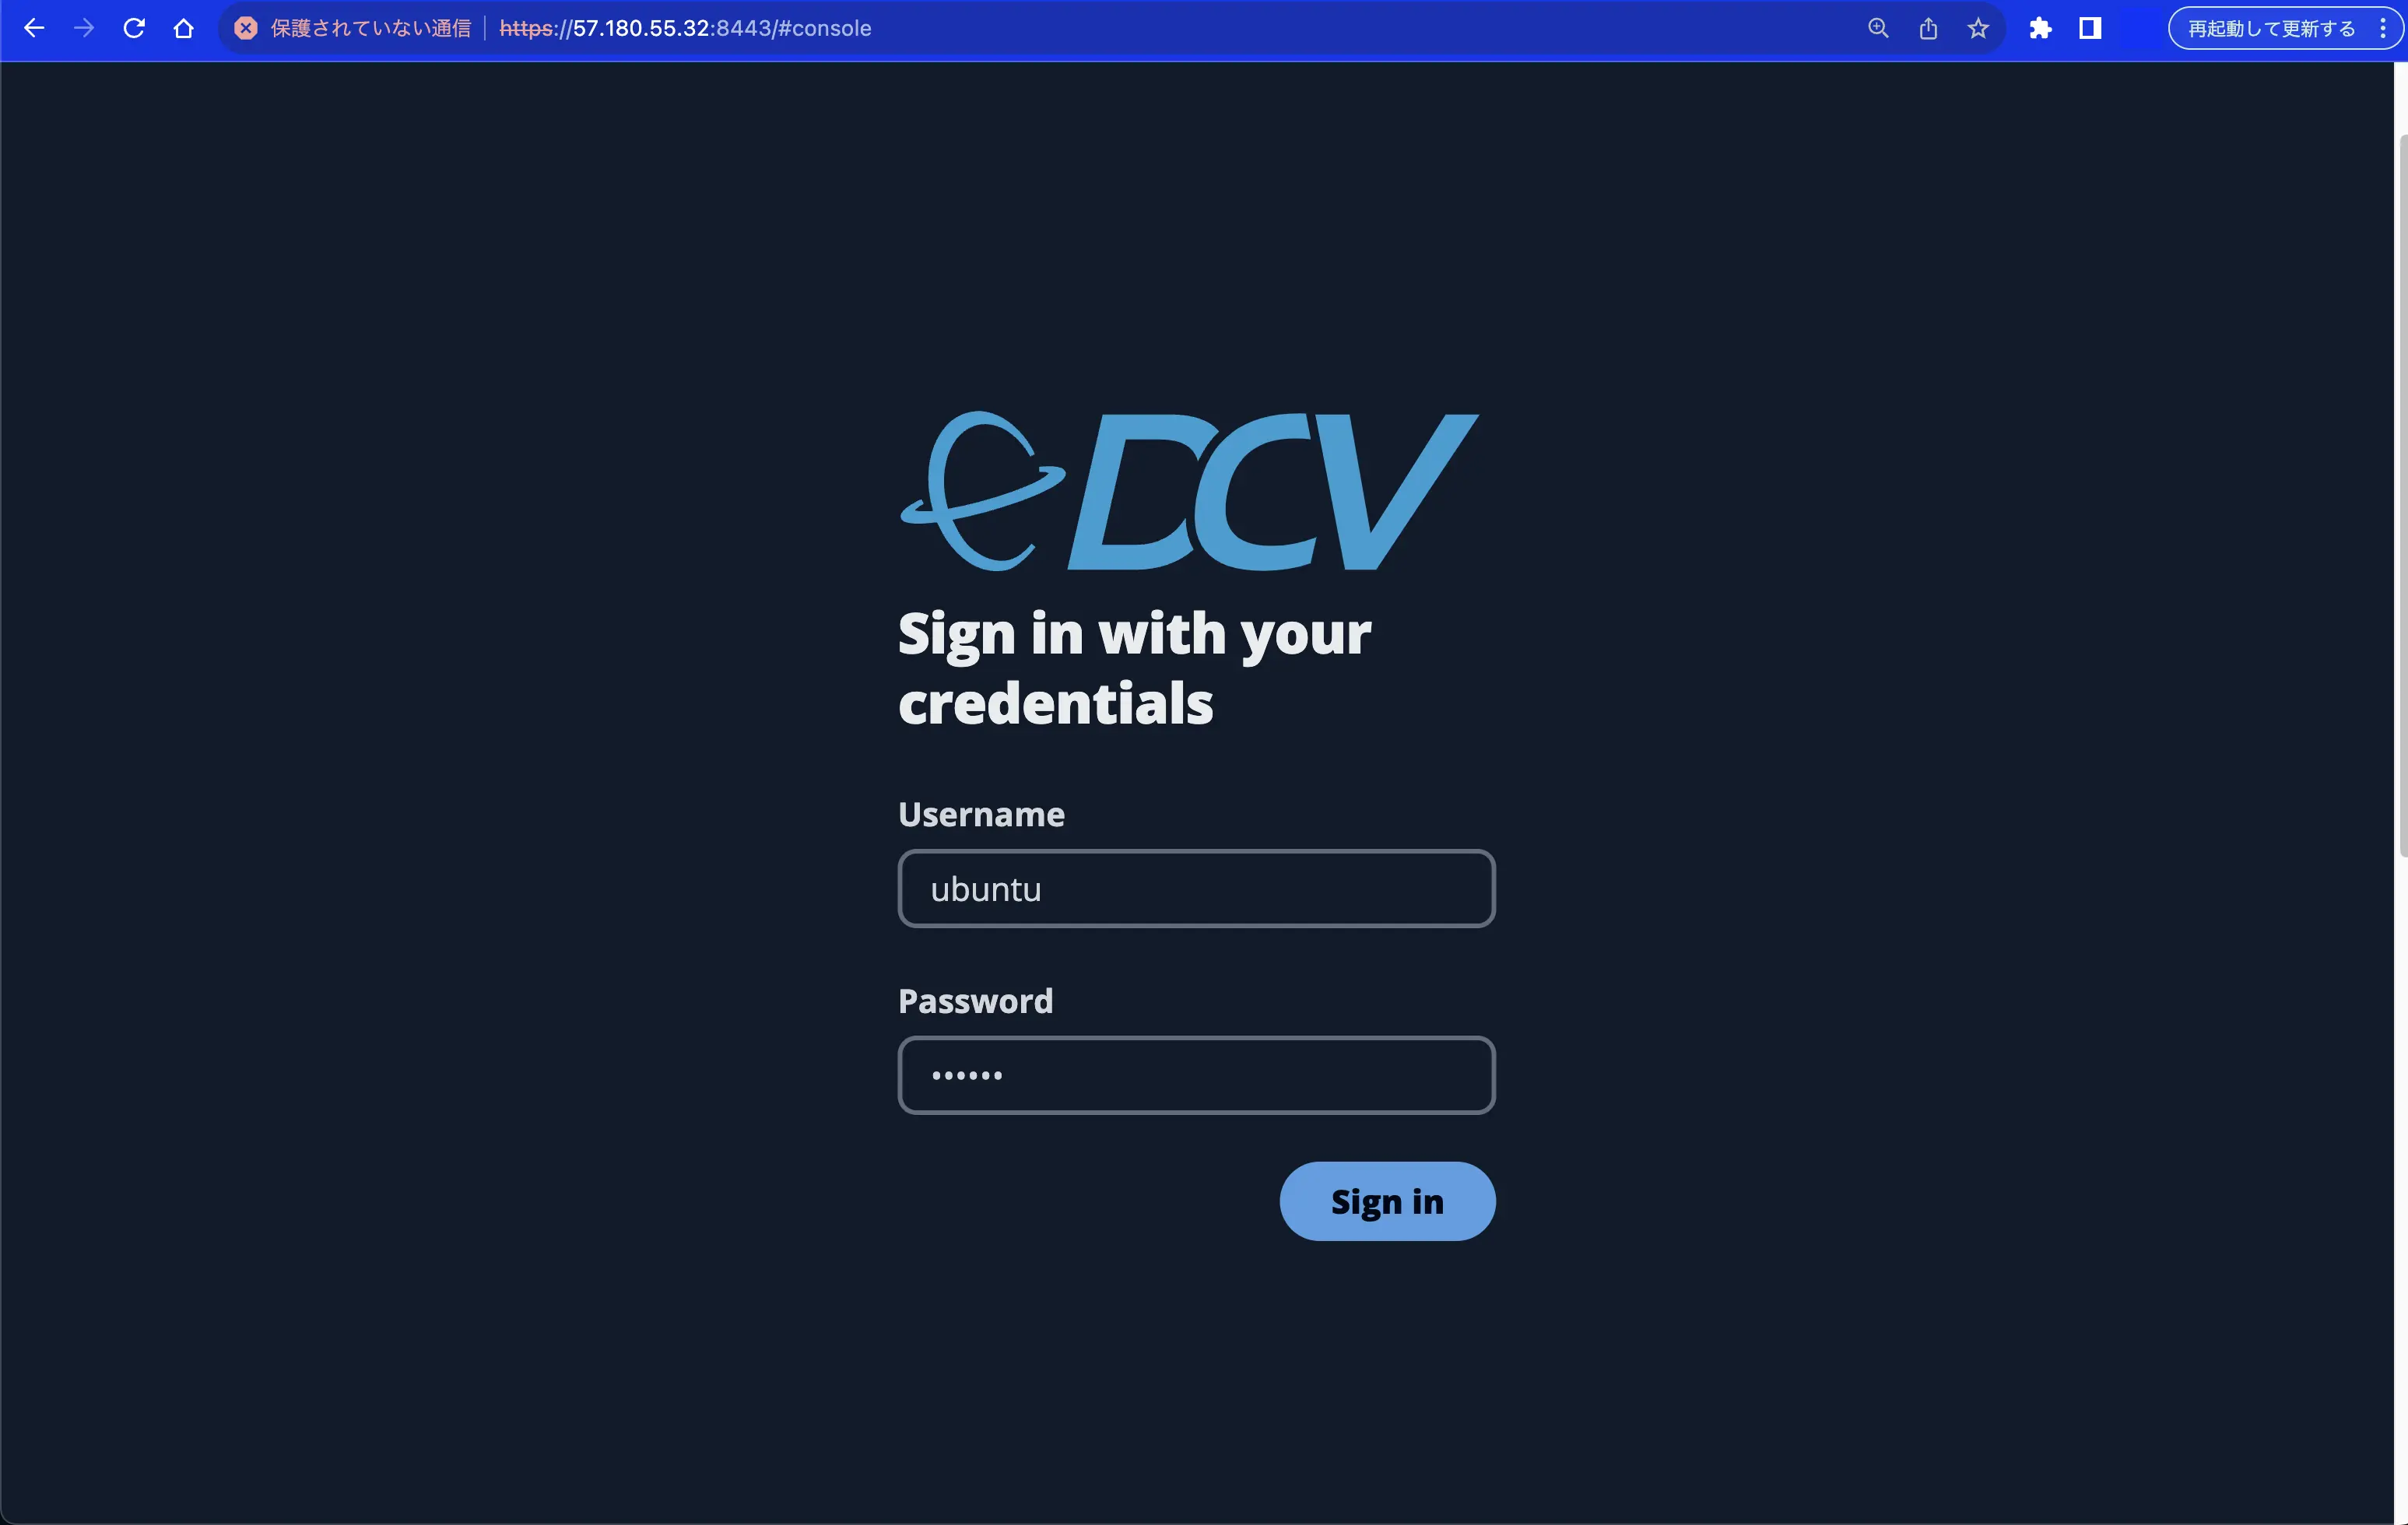
$ sudo systemctl status dcvserver● dcvserver.service - NICE DCV server daemon Loaded: loaded (/lib/systemd/system/dcvserver.service; enabled; vendor preset: enabled) Active: active (running) since Sat 2023-12-16 12:16:43 UTC; 13min ago Process: 45409 ExecStartPre=/sbin/modprobe -a eveusb v4l2loopback (code=exited, status=1/FAILURE) Main PID: 45410 (dcvserver) Tasks: 6 (limit: 4598) Memory: 7.8M CPU: 4.526s CGroup: /system.slice/dcvserver.service ├─45410 /bin/bash /usr/bin/dcvserver -d --service └─45411 /usr/lib/x86_64-linux-gnu/dcv/dcvserver --serviceWebブラウザからアクセスするときの URL は https://<ip>:8443/#console です。
以下のコマンドで EC2 インスタンスの public ip を調べることができます。
$ aws ec2 describe-instances --filter "Name=tag:Name,Values=ubuntu-ec2" "Name=instance-state-name,Values=running" --query "Reservations[].Instances[].PublicIpAddress" --output textDCV のログイン画面が表示されました。Username は ubuntu で、Password は sudo passwd ubuntuを実行したときに入力したパスワードを入力してください。
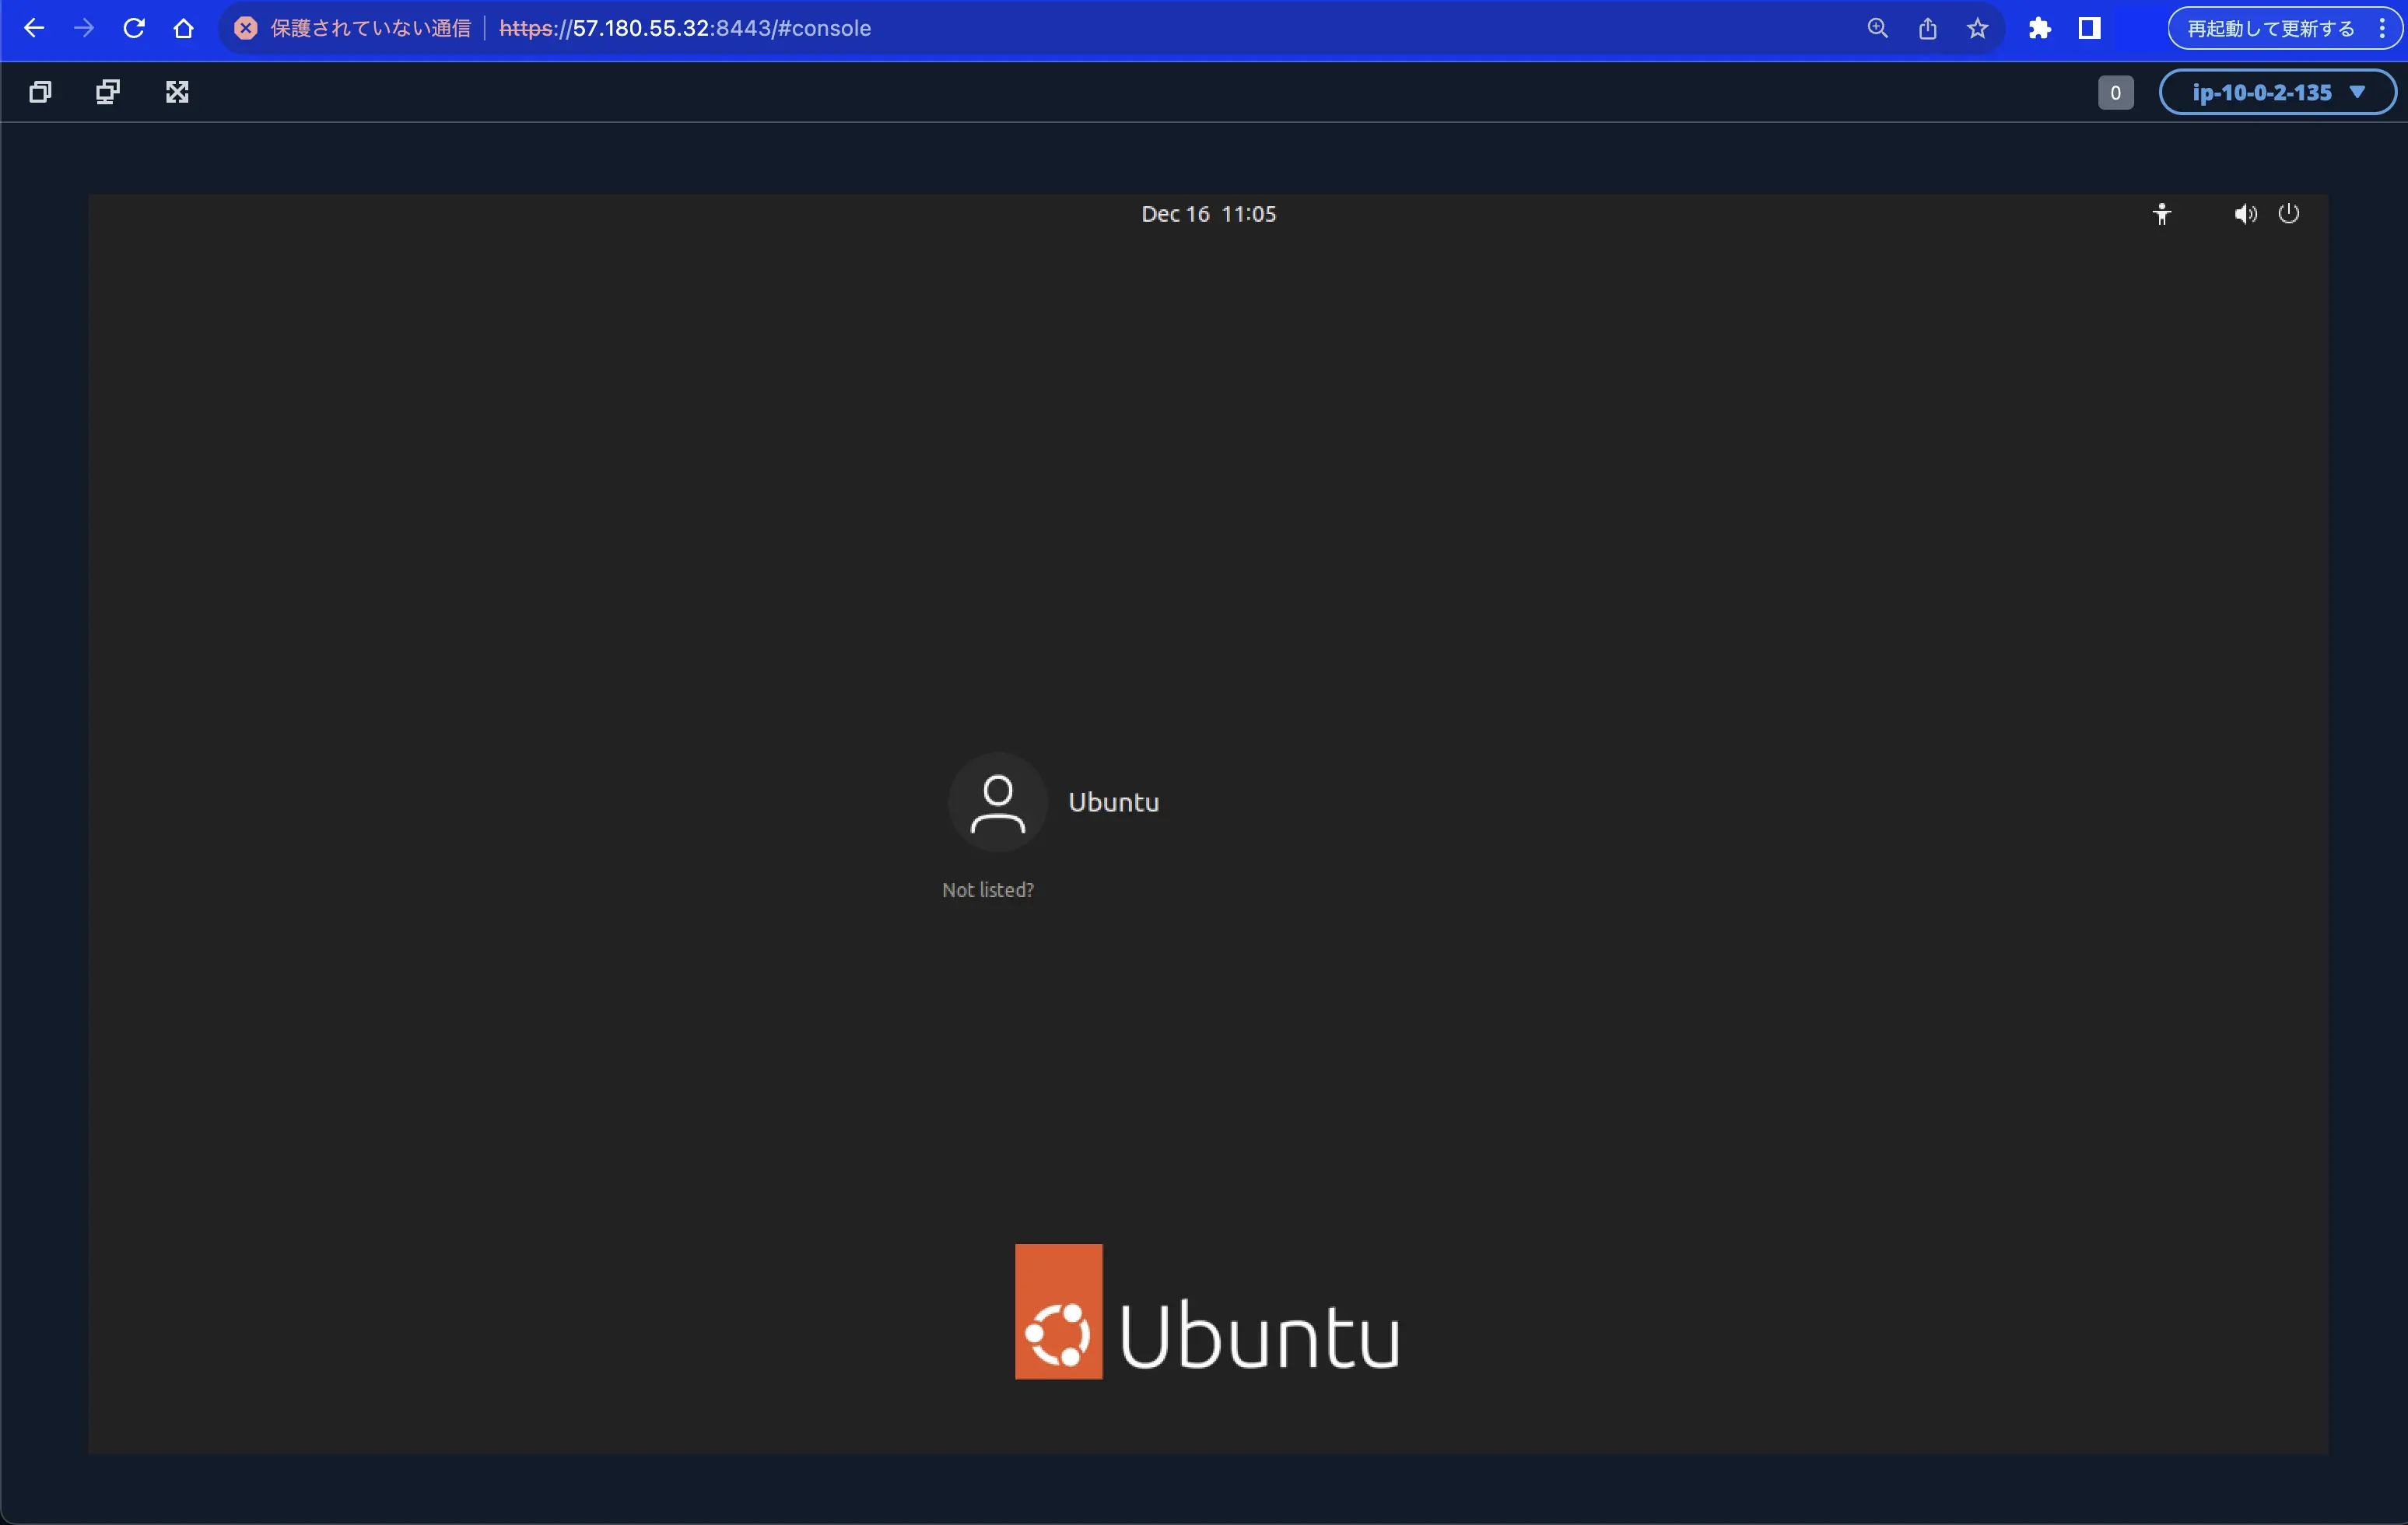
ubuntu を選択します。
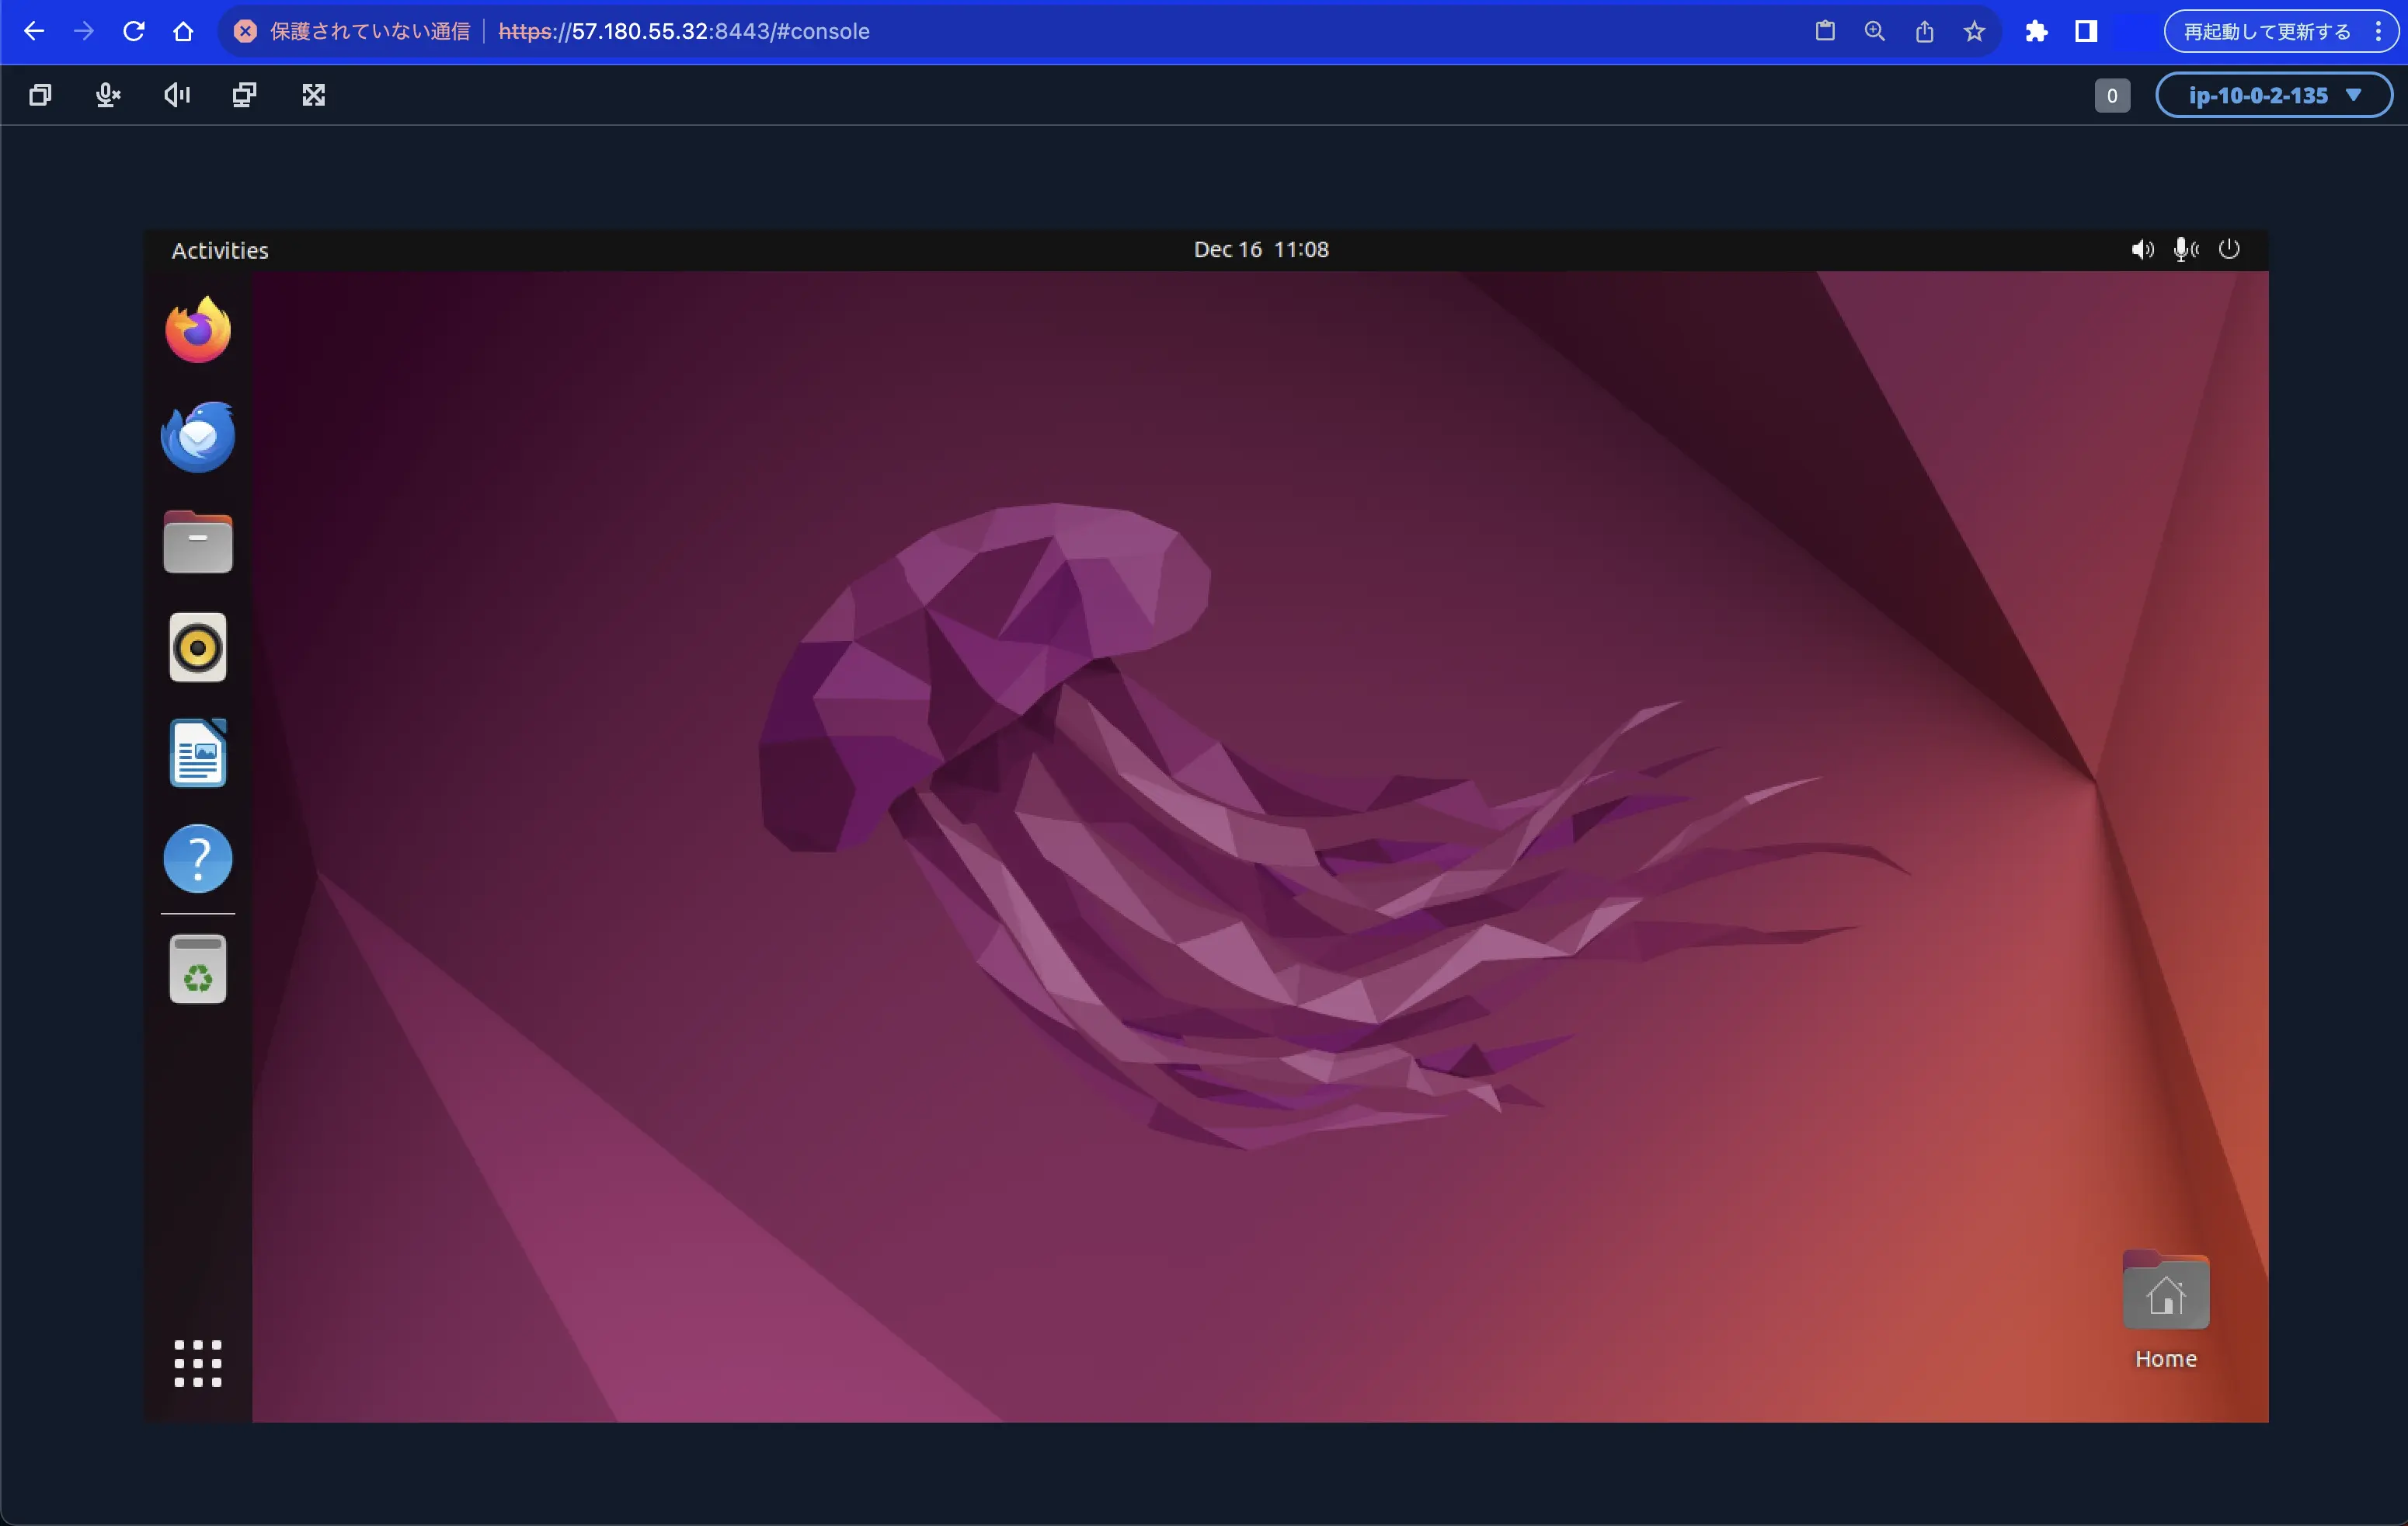
無事にデスクトップが表示されました。
冒頭でお伝えした通り、Web ブラウザから QUIC プロトコルは使用できませんが、もし設定する場合は以下の手順で実現できます。
$ cat /etc/dcv/dcv.conf | grep "enable-quic-frontend="#enable-quic-frontend=true
$ sudo sed -i -e "s/^#enable-quic-frontend/enable-quic-frontend/g" /etc/dcv/dcv.conf
$ cat /etc/dcv/dcv.conf | grep "enable-quic-frontend="enable-quic-frontend=true
# httpしか出力されない$ dcv list-endpoints'http' (address: 0.0.0.0, port: '8443')'http' (address: ::, port: '8443')
$ sudo systemctl stop dcvserver$ sudo systemctl start dcvserver
# quicが追加される$ dcv list-endpoints'http' (address: 0.0.0.0, port: '8443')'http' (address: ::, port: '8443')'quic' (address: 0.0.0.0, port: '8443')'quic' (address: ::, port: '8443')