Mac から Ubuntu イメージを使用したEC2インスタンスに VNC で接続する
ある案件で、Ubuntu イメージから立ち上げた EC2 インスタンスに内製化したアプリケーションから Virtual Network Computing (以下: VNC) で接続するタスクを担当することになりました。
そもそもこの件ではじめて VNC に触れるので構築方法を備忘録として残そうと思います。
作成したコードは以下にあります。 https://github.com/kntks/blog-code/tree/main/2023/12/mac-ubuntu-ec2-vnc
| Mac | M1 Ventura 13.2.1 |
| Terraform | 1.6.5 |
MacからVNCでEC2インスタンスにVNCで接続する
Section titled “MacからVNCでEC2インスタンスにVNCで接続する”
TerraformでEC2を構築する
Section titled “TerraformでEC2を構築する”Terraform を使って EC2 インスタンスを構築します。使用する AMI は ubuntu-jammy-22.04 です。
describe-images
$ aws ec2 describe-images --owners amazon --query "sort_by(Images, &CreationDate)[-1]" --filters "Name=name,Values=ubuntu/images/hvm-ssd/ubuntu-jammy-22.04-arm64-server-**"{ "Architecture": "arm64", "CreationDate": "2023-11-28T04:27:45.000Z", "ImageId": "ami-06da40830d5da5c27", "ImageLocation": "amazon/ubuntu/images/hvm-ssd/ubuntu-jammy-22.04-arm64-server-20231128", "ImageType": "machine", "Public": true, "OwnerId": "099720109477", "PlatformDetails": "Linux/UNIX", "UsageOperation": "RunInstances", "State": "available", "BlockDeviceMappings": [ { "DeviceName": "/dev/sda1", "Ebs": { "DeleteOnTermination": true, "SnapshotId": "snap-0260ba9ceaa918525", "VolumeSize": 8, "VolumeType": "gp2", "Encrypted": false } }, { "DeviceName": "/dev/sdb", "VirtualName": "ephemeral0" }, { "DeviceName": "/dev/sdc", "VirtualName": "ephemeral1" } ], "Description": "Canonical, Ubuntu, 22.04 LTS, arm64 jammy image build on 2023-11-28", "EnaSupport": true, "Hypervisor": "xen", "ImageOwnerAlias": "amazon", "Name": "ubuntu/images/hvm-ssd/ubuntu-jammy-22.04-arm64-server-20231128", "RootDeviceName": "/dev/sda1", "RootDeviceType": "ebs", "SriovNetSupport": "simple", "VirtualizationType": "hvm", "DeprecationTime": "2025-11-28T04:27:45.000Z"}`tls_private_key` を使う場合は注意が必要!!
まず、EC2インスタンスを作成し、Session Manager でログインできる状態を作成します。
main.tf
locals {  name             = "ubuntu-ec2"  vpc_cidr         = "10.0.0.0/16"  private_vpc_cidr = "10.1.0.0/16"

  azs            = ["ap-northeast-1a"]  public_subnets = ["10.0.2.0/24"]}
data "aws_caller_identity" "current" {}data "aws_region" "current" {}
module "vpc" {  source  = "terraform-aws-modules/vpc/aws"  version = "5.2.0"
  name = local.name  cidr = local.vpc_cidr
  azs            = local.azs  public_subnets = local.public_subnets
  enable_dns_hostnames = true  enable_dns_support   = true  enable_nat_gateway   = false
  manage_default_security_group  = true  default_security_group_ingress = []  default_security_group_egress = [    {      from_port   = 0      to_port     = 0      protocol    = -1      cidr_blocks = "0.0.0.0/0"    }  ]}
data "aws_ami" "ubuntu" {  most_recent = true  owners      = ["amazon"]
  filter {    name   = "name"    values = ["ubuntu/images/hvm-ssd/ubuntu-jammy-22.04-amd64-server-**"]  }
  filter {    name   = "virtualization-type"    values = ["hvm"]  }}
module "ec2_instance" {  source  = "terraform-aws-modules/ec2-instance/aws"  version = "~> 5.5"
  name                   = local.name  subnet_id              = element(module.vpc.public_subnets, 0)  ami                    = data.aws_ami.ubuntu.id  instance_type          = "t3.medium"  monitoring             = false
  # Spot request specific attributes  create_spot_instance = true  spot_price                          = "0.1"  spot_wait_for_fulfillment           = true  spot_type                           = "persistent"  spot_instance_interruption_behavior = "terminate"

  vpc_security_group_ids = [module.vpc.default_security_group_id]
  associate_public_ip_address = true
  create_iam_instance_profile = true  iam_role_description        = "IAM role for EC2 instance"  iam_role_policies = {    AmazonSSMManagedInstanceCore = "arn:aws:iam::aws:policy/AmazonSSMManagedInstanceCore"  }
}
provider.tf
terraform {  required_version = "~> 1.6.0"  required_providers {    aws = {      source  = "hashicorp/aws"      version = "~> 5.29"    }  }}
provider "aws" {  region = "ap-northeast-1"
  default_tags {    tags = {      Env = "dev"    }  }}
backend.tf
terraform { backend "local" { path = "terraform.tfstate" }}Session Manager から EC2 にログインする
Section titled “Session Manager から EC2 にログインする”$ aws ssm start-session --target i-05a3432a5d809706a$ sudo su
$ iduid=0(root) gid=0(root) groups=0(root)必要なツールをインストールする
Section titled “必要なツールをインストールする”ここからは VNC 接続を実現するためのツールをインストールします。
$ apt update && apt upgrade -y$ apt install -y ubuntu-desktop tigervnc-standalone-serverVNC サーバを起動する
Section titled “VNC サーバを起動する”インストールが完了すると、vncserver コマンドを実行できます。
$ vncserver -list
TigerVNC server sessions:
X DISPLAY #  RFB PORT #  RFB UNIX PATH  PROCESS ID #  SERVER
vncserver を起動すると passwordを設定する必要があるので、設定します。
※後ほどこのパスワードは使用するので覚えておいてください
$ vncserver :1
You will require a password to access your desktops.
Password:Verify:Would you like to enter a view-only password (y/n)? yPassword:Verify:/usr/bin/xauth:  file /root/.Xauthority does not exist
New Xtigervnc server 'ip-10-0-2-203.ap-northeast-1.compute.internal:1 (root)' on port 5901 for display :1.Use xtigervncviewer -SecurityTypes VncAuth -passwd /root/.vnc/passwd :1 to connect to the VNC server.
Waiting for connections... という文字列が出たら Mac から VNC 接続します。
$ aws ssm start-session --target i-05a3432a5d809706a  --document-name AWS-StartPortForwardingSessionToRemoteHost --parameters '{"portNumber":["5901"],"localPortNumber":["5901"]}'
Starting session with SessionId: xxxx-0f20c9338b5b797f1Port 5901 opened for sessionId xxxx-0f20c9338b5b797f1.Waiting for connections...
VNC 接続する
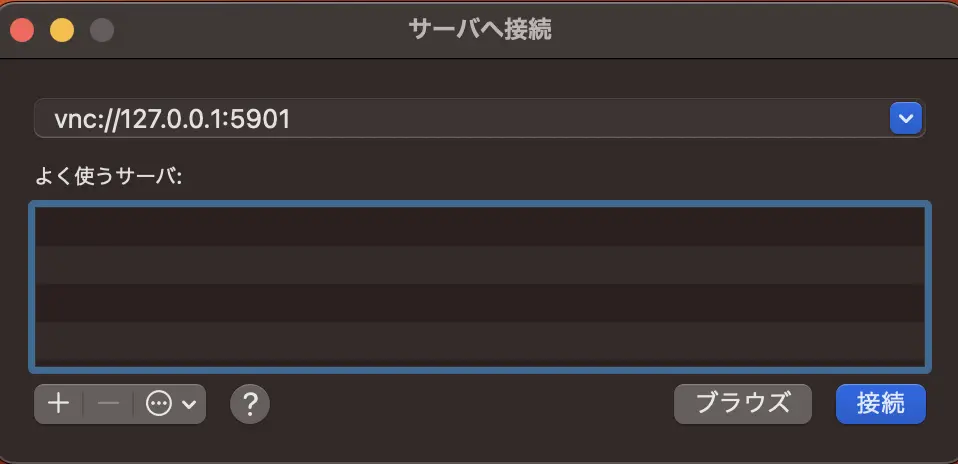
Section titled “VNC 接続する”Mac で Finder のアプリをクリックすると、画面左上のバーに移動という文字列が見えます。

そのあと、サーバへ移動をクリック

先ほど、 aws ssm start-session コマンドで Ubuntu の 5901 port をローカルの 5901 ポートにマッピングしました。なので vnc://127.0.0.1:5901 を入力します。
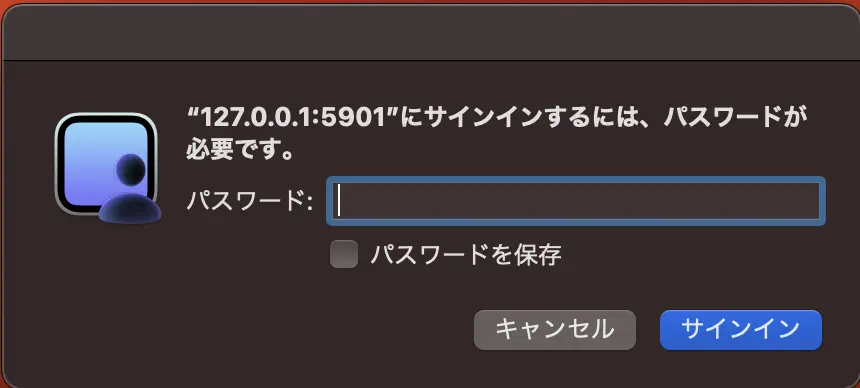
VNC サーバを立ち上げる際 vncserver :1 と入力し、パスワードを設定したと思いますが、ここで、そのパスワードを入力します。
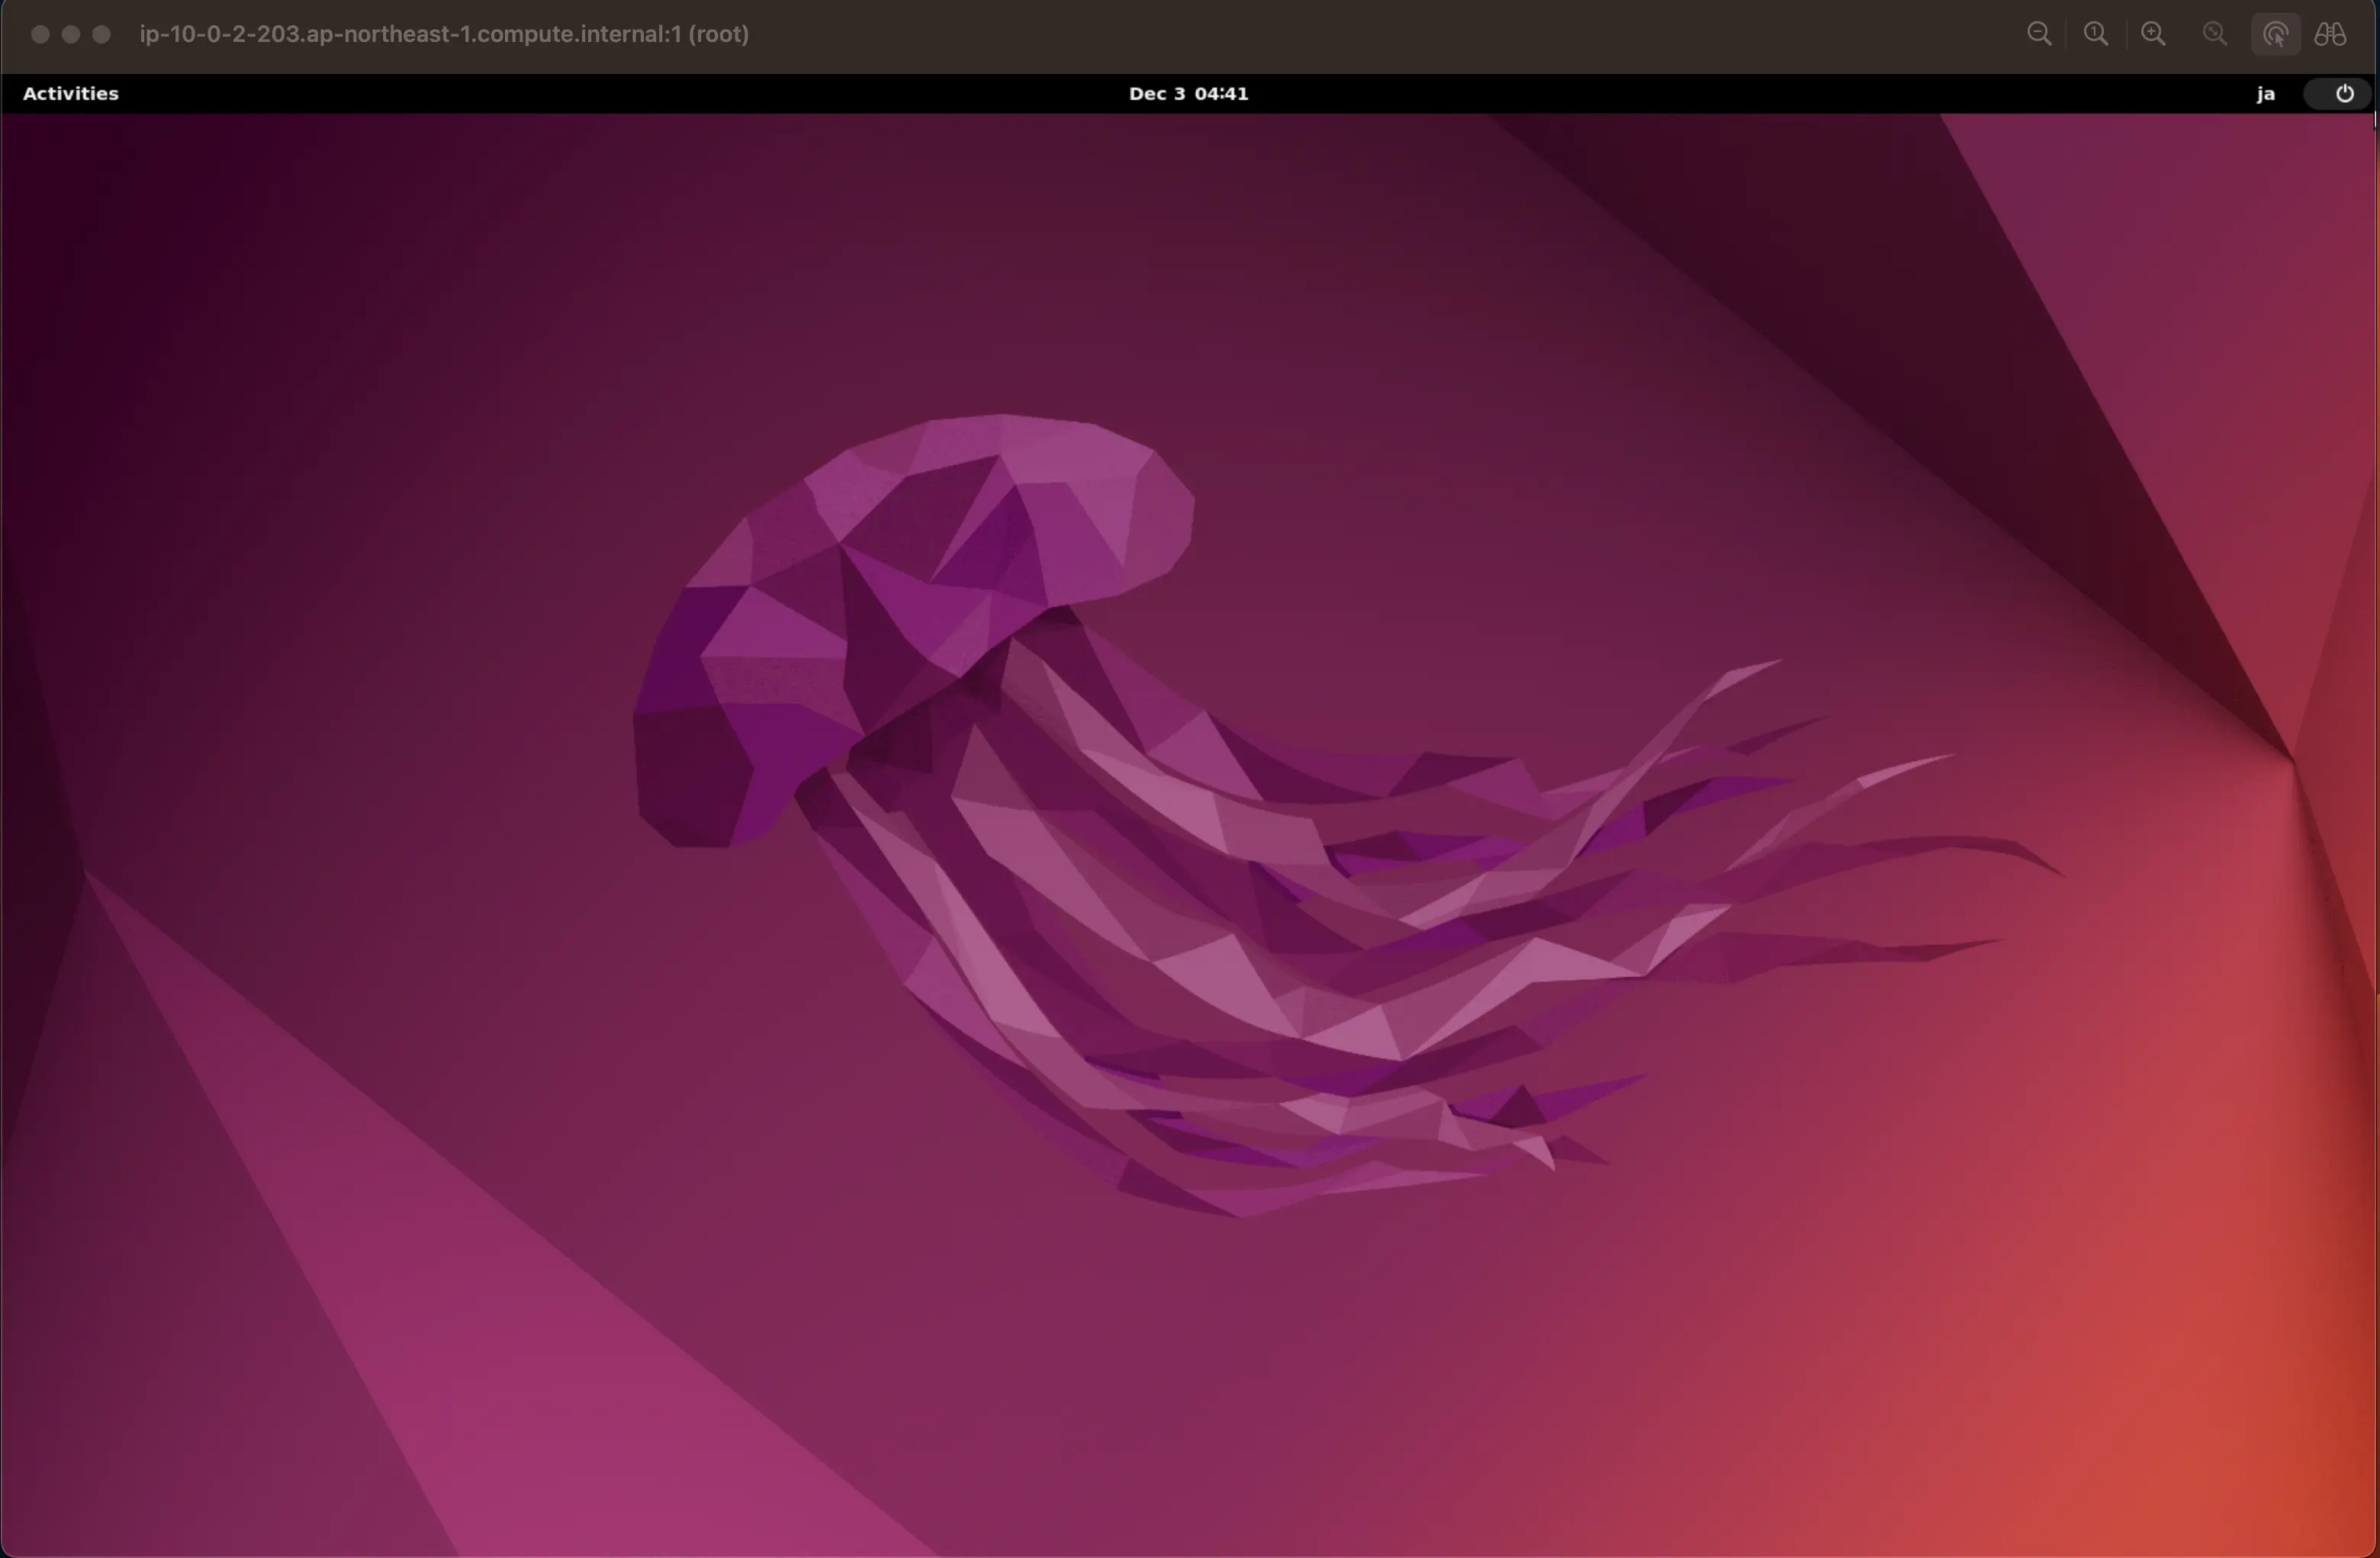
無事に開きました!
vncserver-config-defaults
Section titled “vncserver-config-defaults”/etc/tigervnc/vncserver-config-defaults の中身を確認してみます。
メモ: manpage にも同じ内容が書いています
$vncUserDir の設定によって $HOME/.vnc ディレクトリにログが集まるようです。
# $vncUserDir contains the filename for the log files directory of Xtigervnc# (the server) and the viewers that are connected to it.## Default: $vncUserDir = "$ENV{HOME}/.vnc";確かにディレクトリが存在します。
$ ls -1 ~/.vnc/ip-10-0-2-203.ap-northeast-1.compute.internal:5901.logip-10-0-2-203.ap-northeast-1.compute.internal:5901.pidpasswd$vncStartup は起動スクリプトに $vncUserDir/Xtigervnc-session, $vncUserDir/xstartup がない場合に使用されるスクリプトを設定するようです。
デフォルトでは、 /etc/X11/Xtigervnc-session が設定されています。
# $vncStartup points to a script that will be started at the very beginning# when neither $vncUserDir/Xtigervnc-session nor $vncUserDir/xstartup is present.# If $vncUserDir/Xtigervnc-session is present, it will be used. Otherwise, we try# $vncUserDir/xstartup. If this is also absent, then we use the script given by# $vncStartup. If $vncStartup is specified in $vncUserDir/tigervnc.conf, then this# script is used unconditionally. That is without checking for the presence of# $vncUserDir/Xtigervnc-session or $vncUserDir/xstartup.## Default: $vncStartup = "/etc/X11/Xtigervnc-session";/etc/X11/Xtigervnc-session
$ cat /etc/X11/Xtigervnc-session#! /bin/sh
test x"$SHELL" = x"" && SHELL=/bin/bashtest x"$1"     = x"" && set -- default
if test -r /etc/default/keyboard &&   test -x /usr/bin/setxkbmap; then  . /etc/default/keyboard  /usr/bin/setxkbmap \    -model   "${XKBMODEL}" \    -layout  "${XKBLAYOUT}" \    -variant "${XKBVARIANT}" \    "${XKBOPTIONS}"fi
tigervncconfig -iconic &"$SHELL" -l <<EOFexec /etc/X11/Xsession "$@"EOFtigervncserver -kill $DISPLAY
/etc/tigervnc/vncserver-config-defaults
$ cat /etc/tigervnc/vncserver-config-defaults# /etc/tigervnc/vncserver-config-defaults written by Joachim Falk. This file is# in the Public Domain.## This is a configuration file for the tigervnc-standalone-server and the# tigervnc-scraping-server packages.## After this file, $ENV{HOME}/.vnc/tigervnc.conf will be sourced, so values can# be overwritten on a per-user basis.## Next, command-line options overwrite the settings in both this file as well as# the user's tigervnc.conf config file.## Finally, /etc/tigervnc/vncserver-config-mandatory is parsed. If this file# exists and defines options to be passed to Xtigervnc, they will override any# of the same options defined in a user's tigervnc.conf file as well as options# given via the command line. The vncserver-config-mandatory file offers a# mechanism to establish some basic form of system-wide policy.## ******************************************************************************# * WARNING! There is nothing stopping users from constructing their own start *# * script that calls Xtigervnc directly to bypass any options defined in      *# * /etc/tigervnc/vncserver-config-mandatory.                                  *# ******************************************************************************## See the following manpages for more details:#  - tigervnc.conf(5x)#  - tigervncserver(1)#  - tigervncsession(8)#  - Xtigervnc(1)## This file has Perl syntax and is source from the tigervncserver script. Every# value has suitable defaults, so you probably don't need any modifications.# If you want to reactivate default values, you have to specify an undef value.# For example, $fontPath will set to the default value after## $fontPath = "/foo";# $fontPath = undef;## If you are missing something, please let me know.# joachim.falk@gmx.de
# System configuration# --------------------## This section contains entries that should be true for all users.
# $fontPath should be a comma separated list of fonts to be added to the font#           path. If not specified, the default will apply.# Example:#       $fontPath = "tcp/localhost:7100"; # would force Xtigervnc to use xfs.# Example:#       $fontPath = "";#       $fontPath .= "/usr/share/fonts/X11/misc,";#       $fontPath .= "/usr/share/fonts/X11/cyrillic,";#       $fontPath .= "/usr/share/fonts/X11/100dpi/:unscaled,";#       $fontPath .= "/usr/share/fonts/X11/75dpi/:unscaled,";#       $fontPath .= "/usr/share/fonts/X11/Type1,";#       $fontPath .= "/usr/share/fonts/X11/100dpi,";#       $fontPath .= "/usr/share/fonts/X11/75dpi,";## Default: $fontPath = undef; # Use Xtigervnc built-in default font path.
# $PAMService is the PAM service used for plain password authentication#             if one of the security types Plain, TLSPlain, and#             X509Plain is used.## Default: $PAMService = "tigervnc"; # if /etc/pam.d/vnc is absent.# Default: $PAMService = "vnc";      # if /etc/pam.d/vnc is present.
# $sslAutoGenCertCommand is used to auto generate the certificate# for the X509Cert and X509Key options. The configuration for# openssl is taken from /etc/tigervnc/openssl.cnf where we substitute# @HostName@ by the fully qualified domain name of the host.## Example: $sslAutoGenCertCommand =#  "openssl req -newkey rsa:4096 -x509 -days 365 -nodes";## Default: $sslAutoGenCertCommand =#  "openssl req -newkey ec:/etc/tigervnc/openssl-ecparams.pem -x509 -days 2190 -nodes";
# User configuration# ------------------## This section contains entries that may change from user to user.# You can overwrite these settings by providing a ~/.vnc/tigervnc.conf# configuration file.
# $vncUserDir contains the filename for the log files directory of Xtigervnc#             (the server) and the viewers that are connected to it.## Default: $vncUserDir = "$ENV{HOME}/.vnc";
# $vncPasswdFile contains the filename of the password file for Xtigervnc.#                This file is only used for the security types VncAuth,#                TLSVnc, and X509Vnc.## Default: $vncPasswdFile = "$vncUserDir/passwd";
# $vncStartup points to a script that will be started at the very beginning# when neither $vncUserDir/Xtigervnc-session nor $vncUserDir/xstartup is present.# If $vncUserDir/Xtigervnc-session is present, it will be used. Otherwise, we try# $vncUserDir/xstartup. If this is also absent, then we use the script given by# $vncStartup. If $vncStartup is specified in $vncUserDir/tigervnc.conf, then this# script is used unconditionally. That is without checking for the presence of# $vncUserDir/Xtigervnc-session or $vncUserDir/xstartup.## Default: $vncStartup = "/etc/X11/Xtigervnc-session";
# The $session option controls which X session type will be started. This# should match one of the files in /usr/share/xsessions. For example, if there# is a file called gnome.desktop, then $session = "gnome" would start this X# session. The command to start the session is passed to the $vncStartup# script. If this is not specified, then /etc/X11/Xtigervnc-session will start# the session specified by /usr/bin/x-session-manager.## Default: $session = undef;
# $xauthorityFile should be the path to the authority file that should be used#                 by the Xtigervnc server.## Default: $xauthorityFile = "$ENV{XAUTHORITY}"        # if the env var is defined.# Default: $xauthorityFile = "$ENV{HOME}/.Xauthority"; # otherwise
# $desktopName should be set to the default name of the desktop.#              This can be changed at the command line with -name.## Default: $desktopName = "${HOSTFQDN}:nn ($USER)" # Where nn is the display number.
# $geometry is is only used by the standalone TigerVNC server. It sets the#           framebuffer width & height. A default can be derived if the#           tigervncserver is run in a X session -- either $ENV{DISPLAY} or the#           session given by $getDefaultFrom -- with the -xdisplaydefaults#           option. The geometry can also be changed at the commandline with#           the -geometry option. Otherwise, the fixed default provided below#           will be used.## Default: $geometry = "1920x1200";
# $depth       sets the framebuffer color depth. Must be one of 16, 24, or 32.# $pixelformat sets the default pixelformat.#              A default can be derived if the tigervncserver is run in a#              X session -- either $ENV{DISPLAY} or the session given by#              $getDefaultFrom -- with the -xdisplaydefaults option. The depth#              and pixelformat can also be changed at the commandline with#              the -depth and -pixelformat options. Otherwise, the fixed#              defaults provided below for the two settings will be used.## Example: $depth = "16";#          $pixelformat = "rgb565";## Default: $depth = "24";# Default: $pixelformat = undef;
# $wmDecoration sets the adjustment of $geometry to accommodate the window decoration#               used by the X11 window manager. This is used to fully display#               the VNC desktop even if the VNC viewer is not in full screen mode.## Default: $wmDecoration = "8x64";
# $getDefaultFrom sets the display for the -xdisplaydefaults option if#                 tigervncserver is not called in an X session, i.e.,#                 the $ENV{DISPLAY} variable is not set. The -xdisplaydefaults#                 option can be used to derive values for the above three#                 options, i.e., $geometry to $pixelformat. The $getDefaultFrom#                 value will be added to the call of xdpyinfo.## Example: $getDefaultFrom = "-display localhost:0";## Default: $getDefaultFrom = undef;
# $scrapingGeometry is only used by the scraping TigerVNC server. It specifies#                   the screen area that will be shown to VNC clients, e.g.,#                   640x480+320+240. The format is <w>x<h>+<xoff>+<yoff>, where#                   `+' signs can be replaced with `-' signs to specify offsets#                   from the right and/or from the bottom of the screen.#                   Offsets are optional, +0+0 is assumed by default (top left#                   corner). If the argument is empty, full screen is shown to#                   VNC clients (this is the default).## Example: $scrapingGeometry = "640x480+320+240";## Default: $scrapingGeometry = undef;
# $localhost should the TigerVNC server only listen on localhost for#            incoming VNC connections.## Example: $localhost = "yes";# Example: $localhost = "no";## Default: $localhost = "yes"; # if $SecurityTypes does not contain any TLS*#                              #    or X509* security types or the $SecurityTypes#                              #    does contain at least on *None security type.# Default: $localhost = "no";  # Otherwise
# $SecurityTypes a comma separated list of security types the TigerVNC#                server will offer. Available are None, VncAuth, Plain,#                TLSNone, TLSVnc, TLSPlain, X509None, X509Vnc, and X509Plain.## Example: $SecurityTypes = "X509Vnc,X509Plain,TLSVnc,TLSPlain,VncAuth";## Default: $SecurityTypes = "VncAuth"        # if localhost is enabled (the default)# Default: $SecurityTypes = "VncAuth,TLSVnc" # otherwise
# $PlainUsers a comma separated list of users that are authorized to access#             the VNC server if the security types Plain, TLSPlain, or#             X509Plain are used to establish the connection. The password#             for these users are check by the system via the PAM service#             specified via $PAMService option.## Example: $PlainUsers = "user1,user2";## Default: $PlainUsers only contains the user starting the tigervncserver.
# $X509Cert and $X509Key contan the filenames for a certificate and its#           key that is used for the security types X509None, X509Vnc,#           and X509Plain.## Default: $X509Cert is auto generated if absent and stored in#                    ~/.vnc/${HOSTFQDN}-SrvCert.pem# Default: $X509Key  is auto generated if absent and stored in#                    ~/.vnc/${HOSTFQDN}-SrvKey.pem## If filenames are given for $X509Cert and $X509Key either here or# on the commandline via -X509Cert and -X509Key options, then# the auto generation is disabled and the user has to take care# that usable certificates are present.
1;
/etc/tigervnc/vncserver.users
$ cat /etc/tigervnc/vncserver.users# TigerVNC User assignment## This file assigns users to specific VNC display numbers.# The syntax is <display>=<username>. E.g.:## :2=andrew# :3=lisaxstartup
Section titled “xstartup”xstartup ファイルを作成してみます。
$ touch ~/.vnc/xstartup$ chmod 755 ~/.vnc/xstartup$ vim ~/.vnc/xstartup#!/bin/sh
# Uncomment the following two lines for normal desktop:# unset SESSION_MANAGER# exec /etc/X11/xinit/xinitrc
gnome-session
[ -x /etc/vnc/xstartup ] && exec /etc/vnc/xstartup[ -r $HOME/.Xresources ] && xrdb $HOME/.Xresourcesxsetroot -solid greyvncconfig -iconic &x-window-manager &$ systemctl start gdm$ systemctl status gdm● gdm.service - GNOME Display Manager Loaded: loaded (/lib/systemd/system/gdm.service; static) Active: active (running) since Sun 2023-12-03 06:52:34 UTC; 2s ago Process: 32055 ExecStartPre=/usr/share/gdm/generate-config (code=exited, status=0/SUCCESS) Main PID: 32060 (gdm3) Tasks: 3 (limit: 4598) Memory: 1.5M CPU: 31ms CGroup: /system.slice/gdm.service └─32060 /usr/sbin/gdm3
Dec 03 06:52:34 ip-10-0-2-203 systemd[1]: Starting GNOME Display Manager...Dec 03 06:52:34 ip-10-0-2-203 systemd[1]: Started GNOME Display Manager.VNC サーバを起動します。
$ vncserver -kill$ vncserver :1特別に何かが変わるわけではありませんが、xstartup ファイルを記述することでデスクトップ環境をカスタマイズできるようにしました。