Cloudflare Pages + Terraformでブログ環境を構築する
以前の投稿ではCloudflare Pagesをはじめて触ったときに画面上からクリックしてブログを作成しました。
しかし、ドメイン設定、プロジェクト作成など手順が思いのほか多いです。個人ブログだけなら1つで問題ないのですが、複数サイトの運用を考える場合、単純で退屈な作業です。
今回はTerraformを使って一連の作業を、できるかぎりコードかしてみようと思います。
providerは公式のcloudflare/terraform-provider-cloudflareです。
- とりあえずCloudflare Pages触ってみた人
- Cloudflare PagesをTerraformで管理したい人
Cloudflareのproviderについて
Section titled “Cloudflareのproviderについて”provider "cloudflare" { account_id = "..."}各リソースに定義する形になるそうです。
provider "cloudflare" {}
resource "cloudflare_resource" "example" {  account_id = "..."  name = "..."}
Provider configuration for account_id is removed
Terraformを実行するためのAPIトークンを作成する
Section titled “Terraformを実行するためのAPIトークンを作成する”まずはTerraforを実行するためにトークンを発行します。

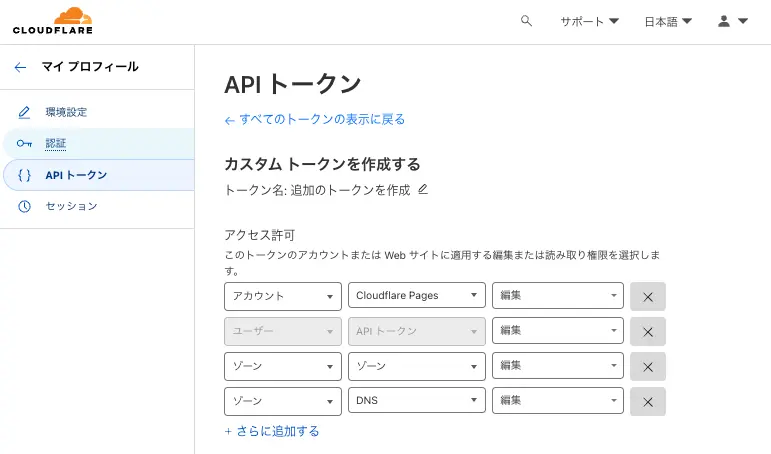
| アカウント | Cloudflare Pages | 編集 | Pagesのプロジェクトを作成するのに必要です |
| ユーザー | APIトークン | 編集 | GitHub Actions用のトークンを作成する際に必要です |
| ゾーン | ゾーン | 編集 | dnsのzoneを作成する際に必要です |
| ゾーン | DNS | 編集 | dnsのcname recordを設定するために必要です |
Cloudflare APIでPermission Group一覧を取得する
CloudflareでZoneを作成する
Section titled “CloudflareでZoneを作成する”terraformはterraform.tfvarsを変数として自動的に読み取ってくれるので、これを利用します。
terraform.tfvarsファイルにシークレット(APIトークン)を定義します。
$ tree.├── README.md├── backend.tf├── main.tf├── output.tf├── provider.tf├── terraform.tfvars└── variables.tfZoneを作成するためにcloudflare_zone (Resource) - Terraform registoryを利用します。
terraform { backend "local" { path = "./terraform.tfstate" }}resource "cloudflare_zone" "blog_zone" { account_id = local.account_id zone = local.zone_apex plan = "free"}terraform { required_version = "1.3.7"
required_providers { cloudflare = { source = "cloudflare/cloudflare" version = "4.0.0-rc2" } }}
provider "cloudflare" { api_token = var.cloudflare_api_token}variable "cloudflare_api_token" {}
locals { account_id = "account_id" project_name = "blog" production_branch = "main" zone_apex = "takenoko.dev"}cloudflare_api_token = "api_token"output "name_servers" { value = cloudflare_zone.blog_zone.name_servers}コードの準備ができました!さっそくterraform applyしてみましょう!
terraform plan
$ terraform init$ terraform plan
Terraform used the selected providers to generate the following execution plan. Resource actions are indicated with the following symbols:  + create
Terraform will perform the following actions:
  # cloudflare_zone.blog_zone will be created  + resource "cloudflare_zone" "blog_zone" {      + account_id          = "xxxxxxxx"      + id                  = (known after apply)      + meta                = (known after apply)      + name_servers        = (known after apply)      + paused              = false      + plan                = "free"      + status              = (known after apply)      + type                = "full"      + vanity_name_servers = (known after apply)      + verification_key    = (known after apply)      + zone                = "takenoko.dev"    }
Plan: 1 to add, 0 to change, 0 to destroy.
Changes to Outputs:  + name_servers = (known after apply)
terraform apply --auto-approve
$ terraform apply --auto-approve
Terraform used the selected providers to generate the following execution plan. Resource actions are indicated with the following symbols:  + create
Terraform will perform the following actions:
  # cloudflare_zone.blog_zone will be created  + resource "cloudflare_zone" "blog_zone" {      + account_id          = "xxxxxxxx"      + id                  = (known after apply)      + meta                = (known after apply)      + name_servers        = (known after apply)      + paused              = false      + plan                = "free"      + status              = (known after apply)      + type                = "full"      + vanity_name_servers = (known after apply)      + verification_key    = (known after apply)      + zone                = "takenoko.dev"    }
Plan: 1 to add, 0 to change, 0 to destroy.
Changes to Outputs:  + name_servers = (known after apply)cloudflare_zone.blog_zone: Creating...cloudflare_zone.blog_zone: Creation complete after 2s [id=3724e8177fdba2976983825edeb37da9]
Apply complete! Resources: 1 added, 0 changed, 0 destroyed.
Outputs:
name_servers = tolist([  "hoge.ns.cloudflare.com",  "foo.ns.cloudflare.com",])
ゾーンができていることを確認しました!
ネームサーバを登録する
Section titled “ネームサーバを登録する”先ほどのterraform applyの出力結果からネームサーバの情報を取得できました。
Outputs:
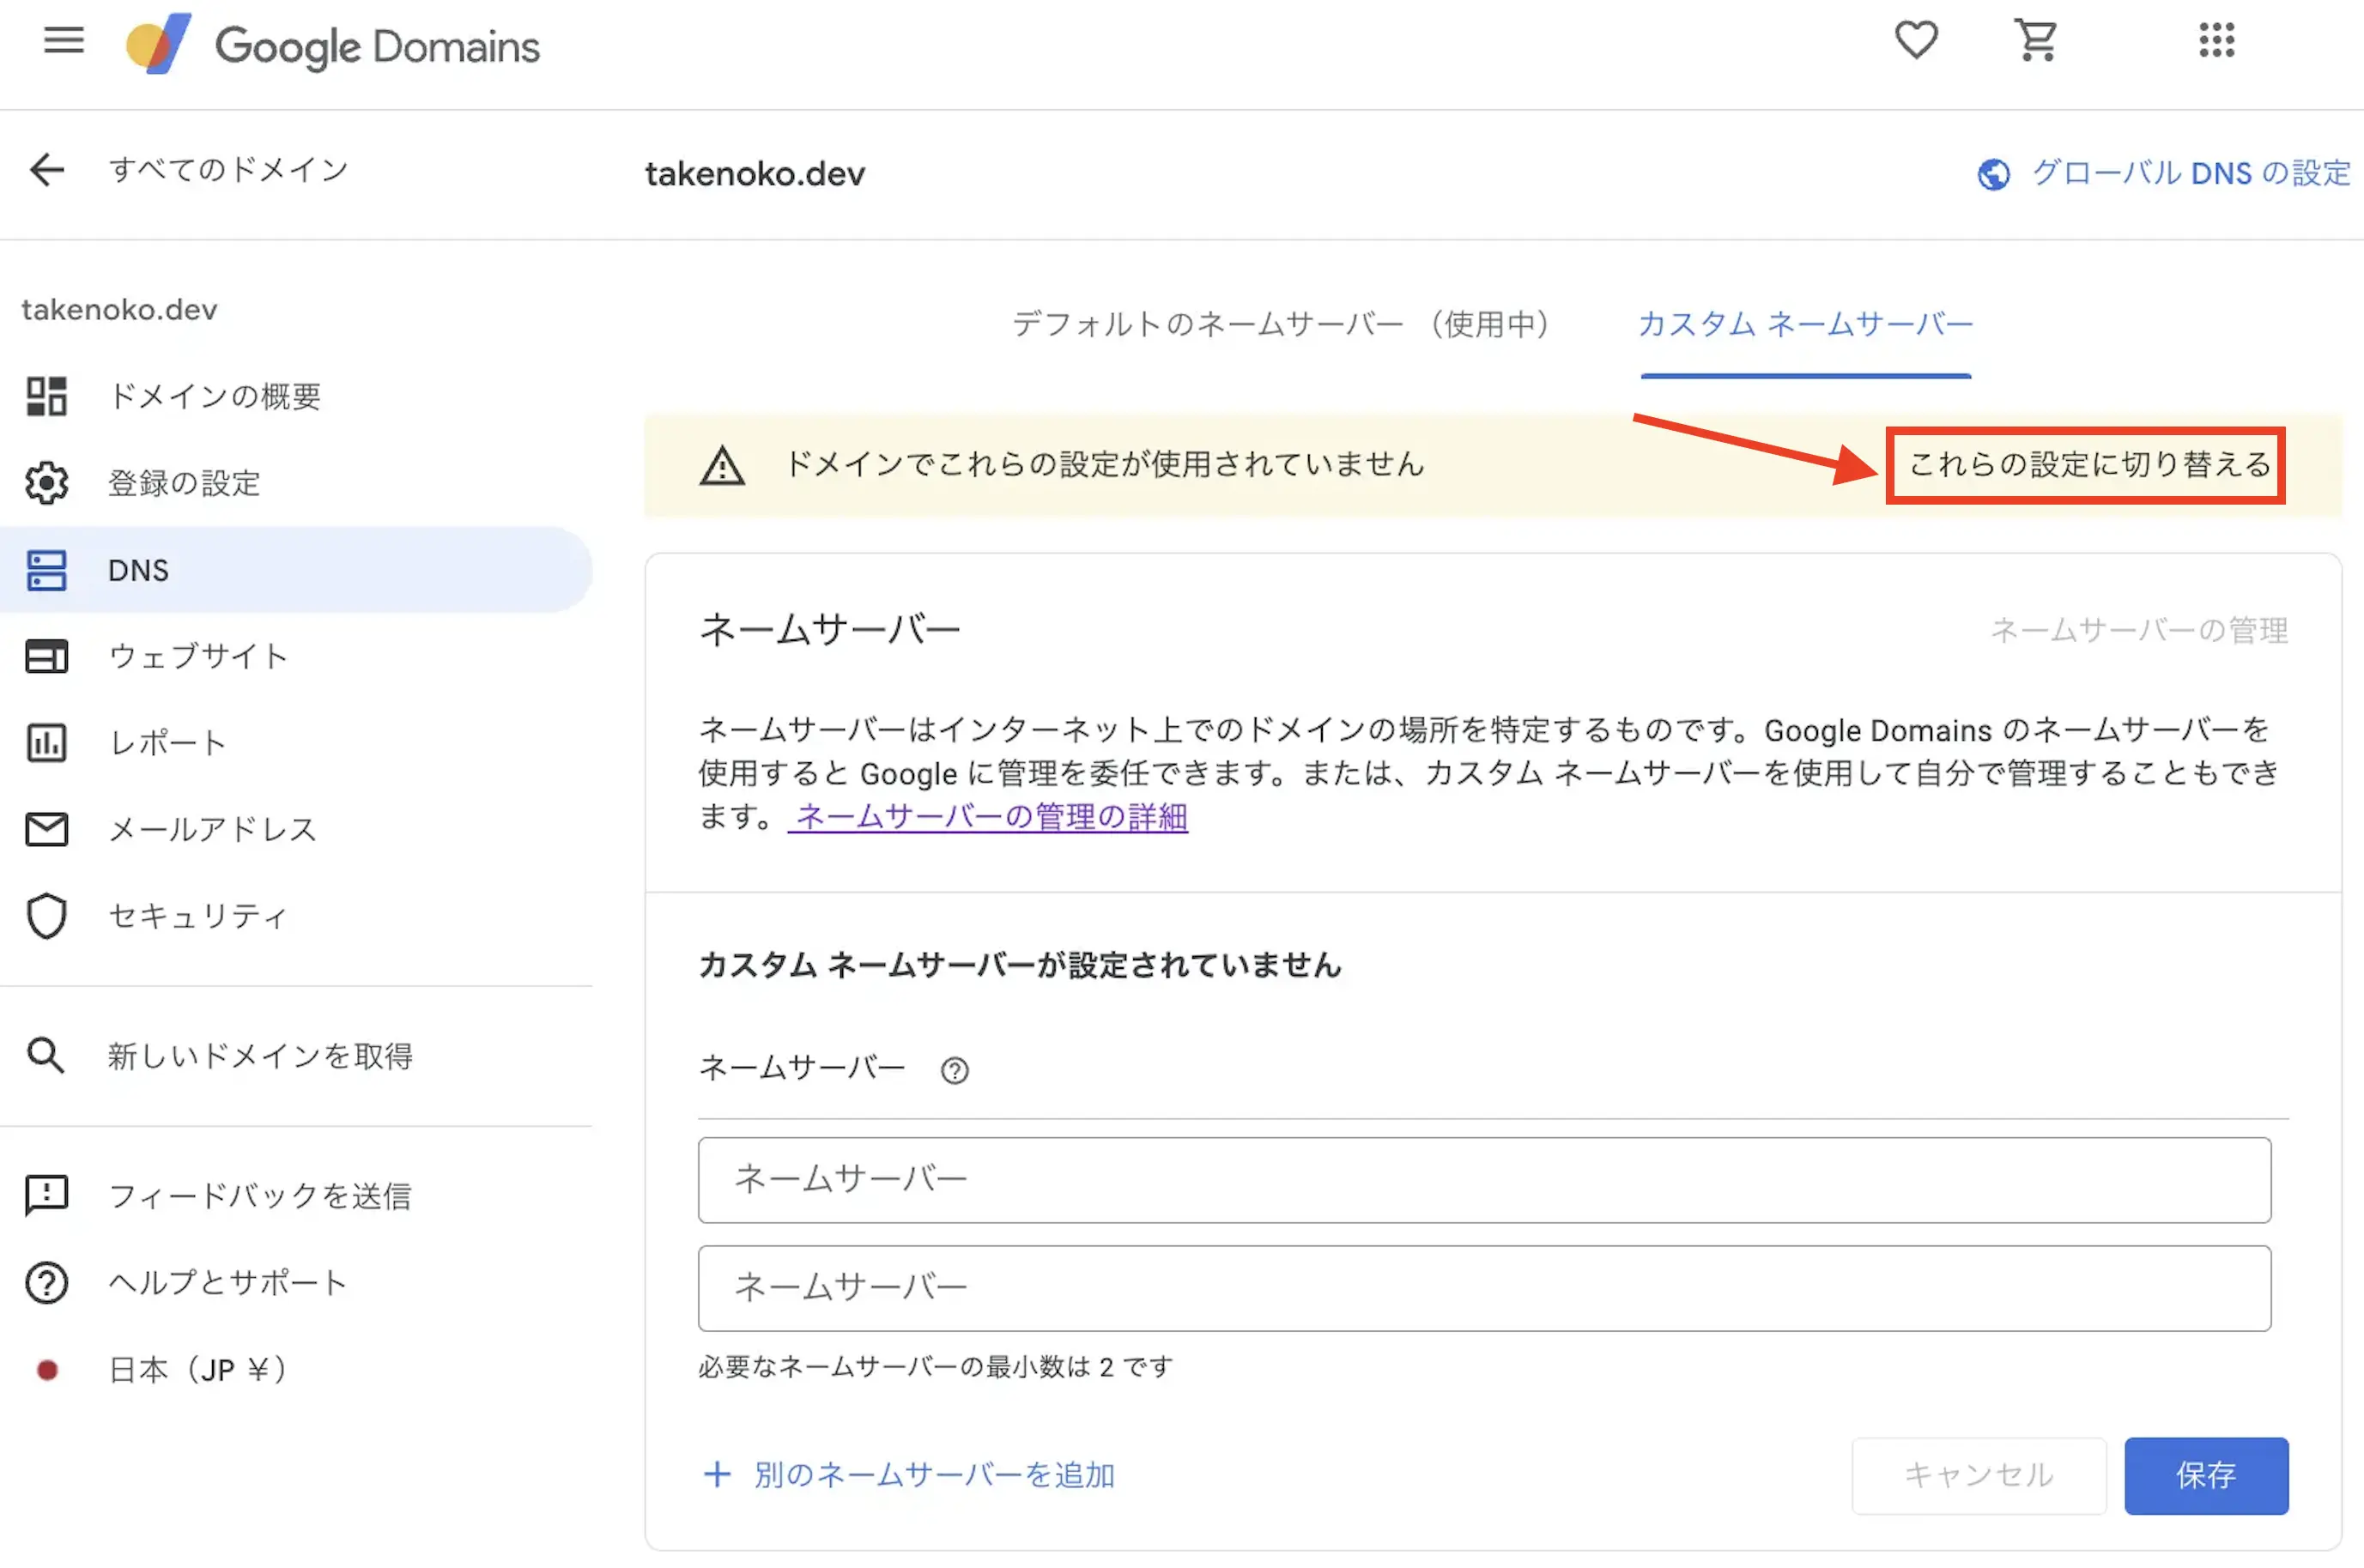
name_servers = tolist([ "hoge.ns.cloudflare.com", "foo.ns.cloudflare.com",])今回はドメインをGoogle Doaminsで管理しているので、そちらに登録しにいきます。
自分が管理しているドメイン(Google Domains)に移動し、先ほど確認したCloudflareのネームサーバをコピペ & 保存します。
これらの設定に切り替えるボタンを押したあとこちらのDNS設定はアクティブですの文言が出ます。
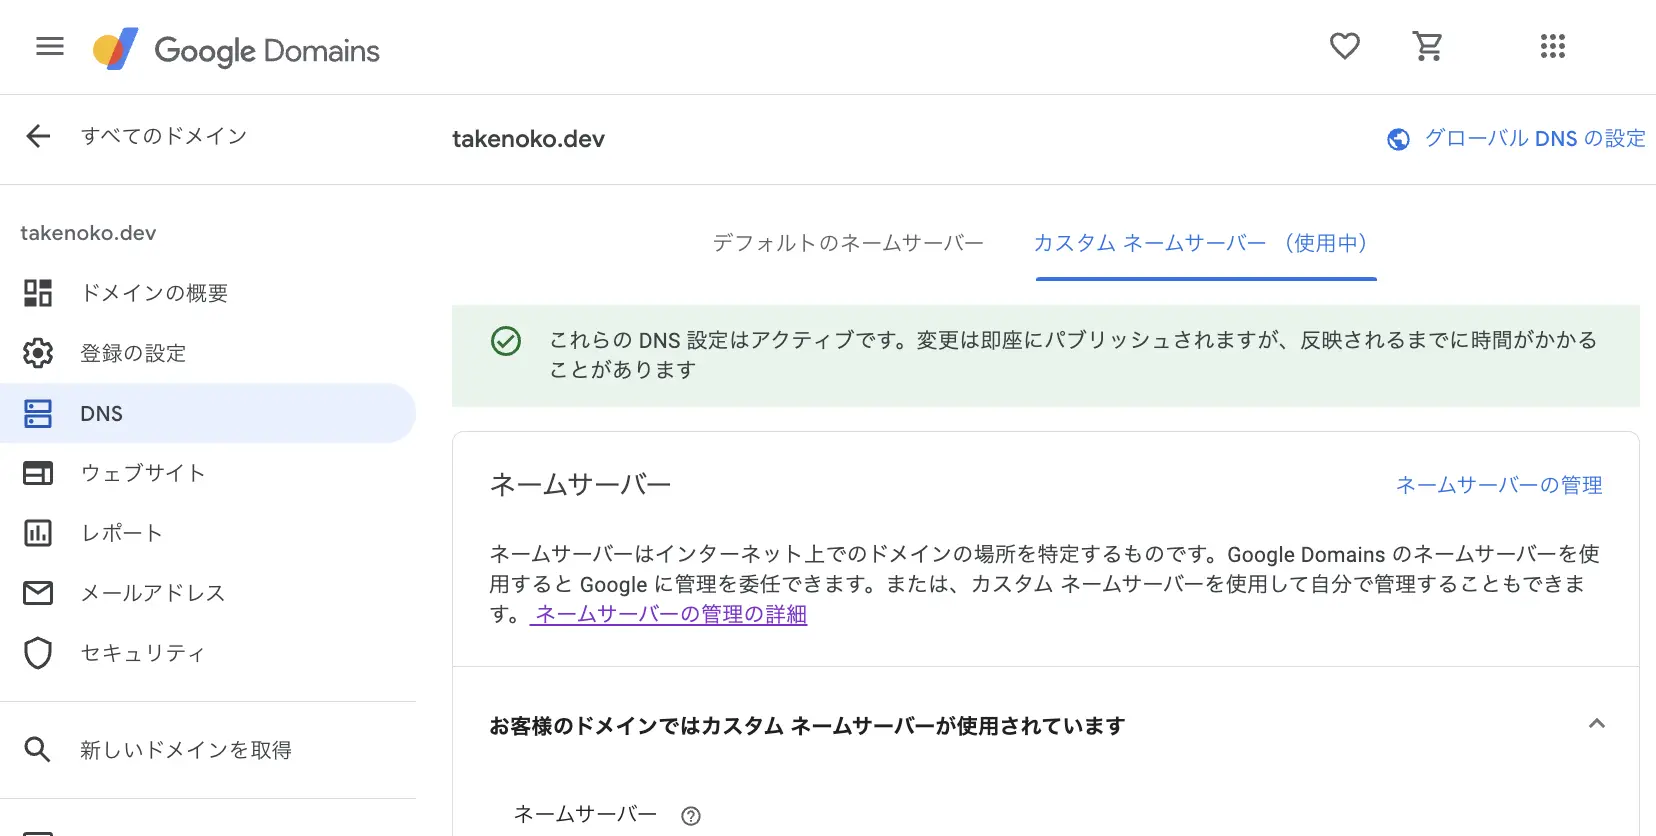
時間が経つとCloudflare側でzoneの設定が完了したことを確認できます。

参考
プロジェクトを作成する
Section titled “プロジェクトを作成する”今度はプロジェクトを作成してみます。
先ほどのTerarformのコードからcloudflare_pages_project (Resource) - Terraform registoryを追加します。
resource "cloudflare_zone" "blog_zone" {  account_id = local.account_id  zone       = local.zone_apex  plan       = "free"}
resource "cloudflare_pages_project" "blog_project" {  account_id        = local.account_id  name              = local.project_name  production_branch = local.production_branch}
terraformコマンドを実行して実作にapplyしてみましょう
terraform plan
$ terraform fmt
$ terraform plancloudflare_zone.blog_zone: Refreshing state... [id=xxxxx]
Terraform used the selected providers to generate the following execution plan. Resource actions are indicated with the following symbols:  + create
Terraform will perform the following actions:
  # cloudflare_pages_project.blog_project will be created  + resource "cloudflare_pages_project" "blog_project" {      + account_id        = "xxxxxxxxx"      + created_on        = (known after apply)      + domains           = (known after apply)      + id                = (known after apply)      + name              = "blog"      + production_branch = "main"      + subdomain         = (known after apply)    }
Plan: 1 to add, 0 to change, 0 to destroy.
terraform apploy --auto-approve
$ terraform apply --auto-approvecloudflare_zone.blog_zone: Refreshing state... [id=xxxx]
Terraform used the selected providers to generate the following execution plan. Resource actions are indicated with the following symbols: + create
Terraform will perform the following actions:
# cloudflare_pages_project.blog_project will be created + resource "cloudflare_pages_project" "blog_project" { + account_id = "xxxxx" + created_on = (known after apply) + domains = (known after apply) + id = (known after apply) + name = "blog" + production_branch = "main" + subdomain = (known after apply) }
Plan: 1 to add, 0 to change, 0 to destroy.cloudflare_pages_project.blog_project: Creating...cloudflare_pages_project.blog_project: Creation complete after 4s [id=blog]
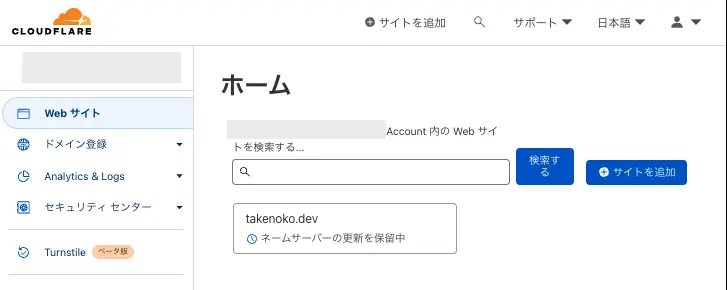
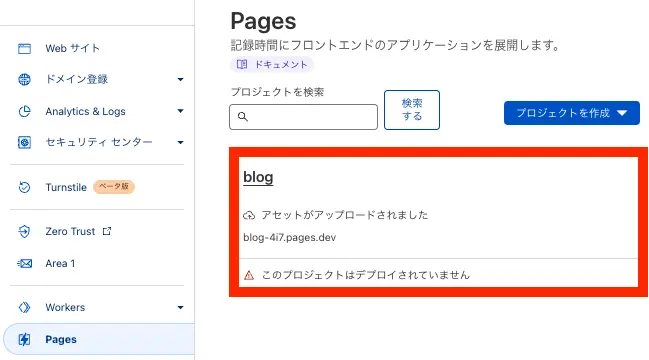
Apply complete! Resources: 1 added, 0 changed, 0 destroyed.Cloudflare Pagesの画面を見に行くと・・・
いい感じにできていそうです!
カスタムドメインを設定する
Section titled “カスタムドメインを設定する”カスタムドメインを設定するためにcloudflare_pages_domain (Resource) - Terraform registoryを追加します。
以下のハイライト箇所です。
resource "cloudflare_zone" "blog_zone" {  account_id = local.account_id  zone       = local.zone_apex  plan       = "free"}
resource "cloudflare_pages_project" "blog_project" {  account_id        = local.account_id  name              = local.project_name  production_branch = local.production_branch}
resource "cloudflare_pages_domain" "blog_domain" { account_id = local.account_id project_name = local.project_name domain = local.blog_domain}variable "cloudflare_api_token" {}
locals { account_id = "account_id" project_name = "blog" production_branch = "main" zone_apex = "takenoko.dev" blog_domain = "blog.${local.zone_apex}"}terraform plan
$ terraform plancloudflare_zone.blog_zone: Refreshing state... [id=xxxxxx]cloudflare_pages_project.blog_project: Refreshing state... [id=blog]
Terraform used the selected providers to generate the following execution plan. Resource actions are indicated with the following symbols:  + create  ~ update in-place
Terraform will perform the following actions:
  # cloudflare_pages_domain.blog_domain will be created  + resource "cloudflare_pages_domain" "blog_domain" {      + account_id   = "xxxxxxxx"      + domain       = "blog.takenoko.dev"      + id           = (known after apply)      + project_name = "blog"      + status       = (known after apply)    }
  # cloudflare_pages_project.blog_project will be updated in-place  ~ resource "cloudflare_pages_project" "blog_project" {        id                = "blog"        name              = "blog"        # (5 unchanged attributes hidden)
      - deployment_configs {          - preview {              - always_use_latest_compatibility_date = false -> null              - compatibility_date                   = "2023-02-12" -> null              - compatibility_flags                  = [] -> null              - d1_databases                         = {} -> null              - durable_object_namespaces            = {} -> null              - environment_variables                = {} -> null              - fail_open                            = false -> null              - kv_namespaces                        = {} -> null              - r2_buckets                           = {} -> null              - usage_model                          = "bundled" -> null            }
          - production {              - always_use_latest_compatibility_date = false -> null              - compatibility_date                   = "2023-02-12" -> null              - compatibility_flags                  = [] -> null              - d1_databases                         = {} -> null              - durable_object_namespaces            = {} -> null              - environment_variables                = {} -> null              - fail_open                            = false -> null              - kv_namespaces                        = {} -> null              - r2_buckets                           = {} -> null              - usage_model                          = "bundled" -> null            }        }    }
Plan: 1 to add, 1 to change, 0 to destroy.
terraform apply --auto-approve
$ terraform apply --auto-approvecloudflare_zone.blog_zone: Refreshing state... [id=xxxxxx]cloudflare_pages_project.blog_project: Refreshing state... [id=blog]
Terraform used the selected providers to generate the following execution plan. Resource actions are indicated with the following symbols:  + create  ~ update in-place
Terraform will perform the following actions:
  # cloudflare_pages_domain.blog_domain will be created  + resource "cloudflare_pages_domain" "blog_domain" {      + account_id   = "xxxxxxxxxx"      + domain       = "blog.takenoko.dev"      + id           = (known after apply)      + project_name = "blog"      + status       = (known after apply)    }
  # cloudflare_pages_project.blog_project will be updated in-place  ~ resource "cloudflare_pages_project" "blog_project" {        id                = "blog"        name              = "blog"        # (5 unchanged attributes hidden)
      - deployment_configs {          - preview {              - always_use_latest_compatibility_date = false -> null              - compatibility_date                   = "2023-02-12" -> null              - compatibility_flags                  = [] -> null              - d1_databases                         = {} -> null              - durable_object_namespaces            = {} -> null              - environment_variables                = {} -> null              - fail_open                            = false -> null              - kv_namespaces                        = {} -> null              - r2_buckets                           = {} -> null              - usage_model                          = "bundled" -> null            }
          - production {              - always_use_latest_compatibility_date = false -> null              - compatibility_date                   = "2023-02-12" -> null              - compatibility_flags                  = [] -> null              - d1_databases                         = {} -> null              - durable_object_namespaces            = {} -> null              - environment_variables                = {} -> null              - fail_open                            = false -> null              - kv_namespaces                        = {} -> null              - r2_buckets                           = {} -> null              - usage_model                          = "bundled" -> null            }        }    }
Plan: 1 to add, 1 to change, 0 to destroy.cloudflare_pages_domain.blog_domain: Creating...cloudflare_pages_project.blog_project: Modifying... [id=blog]cloudflare_pages_project.blog_project: Modifications complete after 1s [id=blog]cloudflare_pages_domain.blog_domain: Creation complete after 1s [id=xxxxxxx]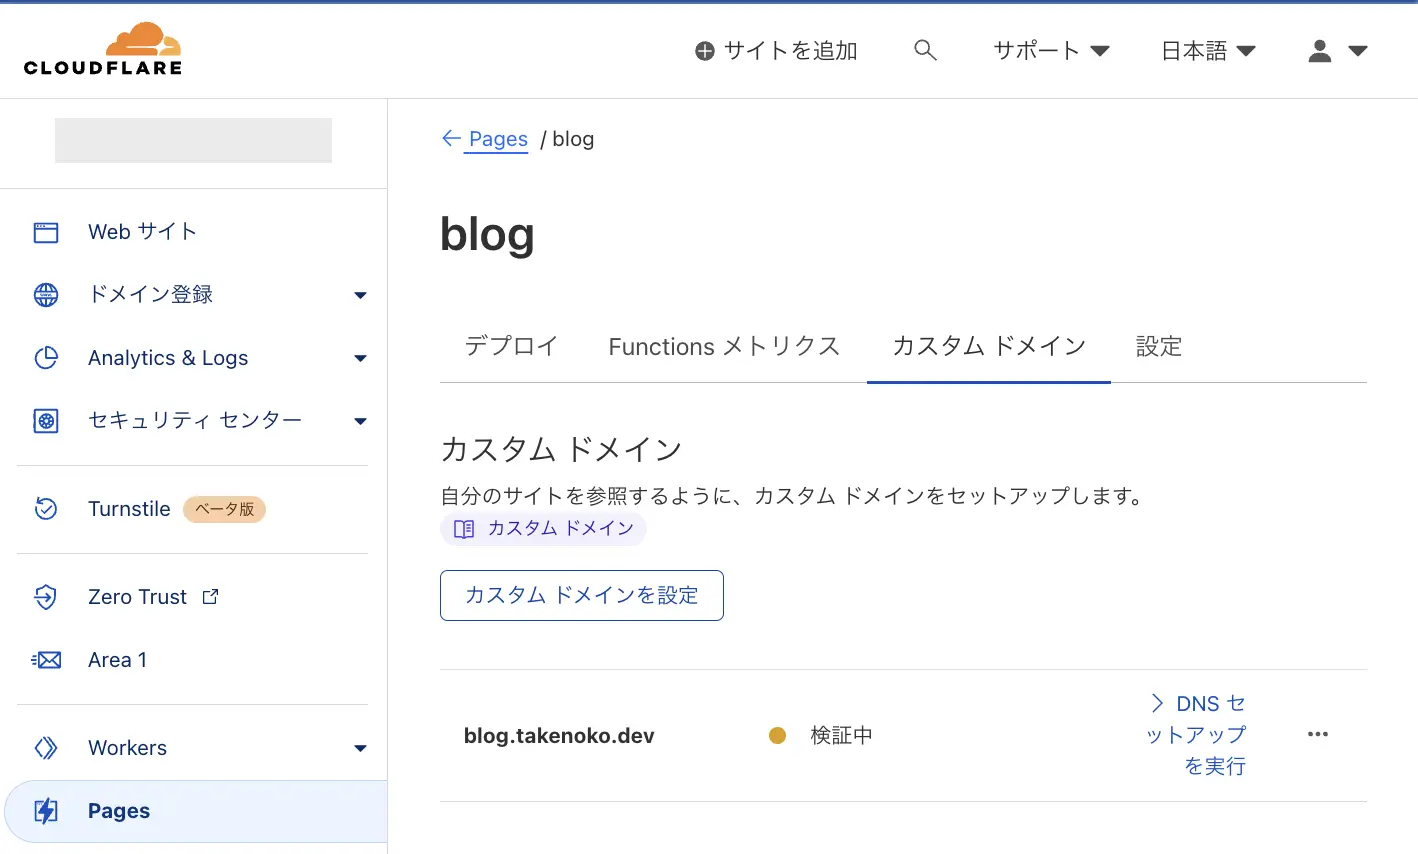
Apply complete! Resources: 1 added, 1 changed, 0 destroyed.カスタムドメインの設定はできましたが、CNAMEを登録していないため、検証中になっています。
次はレコードをDNSに登録します。
DNSにCNAMEを登録する
Section titled “DNSにCNAMEを登録する”CNAMEを登録するためにcloudflare_record (Resource) - Terraform registoryを利用します。
以下のハイライト箇所です。
resource "cloudflare_zone" "blog_zone" {  account_id = local.account_id  zone       = local.zone_apex  plan       = "free"}
resource "cloudflare_pages_project" "blog_project" {  account_id        = local.account_id  name              = local.project_name  production_branch = local.production_branch}
resource "cloudflare_pages_domain" "blog_domain" {  account_id   = local.account_id  project_name = local.project_name  domain       = local.blog_domain}
resource "cloudflare_record" "blog" {  zone_id = cloudflare_zone.blog_zone.id  name    = local.blog_domain  value   = cloudflare_pages_project.blog_project.domains[0]  type    = "CNAME"  ttl     = 3600}
terraform plan
$ terraform plancloudflare_pages_domain.blog_domain: Refreshing state... [id=ce820216-adbd-4568-91af-587df1510437]cloudflare_zone.blog_zone: Refreshing state... [id=3724e8177fdba2976983825edeb37da9]cloudflare_pages_project.blog_project: Refreshing state... [id=blog]
Terraform used the selected providers to generate the following execution plan. Resource actions are indicated with the following symbols:  + create  ~ update in-place
Terraform will perform the following actions:
  # cloudflare_pages_project.blog_project will be updated in-place  ~ resource "cloudflare_pages_project" "blog_project" {        id                = "blog"        name              = "blog"        # (5 unchanged attributes hidden)
      - deployment_configs {          - preview {              - always_use_latest_compatibility_date = false -> null              - compatibility_date                   = "2023-02-12" -> null              - compatibility_flags                  = [] -> null              - d1_databases                         = {} -> null              - durable_object_namespaces            = {} -> null              - environment_variables                = {} -> null              - fail_open                            = false -> null              - kv_namespaces                        = {} -> null              - r2_buckets                           = {} -> null              - usage_model                          = "bundled" -> null            }
          - production {              - always_use_latest_compatibility_date = false -> null              - compatibility_date                   = "2023-02-12" -> null              - compatibility_flags                  = [] -> null              - d1_databases                         = {} -> null              - durable_object_namespaces            = {} -> null              - environment_variables                = {} -> null              - fail_open                            = false -> null              - kv_namespaces                        = {} -> null              - r2_buckets                           = {} -> null              - usage_model                          = "bundled" -> null            }        }    }
  # cloudflare_record.blog will be created  + resource "cloudflare_record" "blog" {      + allow_overwrite = false      + created_on      = (known after apply)      + hostname        = (known after apply)      + id              = (known after apply)      + metadata        = (known after apply)      + modified_on     = (known after apply)      + name            = "blog.takenoko.dev"      + proxiable       = (known after apply)      + ttl             = 3600      + type            = "CNAME"      + value           = "blog-4i7.pages.dev"      + zone_id         = "xxxxxxxxxx"    }
Plan: 1 to add, 1 to change, 0 to destroy.
terraform apply --auto-approve
$ terraform apply --auto-approvecloudflare_pages_domain.blog_domain: Refreshing state... [id=xxxxxxxx]cloudflare_zone.blog_zone: Refreshing state... [id=xxxxxxx]cloudflare_pages_project.blog_project: Refreshing state... [id=blog]
Terraform used the selected providers to generate the following execution plan. Resource actions are indicated with the following symbols: + create ~ update in-place
Terraform will perform the following actions:
# cloudflare_pages_project.blog_project will be updated in-place ~ resource "cloudflare_pages_project" "blog_project" { id = "blog" name = "blog" # (5 unchanged attributes hidden)
- deployment_configs { - preview { - always_use_latest_compatibility_date = false -> null - compatibility_date = "2023-02-12" -> null - compatibility_flags = [] -> null - d1_databases = {} -> null - durable_object_namespaces = {} -> null - environment_variables = {} -> null - fail_open = false -> null - kv_namespaces = {} -> null - r2_buckets = {} -> null - usage_model = "bundled" -> null }
- production { - always_use_latest_compatibility_date = false -> null - compatibility_date = "2023-02-12" -> null - compatibility_flags = [] -> null - d1_databases = {} -> null - durable_object_namespaces = {} -> null - environment_variables = {} -> null - fail_open = false -> null - kv_namespaces = {} -> null - r2_buckets = {} -> null - usage_model = "bundled" -> null } } }
# cloudflare_record.blog will be created + resource "cloudflare_record" "blog" { + allow_overwrite = false + created_on = (known after apply) + hostname = (known after apply) + id = (known after apply) + metadata = (known after apply) + modified_on = (known after apply) + name = "blog.takenoko.dev" + proxiable = (known after apply) + ttl = 3600 + type = "CNAME" + value = "blog-4i7.pages.dev" + zone_id = "xxxxx" }
Plan: 1 to add, 1 to change, 0 to destroy.cloudflare_pages_project.blog_project: Modifying... [id=blog]cloudflare_pages_project.blog_project: Modifications complete after 2s [id=blog]cloudflare_record.blog: Creating...cloudflare_record.blog: Creation complete after 0s [id=xxxxxxxxx]
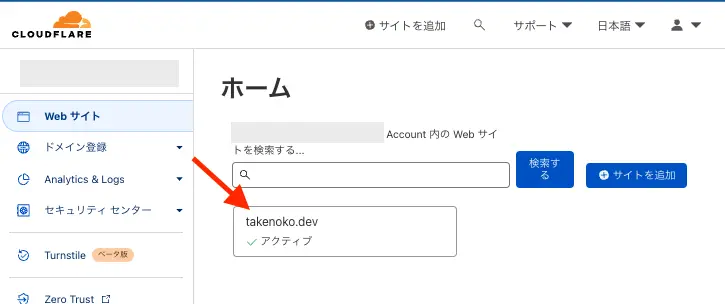
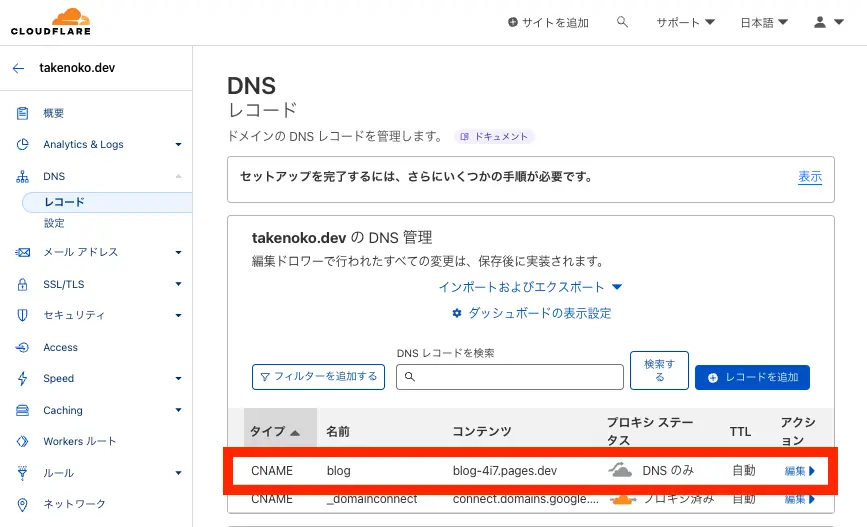
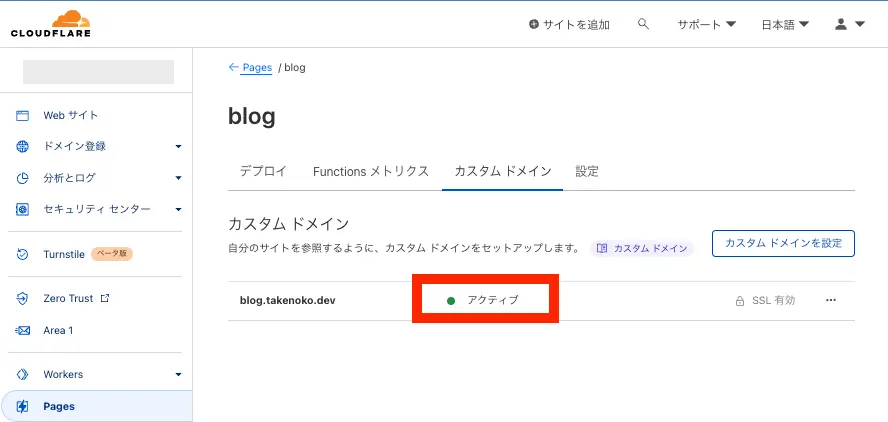
Apply complete! Resources: 1 added, 1 changed, 0 destroyed.Webサイトから自分が作成したサイトをクリックすると、DNSを確認できます。
意図した通りにCNAMEが登録されていますね。
Pagesに戻ってカスタムドメインのステータスを確認してみましょう。無事アクティブになっています。問題なさそうですね。
GitHub Actionsでデプロイする用にAPIトークンを発行する
Section titled “GitHub Actionsでデプロイする用にAPIトークンを発行する”Terraformを実行するためのAPIトークンを作成するで作成したAPIトークンは権限が強いため、新規にGitHub Actions用のトークンを生成します。
そのために以下2つのリソースを使います。
- cloudflare_api_token_permission_groups (Data Source) - Terraform registory
- cloudflare_api_token (Resource) - Terraform registory
以下のハイライトの箇所を追記して、terraform planを実行します
resource "cloudflare_zone" "blog_zone" {  account_id = local.account_id  zone       = local.zone_apex  plan       = "free"}
resource "cloudflare_pages_project" "blog_project" {  account_id        = local.account_id  name              = local.project_name  production_branch = local.production_branch}
resource "cloudflare_pages_domain" "blog_domain" {  account_id   = local.account_id  project_name = local.project_name  domain       = local.blog_domain}
resource "cloudflare_record" "blog" {  zone_id = cloudflare_zone.blog_zone.id  name    = local.blog_domain  value   = cloudflare_pages_project.blog_project.domains[0]  type    = "CNAME"  ttl     = 3600}
data "cloudflare_api_token_permission_groups" "all" {}
resource "cloudflare_api_token" "gh_actions" {  name = "gh-actions-token"
  policy {    permission_groups = [      data.cloudflare_api_token_permission_groups.all.account["Pages Write"],
resources = { "com.cloudflare.api.account.${local.account_id}" = "*" } }}terraform plan
$ terraform plandata.cloudflare_api_token_permission_groups.all: Reading...cloudflare_pages_domain.blog_domain: Refreshing state... [id=ce820216-adbd-4568-91af-587df1510437]cloudflare_zone.blog_zone: Refreshing state... [id=3724e8177fdba2976983825edeb37da9]cloudflare_pages_project.blog_project: Refreshing state... [id=blog]data.cloudflare_api_token_permission_groups.all: Read complete after 0s [id=6b226d8eb309aae11cd24cbaa8eb1042]cloudflare_record.blog: Refreshing state... [id=abefcf42493324d742842ccae416afaa]
Terraform used the selected providers to generate the following execution plan. Resource actions are indicated with the following symbols:  + create  ~ update in-place
Terraform will perform the following actions:
  # cloudflare_api_token.gh_actions will be created  + resource "cloudflare_api_token" "gh_actions" {      + id          = (known after apply)      + issued_on   = (known after apply)      + modified_on = (known after apply)      + name        = "gh-actions-token"      + status      = (known after apply)      + value       = (sensitive value)
      + policy {          + effect            = "allow"          + permission_groups = [              + "8d28297797f24fb8a0c332fe0866ec89",            ]          + resources         = {              + "com.cloudflare.api.account.xxxxxxxxxxx" = "*"            }        }    }
  # cloudflare_pages_project.blog_project will be updated in-place  ~ resource "cloudflare_pages_project" "blog_project" {        id                = "blog"        name              = "blog"        # (5 unchanged attributes hidden)
      - deployment_configs {          - preview {              - always_use_latest_compatibility_date = false -> null              - compatibility_date                   = "2023-02-12" -> null              - compatibility_flags                  = [] -> null              - d1_databases                         = {} -> null              - durable_object_namespaces            = {} -> null              - environment_variables                = {} -> null              - fail_open                            = false -> null              - kv_namespaces                        = {} -> null              - r2_buckets                           = {} -> null              - usage_model                          = "bundled" -> null            }
          - production {              - always_use_latest_compatibility_date = false -> null              - compatibility_date                   = "2023-02-12" -> null              - compatibility_flags                  = [] -> null              - d1_databases                         = {} -> null              - durable_object_namespaces            = {} -> null              - environment_variables                = {} -> null              - fail_open                            = false -> null              - kv_namespaces                        = {} -> null              - r2_buckets                           = {} -> null              - usage_model                          = "bundled" -> null            }        }    }
Plan: 1 to add, 1 to change, 0 to destroy.
terraform apply --auto-approve
$ terraform apply --auto-approvedata.cloudflare_api_token_permission_groups.all: Reading...cloudflare_pages_domain.blog_domain: Refreshing state... [id=xxxxx]cloudflare_zone.blog_zone: Refreshing state... [id=xxxxx]cloudflare_pages_project.blog_project: Refreshing state... [id=blog]data.cloudflare_api_token_permission_groups.all: Read complete after 0s [id=xxxxx]cloudflare_record.blog: Refreshing state... [id=xxxxx]
Terraform used the selected providers to generate the following execution plan. Resource actions are indicated with the following symbols: + create ~ update in-place
Terraform will perform the following actions:
# cloudflare_api_token.gh_actions will be created + resource "cloudflare_api_token" "gh_actions" { + id = (known after apply) + issued_on = (known after apply) + modified_on = (known after apply) + name = "gh-actions-token" + status = (known after apply) + value = (sensitive value)
+ policy { + effect = "allow" + permission_groups = [ + "8d28297797f24fb8a0c332fe0866ec89", ] + resources = { + "com.cloudflare.api.account.xxxxx" = "*" } } }
# cloudflare_pages_project.blog_project will be updated in-place ~ resource "cloudflare_pages_project" "blog_project" { id = "blog" name = "blog" # (5 unchanged attributes hidden)
- deployment_configs { - preview { - always_use_latest_compatibility_date = false -> null - compatibility_date = "2023-02-12" -> null - compatibility_flags = [] -> null - d1_databases = {} -> null - durable_object_namespaces = {} -> null - environment_variables = {} -> null - fail_open = false -> null - kv_namespaces = {} -> null - r2_buckets = {} -> null - usage_model = "bundled" -> null }
- production { - always_use_latest_compatibility_date = false -> null - compatibility_date = "2023-02-12" -> null - compatibility_flags = [] -> null - d1_databases = {} -> null - durable_object_namespaces = {} -> null - environment_variables = {} -> null - fail_open = false -> null - kv_namespaces = {} -> null - r2_buckets = {} -> null - usage_model = "bundled" -> null } } }
Plan: 1 to add, 1 to change, 0 to destroy.cloudflare_api_token.gh_actions: Creating...cloudflare_pages_project.blog_project: Modifying... [id=blog]cloudflare_api_token.gh_actions: Creation complete after 1s [id=xxxxx]cloudflare_pages_project.blog_project: Modifications complete after 1s [id=blog]
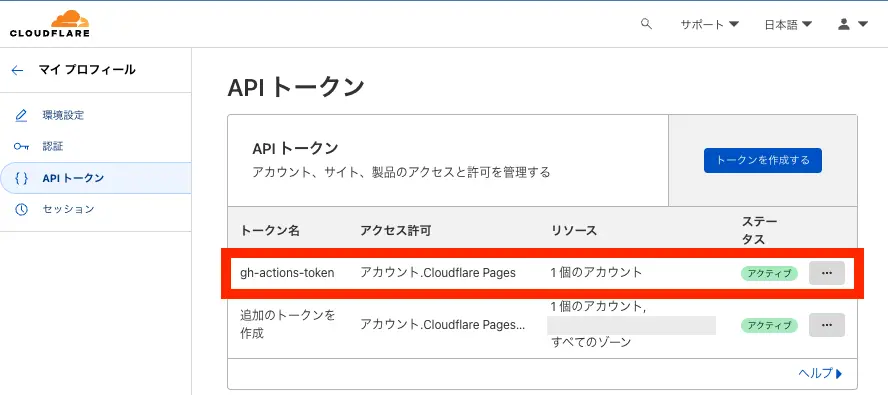
Apply complete! Resources: 1 added, 1 changed, 0 destroyed.applyが完了しました!さっそく自分のプロフィールから確認してみましょう
問題なくgh-actions-tokenが作成されています。
トークンを取り出す
Section titled “トークンを取り出す”terraformのstateファイルにトークンの値があるので、それを取り出します。
$ terraform show -json | jq -rM '.values.root_module.resources[] | select(.address == "cloudflare_api_token.gh_actions") .values.value'このトークンをGitHub Actionsのシークレットにセットすれば自動デプロイができます。
GitHub Actionsの設定はGitHub Actionsを使ってCloudflare Pagesにブログを自動デプロイするに書きましたので、よかったら参考にしてください。
Cloudflare Provider
Section titled “Cloudflare Provider”- cloudflare/terraform-provider-cloudflare
- Provider configuration for account_id is removed
- cloudflare_zone (Resource) - Terraform registory
- cloudflare_pages_project (Resource) - Terraform registory
- cloudflare_pages_domain (Resource) - Terraform registory
- cloudflare_record (Resource) - Terraform registory
- cloudflare_api_token_permission_groups (Data Source) - Terraform registory
- cloudflare_api_token (Resource) - Terraform registory
Terraform Language Documentation
Section titled “Terraform Language Documentation”permission一覧のスコープ
Section titled “permission一覧のスコープ”$ curl -X GET \ --url https://api.cloudflare.com/client/v4/user/tokens/permission_groups \ --header "Authorization: Bearer $TOKEN" \ --header "Content-Type: application/json" | jq '[.result[].scopes[]] | unique'[ "com.cloudflare.api.account", "com.cloudflare.api.account.zone", "com.cloudflare.api.user"]scope: “com.cloudflare.api.account”一覧
$ curl -X GET \ --url https://api.cloudflare.com/client/v4/user/tokens/permission_groups \ --header "Authorization: Bearer $TOKEN" \ --header "Content-Type: application/json" | jq '.result[] | select(any(.scopes[]; . == "com.cloudflare.api.account")) | {name: .name, description: .description}'$ curl -X GET \ --url https://api.cloudflare.com/client/v4/user/tokens/permission_groups \ --header "Authorization: Bearer $TOKEN" \ --header "Content-Type: application/json" | jq '.result | group_by(.scopes[0])[] | {(.[0].scopes[0]): [.[] | .name]}'
{ "com.cloudflare.api.account": [ "Access: Apps and Policies Read", "Access: Apps and Policies Revoke", "Access: Apps and Policies Write", ... ]}{ "com.cloudflare.api.account.zone": [ "API Gateway Read", "API Gateway Write", ...}{ "com.cloudflare.api.user": [ "API Tokens Read", ...}