【Next.js】Auth.jsとKeycloakで実装する認証基盤 その2 ~セキュリティ強化編~
前回の記事では、Next.js と Auth.js を使ってログイン機能を実装する方法を学びました。
前回の学習中に Auth.js のコードリーディングを多少した結果、セッションの有効期限が長すぎたり、OIDC のセキュリティに関する設定を理解していないことに気づきました。
今回は、セッションの有効期限や OIDC の設定方法を理解し、セキュリティを強化します。
https://github.com/kntks/blog-code/tree/main/2025/01/nextjs-keycloak-login-2
| バージョン | |
|---|---|
| Mac | Ventura 13.2.1 |
| Keycloak | 26.0.7 |
| Docker | 26.0.0 |
| Docker Compose | v2.24.5 |
| Terraform | 1.10.3 |
| Node.js | v22.12.0 |
前回と同じ環境 を使用します。
セッションの有効期限を設定する
Section titled “セッションの有効期限を設定する”NextAuth で、option にセッションの有効期限を設定できます。
export const { handlers, signIn, signOut, auth } = NextAuth({ providers: [Keycloak], callbacks: { authorized: async ({ request, auth }) => { // ... }, }, session: { strategy: "jwt", maxAge: 60 * 60 * 24, // 1 day updateAge: 60 * 60, // 1 hour },});maxAage を設定したため、Web ブラウザの Cookie(authjs.session-token)には 1 日間の有効期限が設定されます。
(※ログインした時間が UTC で 2025年1月1日 02:51)

セキュリティを強化する
Section titled “セキュリティを強化する”セキュリティを強化するために Proof Key for Code Exchange (PKCE) と Nonce を有効にします。
Keycloak Provider の引数と、Keycloak の設定を変更します。
PKCE と Nonce についは以前の記事で説明しているため、ここでは PKCE と Nonce の設定方法を学びます。
KeycloakとGo言語でAuthorization Code Flowを学ぶ 2
コードリーディング:Keycloak Provider の型定義を追ってみる
Keycloak Provider の型定義をコードリーディングを通して追ってみます。
引数の options は、OAuthUserConfig 型です。
export default function Keycloak<P extends KeycloakProfile>( options: OAuthUserConfig<P>): OAuthConfig<P> { return { id: "keycloak", name: "Keycloak", type: "oidc", style: { brandColor: "#428bca" }, options, }}OAuthUserConfig 型は、OAuthConfig 型の一部のプロパティを省略した型です。
export type OAuthUserConfig<Profile> = Omit< Partial<OAuthConfig<Profile>>, "options" | "type">OAuthConfig 型は、OIDCConfig 型または OAuth2Config 型です。
type OAuthConfig<Profile>: OIDCConfig<Profile> | OAuth2Config<Profile>;OIDCConfig 型は、OAuth2Config 型の一部のプロパティを省略した型です。
export interface OIDCConfig<Profile> extends Omit<OAuth2Config<Profile>, "type" | "checks"> { type: "oidc" checks?: Array<NonNullable<OAuth2Config<Profile>["checks"]>[number] | "nonce"> /** * If set to `false`, the `userinfo_endpoint` will be fetched for the user data. * @note An `id_token` is still required to be returned during the authorization flow. */ idToken?: boolean}OAuth2Config 型の中を読んでみると、checks というオプションを見つけました。どうやらこのオプションを使うことで、OIDC のセキュリティを強化できるようです。
checks には、"pkce", "state", "none" が設定でき、デフォルト値は ["pkce"] であることがわかります。
export interface OAuth2Config<Profile>  extends CommonProviderOptions,    PartialIssuer {  // ...
  /**   * The CSRF protection performed on the callback endpoint.   * @default ["pkce"]   *   * @note When `redirectProxyUrl` or {@link AuthConfig.redirectProxyUrl} is set,   * `"state"` will be added to checks automatically.   *   * [RFC 7636 - Proof Key for Code Exchange by OAuth Public Clients (PKCE)](https://www.rfc-editor.org/rfc/rfc7636.html#section-4) |   * [RFC 6749 - The OAuth 2.0 Authorization Framework](https://www.rfc-editor.org/rfc/rfc6749.html#section-4.1.1) |   * [OpenID Connect Core 1.0](https://openid.net/specs/openid-connect-core-1_0.html#IDToken) |   */  checks?: Array<"pkce" | "state" | "none">
// ...もう一度、OIDCConfig 型を見てみると、checks に "nonce" が含まれていることがわかります。
export interface OIDCConfig<Profile> extends Omit<OAuth2Config<Profile>, "type" | "checks"> { type: "oidc" checks?: Array<NonNullable<OAuth2Config<Profile>["checks"]>[number] | "nonce"> /** * If set to `false`, the `userinfo_endpoint` will be fetched for the user data. * @note An `id_token` is still required to be returned during the authorization flow. */ idToken?: boolean}ちなみに Auth.js の API reference にも、OAuth2Config などの型定義が記載されています。
Keycloak Provider の引数に checks を設定できます。
このオプションはデフォルトで ["pkce"] が設定されているため、Auth.js 側では意識しなくても PKCE は有効になります。
https://authjs.dev/reference/core/providers#checks
以下は明示的に checks を設定した例です。
export const { handlers, signIn, signOut, auth } = NextAuth({ providers: [Keycloak], providers: [ Keycloak({ checks: ["pkce"], }), ], callbacks: { authorized: async ({ request, auth }) => { // ... }, }, session: { strategy: "jwt", maxAge: 60 * 60 * 24, // 1 day updateAge: 60 * 60, // 1 hour },});実は Terraform を使って Keycloak の設定をしたとき、myapp クライアントにはすでに PKCE を有効にしています。
resource "keycloak_openid_client" "myapp" { # ... pkce_code_challenge_method = "S256" # ...}Keycloak の画面では、Clients > myapp > Advanced で、Proof Key for Code Exchange Code Challenge Method が S256 になっているはずです。


PCKE が有効になっているか確認する
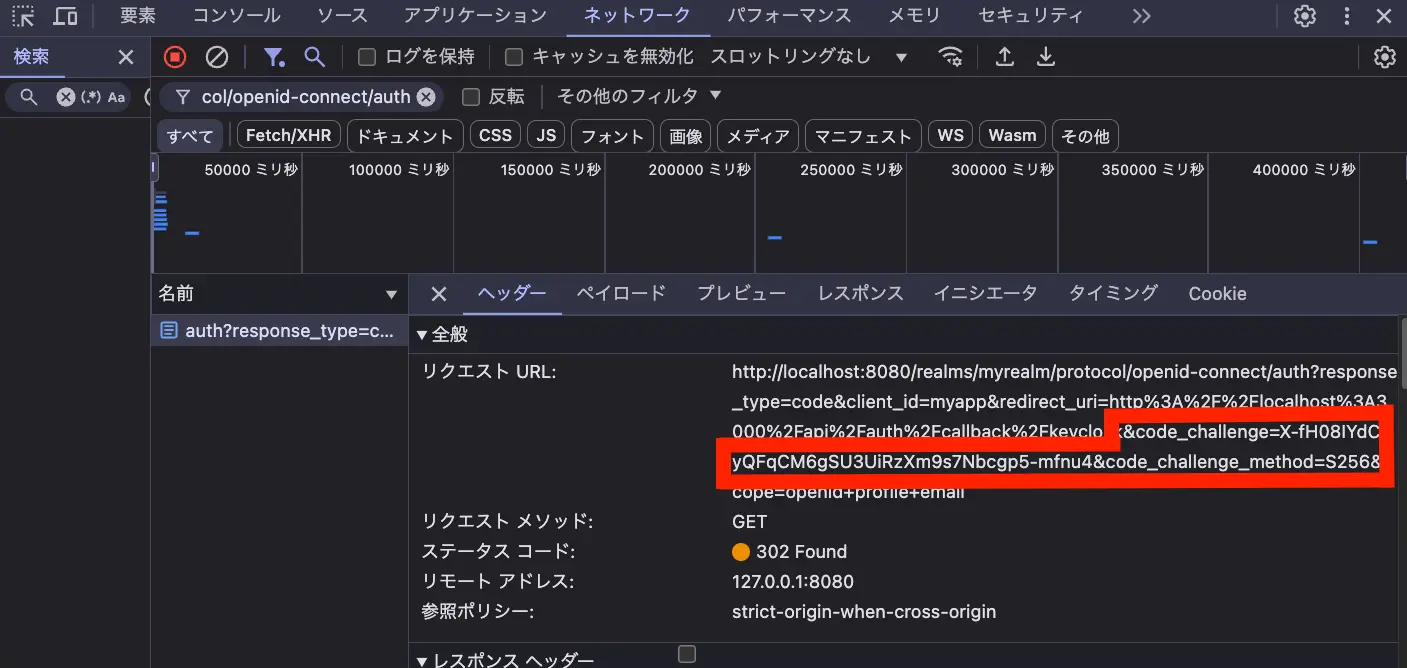
Section titled “PCKE が有効になっているか確認する”PKCE が有効になると、Keycloak への認可リクエスト(GETリクエスト)のクエリパラメータに code_challenge と code_challenge_method が追加されます。
参考:https://datatracker.ietf.org/doc/html/rfc7636#section-4.3
Chrome の Developper Tools で、Keycloak への認可リクエストを確認してみます。
code_challenge と code_challenge_method が追加されていることがわかります。

checks を空にする
Section titled “checks を空にする”ちなみに checks を空にし、Keycloak の Proof Key for Code Exchange Code Challenge Method を S256にしてみます。
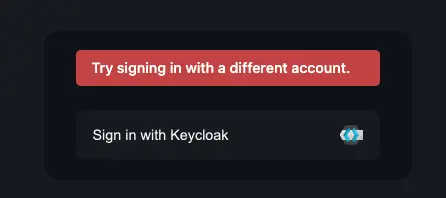
export const { handlers, signIn, signOut, auth } = NextAuth({ providers: [ Keycloak({ checks: [], }), ], callbacks: { authorized: async ({ request, auth }) => { // ... }, }, session: { strategy: "jwt", maxAge: 60 * 60 * 24, // 1 day updateAge: 60 * 60, // 1 hour },});すると以下のエラーメッセージが表示されます。
[auth][error] OAuthCallbackError: OAuth Provider returned an error. Read more at https://errors.authjs.dev#oauthcallbackerror画面は以下のようになります。

Auth.js と Keycloak の設定の組み合わせごとの挙動
Section titled “Auth.js と Keycloak の設定の組み合わせごとの挙動”Auth.js で checks の設定と、Keycloak の Proof Key for Code Exchange Code Challenge Method の設定の組み合わせで挙動がどう変わるかをまとめてみます。
| checksの値 | Keycloak PCKE | 挙動 | |
|---|---|---|---|
| 1 | [] | 設定なし | 正常に動く |
| 2 | [] | S256 | OAuthCallbackError で実行に失敗する |
| 3 | [“pkce”] | 設定なし | 正常に動く |
| 4 | [“pkce”] | S256 | 正常に動く |
3番目の組み合わせについては Keycloak 側で設定を忘れてもエラーにはならないため、気づきにくく注意が必要です。
Keycloak Provider の引数 checks に ["nonce"] を追加します。
Keycloak の場合、このオプションはデフォルトでは設定されていないため明示的に指定してください。
Nonce も PKCE と同様に、認可リクエスト(GETリクエスト)のクエリパラメータに追加されます。
Nonce は、PKCE と違い、ID トークンの Claim として含まれます。
参考:3.1.2.1. Authentication Request
callbacks に jwt を追加し、trigger が "signIn" のときにログを出力します。
Keycloak の場合、profile には、ID トークンの Claims が入っているため、Nonce を確認できます。
export const { handlers, signIn, signOut, auth } = NextAuth({ providers: [ Keycloak({ checks: ["pkce", "nonce"], }), ], callbacks: { authorized: async ({ request, auth }) => { // ... }, jwt: async ({ token, profile, account, trigger }) => { if (trigger === "signIn") { // ID トークンに含まれる Nonce をログに出力 console.log("profile", profile); } return token; }, }, session: { strategy: "jwt", maxAge: 60 * 60 * 24, // 1 day updateAge: 60 * 60, // 1 hour },});コードリーディング:profile には ID トークンの Claims が入っている
以下の handleOAuth 関数は Authorization Code Flow の途中で実行される関数です。
export async function handleOAuth(  params: RequestInternal["query"],  cookies: RequestInternal["cookies"],  options: InternalOptions<"oauth" | "oidc">) {  // ...
  const requireIdToken = isOIDCProvider(provider)
  if (requireIdToken) {    const idTokenClaims = o.getValidatedIdTokenClaims(processedCodeResponse)!    profile = idTokenClaims  } else {    // ...  }
}isOIDCProvider は Keycloak が OIDC Provider であることを確認
export function isOIDCProvider( provider: InternalProvider<"oidc" | "oauth">): provider is InternalProvider<"oidc"> { return provider.type === "oidc"}Nonce が有効になっているか確認する
Section titled “Nonce が有効になっているか確認する”Nonce が有効になると、(Keycloak への)認可リクエスト(GETリクエスト)のクエリパラメータに nonce が追加されます。
Developper Tools で、Keycloak への認可リクエストを確認してみます。

profile を出力してみた結果が以下の通りです。Nonce が含まれていることが確認できます。
profile { exp: 1735968779, iat: 1735968479, auth_time: 1735968359, jti: 'c1f76cd3-74ac-425c-966a-264343fd53ac', iss: 'http://localhost:8080/realms/myrealm', aud: 'myapp', sub: '9709d0d6-2e6f-42bc-96bd-4e270319d67a', typ: 'ID', azp: 'myapp', nonce: 'BfcvHMgGrzG6ImKnRGfTG6YDmJptKRSUXgfsI9ZmQqo', sid: 'b7818721-2a1b-4f58-8d59-a5f7b0505fa8', at_hash: 'yENF9Ajv8USXUCJyRot8-Q', acr: '0', email_verified: false, name: 'foo bar', preferred_username: 'myuser', given_name: 'foo', family_name: 'bar', email: 'myuser@exmple.com'}参考:3.1.2.1. Authentication Request
Nonce の検証は必要?
Section titled “Nonce の検証は必要?”Auth.js が生成した Nonce は、最終的に ID トークンの Claim の中に入っています。
ID トークンを取得した場合、検証を行わないといけません。Nonce についても例外ではなく、検証内容は、OpenID Connect の仕様書 に記載されています。
If a nonce value was sent in the Authentication Request, a nonce Claim MUST be present and its value checked to verify that it is the same value as the one that was sent in the Authentication Request.
(訳)nonce値が認証リクエストで送られた場合、nonce Claimが存在し、それが認証リクエス トで送られたものと同じ値であることを検証するためにその値をチェックしなければ ならない[MUST]。
引用:3.1.3.7. ID Token Validation - OpenID Connect Core 1.0
しかし、Auth.js が内部で利用しているライブラリである panva/oauth4webapi が Nonce を検証しているため、自分たちで検証する必要はなさそうです。
コードリーディング:Nonce の検証
以下の handleOAuth 関数は Authorization Code Flow の途中で実行される関数です。
authorizationCodeGrantRequest が Token Endpoint に対してリクエストを実行し、その結果を processAuthorizationCodeResponse 関数に渡しています。
export async function handleOAuth(  params: RequestInternal["query"],  cookies: RequestInternal["cookies"],  options: InternalOptions<"oauth" | "oidc">) {
  // ...
  // Token Endpoint に対してリクエストを実行  let codeGrantResponse = await o.authorizationCodeGrantRequest(    as,    client,    clientAuth,    codeGrantParams,    redirect_uri,    codeVerifier ?? "decoy",    // ...  )
  // ...
  // Token Endpoint のレスポンスを検証している  const processedCodeResponse = await o.processAuthorizationCodeResponse(    as,    client,    codeGrantResponse,    {      expectedNonce: await checks.nonce.use(cookies, resCookies, options),      requireIdToken,    }  )
// ...}processAuthorizationCodeResponse は内部で processAuthorizationCodeOpenIDResponse を呼び出しています。
この関数が ID トークンの Claim を検証しているため、Nonce の検証は不要です。
async function processAuthorizationCodeOpenIDResponse(  as: AuthorizationServer,  client: Client,  response: Response,  expectedNonce: string | typeof expectNoNonce | undefined,  maxAge: number | typeof skipAuthTimeCheck | undefined,  options: JWEDecryptOptions | undefined,): Promise<TokenEndpointResponse> {  const additionalRequiredClaims: (keyof typeof jwtClaimNames)[] = []  // ...
  const result = await processGenericAccessTokenResponse(    as,    client,    response,    additionalRequiredClaims,    options,  )
  const claims = getValidatedIdTokenClaims(result)!
  // ...
  // Claims にある Nonce を検証  } else if (claims.nonce !== expectedNonce) {    throw OPE('unexpected ID Token "nonce" claim value', JWT_CLAIM_COMPARISON, {      expected: expectedNonce,      claims,      claim: 'nonce',    })  }
  return result}
PKCE と Nonce 両方必要?
Section titled “PKCE と Nonce 両方必要?”authorization code injection などの攻撃を防ぐために、PKCE は必須にした方が良いと思っています。
ほかにも、将来的に OAuth 2.1 がリリースされたときに、PKCE が必須になる可能性があるためです。
参考:https://datatracker.ietf.org/doc/html/draft-ietf-oauth-v2-1-12#name-differences-from-oauth-20
Auth.js の場合、Confidential Client になるため Nonce はなくてもそれほど問題にならないと思っています。しかし、ID トークンの整合性チェックを行うことができるため、Nonce を有効にしても良いかもしれません。
参考:https://datatracker.ietf.org/doc/html/draft-ietf-oauth-security-topics#name-pkce
コードリーディングのメモ
Section titled “コードリーディングのメモ”Auth.js のコードリーディングをしたことで分かったことをメモしておきます。
checks のデフォルトを設定している箇所
Section titled “checks のデフォルトを設定している箇所”function normalizeOAuth( c: OAuthConfig<any> | OAuthUserConfig<any>): OAuthConfigInternal<any> | object { // ... const checks = c.checks ?? ["pkce"] // ...}どこで OIDC の Authorization Code Flow が実行されているか
Section titled “どこで OIDC の Authorization Code Flow が実行されているか”結論 Auth.js は panva/oauth4webapi を利用して、Authorization Code Flow をpackages/core/src/lib/actions/callback/oauth/callback.ts に記述している。
ログインボタンを押した後の処理の流れ
Section titled “ログインボタンを押した後の処理の流れ”NextAuth の初期化によって戻り値から signIn を取得できます。
この関数を実行すると何が起こるのか内部を調べてみます。
export const { handlers, signIn, signOut, auth } = NextAuth({..})まず NextAuth 関数の実装は packages/next-auth/src/index.ts にあります。
signIn の内部で lib/actions.js からインポートされた signIn 関数が実行されています。
// ...
import { signIn, signOut, update } from "./lib/actions.js"
// ...
export default function NextAuth(  config:    | NextAuthConfig    | ((request: NextRequest | undefined) => Awaitable<NextAuthConfig>)): NextAuthResult {  // ...  const httpHandler = (req: NextRequest) => Auth(reqWithEnvURL(req), config)  return {    handlers: { GET: httpHandler, POST: httpHandler } as const,    // @ts-expect-error    auth: initAuth(config),    signIn: (provider, options, authorizationParams) => {      return signIn(provider, options, authorizationParams, config)    },    signOut: (options) => {      return signOut(options, config)    },    unstable_update: (data) => {      return update(data, config)    },  }}
インポートされた signIn 関数は packages/next-auth/src/lib/actions.ts にあります。
この関数は、最後に Keycloak のエンドポイントへリダイレクトを行います。リダイレクト先の URL は以下のような形式となります。
http://localhost:8080/realms/myrealm/protocol/openid-connect/auth?response_type=code&client_id=myapp&redirect_uri=httpxxxxxxxxxxx&scope=openid+profile+email参考:Keycloak server OIDC URI endpoints - Keycloak Documentation
つまり、OIDC の Authentication Request が実行されます。
export async function signIn(){
  // shouldRedirect はデフォルトで true になっている  const {    redirect: shouldRedirect = true,    redirectTo,    ...rest  } = options instanceof FormData ? Object.fromEntries(options) : options
  // ...
  // サインインのためのURLを作成  const signInURL = createActionURL(    "signin",    // @ts-expect-error `x-forwarded-proto` is not nullable, next.js sets it by default    headers.get("x-forwarded-proto"),    headers,    process.env,    config  )
  // ...
  // 今回の場合、url は'http://localhost:3000/api/auth/signin/keycloak?' になる  let url = `${signInURL}/${provider}?${new URLSearchParams(    authorizationParams  )}`

  // Next.jsのサーバー側への初回リクエスト (singIn)は POST メソッドで行われる  const req = new Request(url, { method: "POST", headers, body })  const res = await Auth(req, { ...config, raw, skipCSRFCheck })
  // ...
  // Cookieを設定している  // このCookieには、Callback URL やPKCE、Nonceなどの情報が含まれている  const cookieJar = await cookies()  for (const c of res?.cookies ?? []) cookieJar.set(c.name, c.value, c.options)
  // res.redirect の値をresponseUrlに代入  const responseUrl =    res instanceof Response ? res.headers.get("Location") : res.redirect
  const redirectUrl = responseUrl ?? url
  // shouldRedirect は (オプションをいじっていない限り)true なので、ここでリダイレクトされる  if (shouldRedirect) return redirect(redirectUrl)
  return redirectUrl as any}
コードリーディング:Auth 関数の内部を見てみる
先ほどの関数に、const res = await Auth(req, { ...config, raw, skipCSRFCheck }) とありました。ここをもう少し詳しく見てみます。
AuthInternal 関数が呼び出され、その結果を使用しているようです。
export async function Auth(  request: Request,  config: AuthConfig): Promise<Response | ResponseInternal> {  // ...
 try {    const internalResponse = await AuthInternal(internalRequest, config)    if (isRaw) return internalResponse
    const response = toResponse(internalResponse)    const url = response.headers.get("Location")
    if (!isRedirect || !url) return response
return Response.json({ url }, { headers: response.headers }) } catch (e) { // ... }}次は AuthInternal 関数を覗いてみます。ログインボタンを押して、signIn 関数を実行した場合、method は “POST” になり、action は “signin” になります。そのため、条件分岐の結果として actions.signIn 関数が呼び出されます。
// ...import * as actions from "./actions/index.js"// ...
export async function AuthInternal(  request: RequestInternal,  authOptions: AuthConfig): Promise<ResponseInternal> {  // method = "POST"、action = "signin" です。  const { action, providerId, error, method } = request
  if (method === "GET") {    // ...  } else {    const { csrfTokenVerified } = options    switch (action) {      case "callback":        // ...      case "session":        // ...      case "signin":        validateCSRF(action, csrfTokenVerified)        return await actions.signIn(request, cookies, options)
case "signout": validateCSRF(action, csrfTokenVerified) return await actions.signOut(cookies, sessionStore, options) default: } }}Keycloak の provider.type は oidc なので、getAuthorizationUrl 関数が呼び出されます。
export async function signIn(  request: RequestInternal,  cookies: Cookie[],  options: InternalOptions): Promise<ResponseInternal> {  const signInUrl = `${options.url.origin}${options.basePath}/signin`
  if (!options.provider) return { redirect: signInUrl, cookies }
switch (options.provider.type) { case "oauth": case "oidc": { const { redirect, cookies: authCookies } = await getAuthorizationUrl( request.query, options ) if (authCookies) cookies.push(...authCookies) return { redirect, cookies } } case "email": { // ... } default: return { redirect: signInUrl, cookies } }}getAuthorizationUrl 関数の中では、Cookie の値と、Authroization Endpoint の URL を生成しています。
export async function getAuthorizationUrl(  query: RequestInternal["query"],  options: InternalOptions<"oauth" | "oidc">) {  const { logger, provider } = options
  let url = provider.authorization?.url
  // ...
  const authParams = url.searchParams
  // ...
  // Authorization Reqeust に含めるパラメータを設定している  const params = Object.assign(    {      response_type: "code",      // clientId can technically be undefined, should we check this in assert.ts or rely on the Authorization Server to do it?      client_id: provider.clientId,      redirect_uri,      // @ts-expect-error TODO:      ...provider.authorization?.params,    },    Object.fromEntries(provider.authorization?.url.searchParams ?? []),    query  )
  for (const k in params) authParams.set(k, params[k])
  const cookies: Cookie[] = []
  // ...
  // pkce が有効な場合、code_challenge と code_challenge_method を設定する  if (provider.checks?.includes("pkce")) {    if (as && !as.code_challenge_methods_supported?.includes("S256")) {      // We assume S256 PKCE support, if the server does not advertise that,      // a random `nonce` must be used for CSRF protection.      if (provider.type === "oidc") provider.checks = ["nonce"]    } else {      const { value, cookie } = await checks.pkce.create(options)      authParams.set("code_challenge", value)      authParams.set("code_challenge_method", "S256")      cookies.push(cookie)    }  }
  const nonce = await checks.nonce.create(options)  if (nonce) {    authParams.set("nonce", nonce.value)    cookies.push(nonce.cookie)  }
  // TODO: This does not work in normalizeOAuth because authorization endpoint can come from discovery  // Need to make normalizeOAuth async  if (provider.type === "oidc" && !url.searchParams.has("scope")) {    url.searchParams.set("scope", "openid profile email")  }
logger.debug("authorization url is ready", { url, cookies, provider }) return { redirect: url.toString(), cookies }}今回は、Next.js と Keycloak を使ったログイン機能の実装において、セッションの有効期限設定と OIDC のセキュリティ強化について学びました。具体的には、 セッション時間の設定、PKCE の有効化、Nonce の設定方法をコードリーディングして理解しました。