keycloakify を使って Keycloak のカスタムテーマを作成する環境を構築する
Keycloak のログイン画面などのテーマは自分でカスタマイズできます。昨今のフロントエンドでは、React や Vue を選択している企業も多いと思います。しかし、Keycloak のドキュメントにある Themes を読むと、HTML を使ってカスタマイズする方法しか書かれていません。さらに、実際にデプロイする場合は、JAR 形式にする必要があります。
参考:Deploying themes - Keycloak Documentation
React でカスタムテーマを作成する方法を探したところ、keycloakify というツールを見つけました。
この記事では、keycloakify を実行できる環境を VS Code と devcontainer を使って構築します。
https://github.com/kntks/blog-code/tree/main/2024/04/setup-keycloakify
| バージョン | |
|---|---|
| Mac | Ventura 13.2.1 |
| Keycloak | 23.0.6 |
| Docker | 26.0.0 |
| Docker Compose | v2.24.5 |
| Terraform | 1.7.4 |
| Node.js | 20.12.2 |
keycloakify-starter のクローン
Section titled “keycloakify-starter のクローン”keycloakify-starter をクローンして環境構築します。
git clone --depth 1 https://github.com/keycloakify/keycloakify-starter.git setup-keycloakifycd setup-keycloakify不要なディレクトリやファイルを削除します
rm -rf src/Apprm .dockerignore Dockerfile nginx.confrm -rf .gitdevcontainer の設定
Section titled “devcontainer の設定”yarn build-keycloak-theme コマンドを実行すると .jar ファイルが作成できます。しかし、実行のためにはローカル環境に Java と Maven が必要です。私は Java について詳しくないため、devcontainer を使用して環境を構築します。
FROM node:20.12-bookworm-slimRUN apt-get update && \ apt-get install -y git && \ apt-get install -y openjdk-17-jdk && \ apt-get install -y maven;WORKDIR /workspaceRUN yarn install --frozen-lockfile{ "name": "Keycloakify Starter Devcontainer", "build": { "dockerfile": "../Dockerfile", "context": ".", "args": { } }, "workspaceFolder": "/workspaces", "workspaceMount": "source=${localWorkspaceFolder},target=/workspaces,type=bind,consistency=cached", "features": {}, "postCreateCommand": "yarn install", "customizations": { "vscode": { "extensions": ["dbaeumer.vscode-eslint", "esbenp.prettier-vscode"] } }}devcontainer の起動
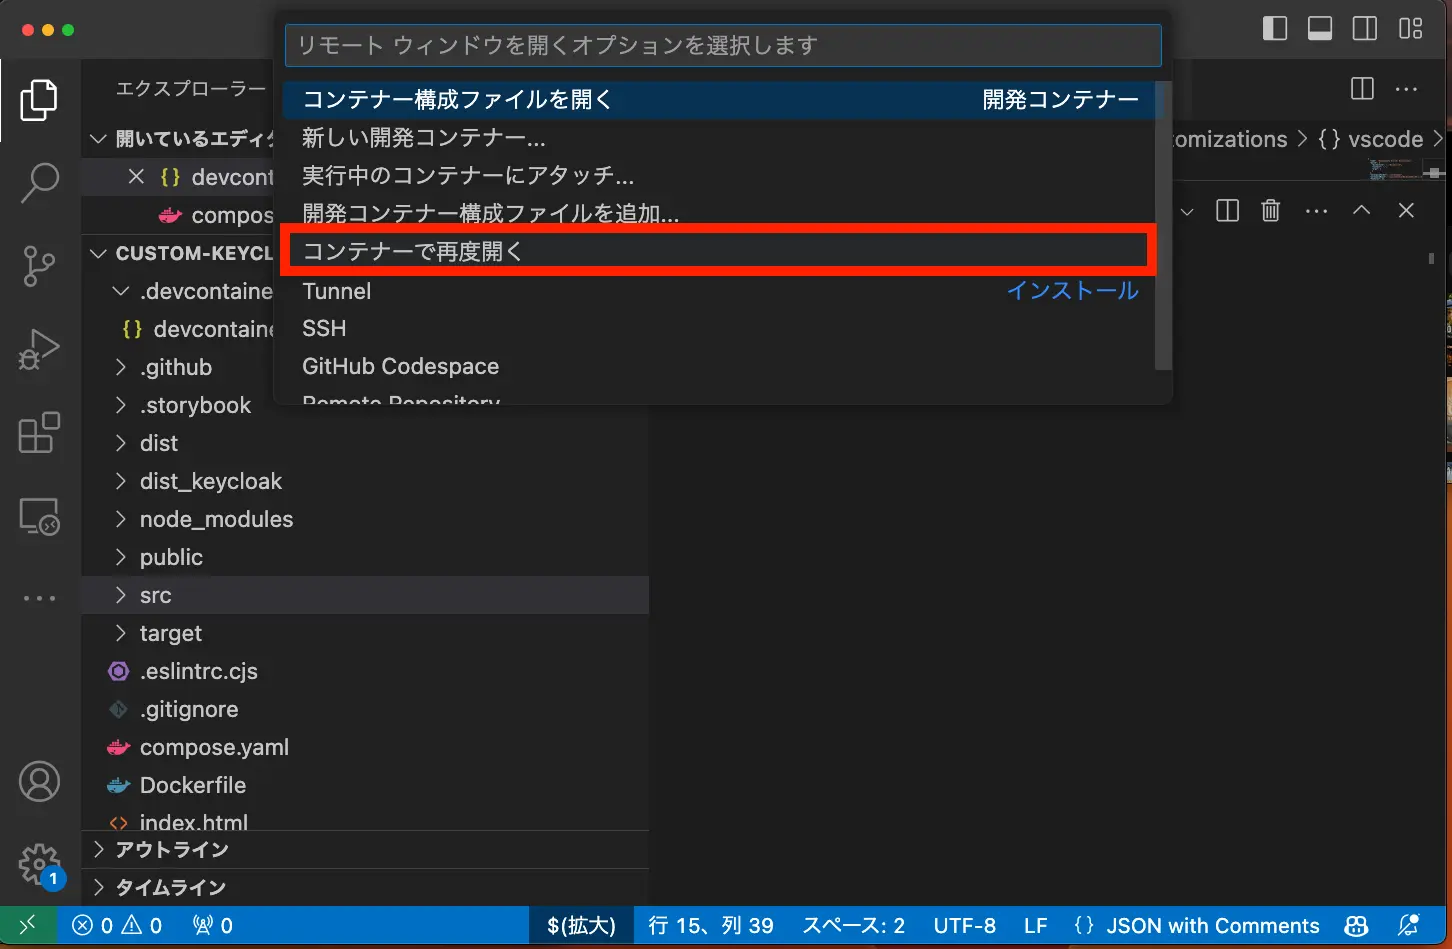
Section titled “devcontainer の起動”VS Code の左下に >< が表示されていると思うので、クリックしてください。
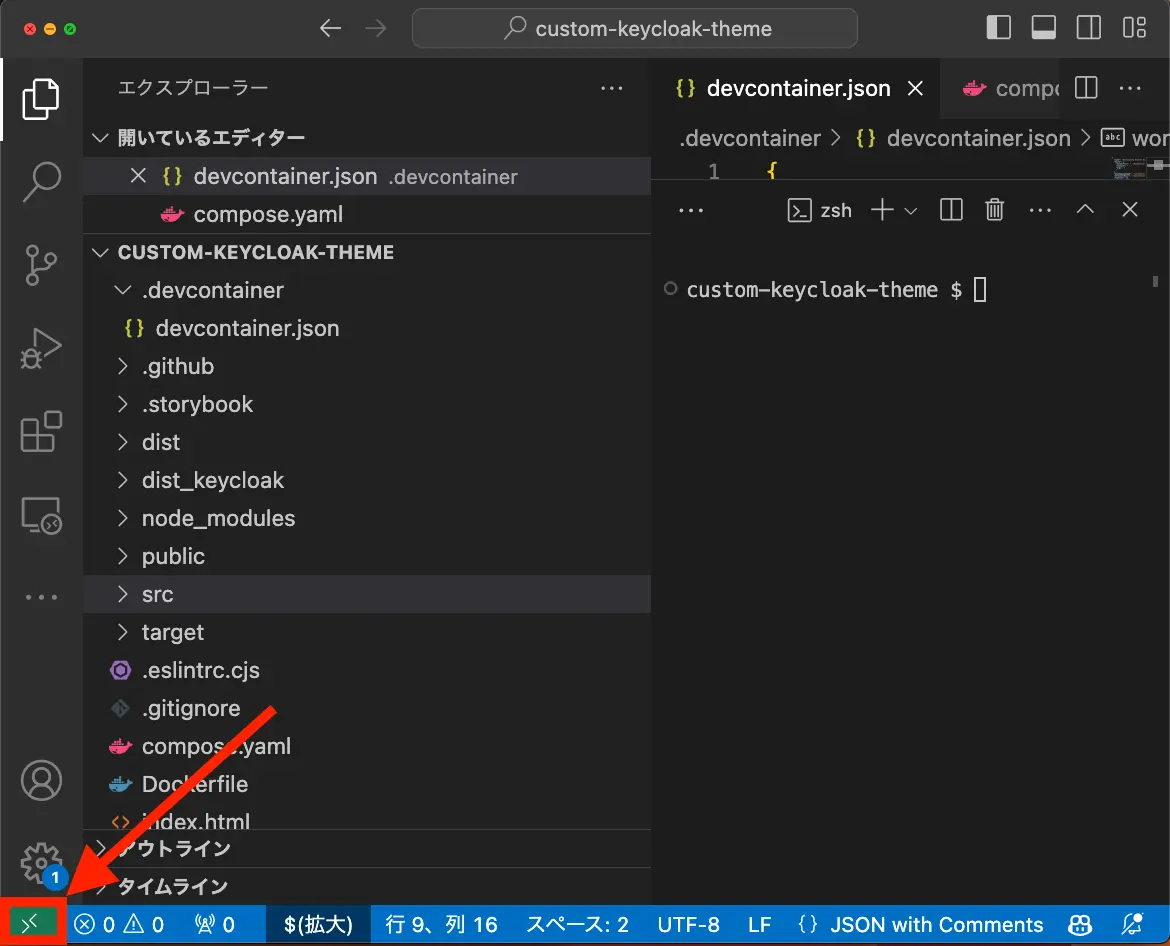
すると、コンテナーで再度開く が表示されるはずです。そこをクリックすると、devcontainer が起動します。
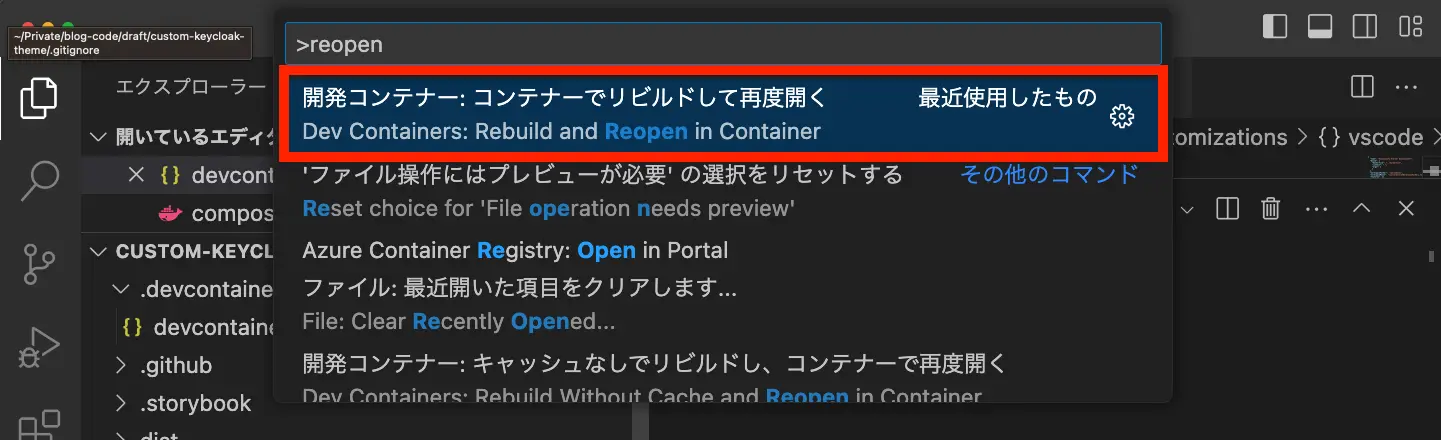
ちなみに、コマンドパレット(Mac だと Command + Shift + P)を開いて Dev Containers: Rebuild and Reopen in Container を選択しても起動できます。
devcontainer が起動した場合、すでに yarn install が実行されているはずなので、VS Code でターミナルを開いて yarn build-keycloak-theme を実行します。
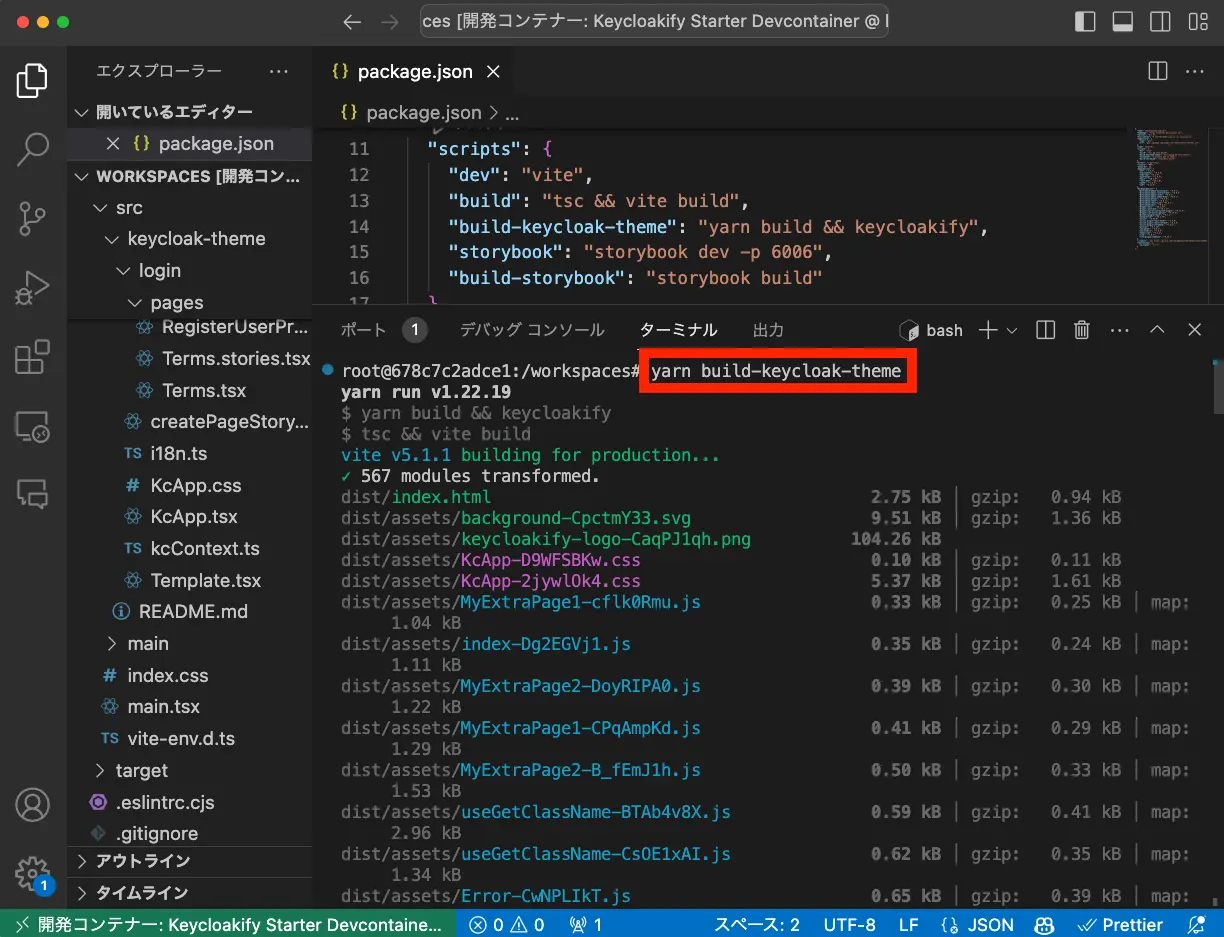
ビルドに成功すると、dist_keycloak ディレクトリが作成されます。
さらに、Keycloak のコンテナイメージを起動するスクリプトが用意されるので、スクリプトを確認してみます。
To test your theme locally you can spin up a Keycloak 23.0.6 container image with the theme pre loaded by running:
👉 $ ./dist_keycloak/start_keycloak_testing_container.sh 👈
ビルド成功時の出力全文
🔏 Building the keycloak theme...⌚
✅ Your keycloak theme has been generated and bundled into ./dist_keycloak/target/keycloakify-starter-keycloak-theme-6.1.7.jar 🚀
To test your theme locally you can spin up a Keycloak 23.0.6 container image with the theme pre loaded by running:
👉 $ ./dist_keycloak/start_keycloak_testing_container.sh 👈
Once your container is up and running:- Log into the admin console 👉 http://localhost:8080/admin username: admin, password: admin 👈- Create a realm:                       Master         -> AddRealm   -> Name: myrealm- Enable registration:                  Realm settings -> Login tab  -> User registration: on- Enable the Account theme (optional):  Realm settings -> Themes tab -> Account theme: keycloakify-starter                                        Clients        -> account    -> Login theme:   keycloakify-starter- Enable the email theme (optional):    Realm settings -> Themes tab -> Email theme:   keycloakify-starter (option will appear only if you have ran npx initialize-email-theme)- Create a client                       Clients        -> Create     -> Client ID:                       myclient                                                                        Root URL:                        https://www.keycloak.org/app/                                                                        Valid redirect URIs:             https://www.keycloak.org/app* http://localhost* (localhost is optional)                                                                        Valid post logout redirect URIs: https://www.keycloak.org/app* http://localhost*                                                                        Web origins:                     *                                                                        Login Theme:                     keycloakify-starter                                                                        Save (button at the bottom of the page)
- Go to  👉  https://www.keycloak.org/app/ 👈 Click "Save" then "Sign in". You should see your login page- Got to 👉  http://localhost:8080/realms/myrealm/account 👈 to see your account theme
Video tutorial: https://youtu.be/WMyGZNHQkjU
Done in 117.67s.以下のスクリプトを確認すると、/workspace/dist_keycloak ディレクトリに移動してから、docker コマンドを実行していることがわかります。
devcontainer 内でさらにコンテナの起動を(個人的に)やりたくないため、Docker Compose を用意し devcontainer の外で実行します。
#!/usr/bin/env bash
docker rm keycloak-testing-container || true
cd "/workspaces/dist_keycloak"
docker run \   -p 8080:8080 \   --name keycloak-testing-container \   -e KEYCLOAK_ADMIN=admin \   -e KEYCLOAK_ADMIN_PASSWORD=admin \   -v "$(pwd)/target/keycloakify-starter-keycloak-theme-6.1.7.jar":"/opt/keycloak/providers/keycloakify-starter-keycloak-theme-6.1.7.jar" \   -v "$(pwd)/src/main/resources/theme/account-v1":"/opt/keycloak/themes/account-v1":rw \   -v "$(pwd)/src/main/resources/theme/keycloakify-starter":"/opt/keycloak/themes/keycloakify-starter":rw \   -v "$(pwd)/src/main/resources/theme/keycloakify-starter_retrocompat":"/opt/keycloak/themes/keycloakify-starter_retrocompat":rw \   -it quay.io/keycloak/keycloak:23.0.6 \   start-dev --features=declarative-user-profile
Docker Compose の設定
Section titled “Docker Compose の設定”dist_keycloak/start_keycloak_testing_container.sh の内容を Docker Compose にしました。これにより devcontainer 内部でコンテナを起動しなくてもよくなります。さらにdocker compose up や docker compose down でコンテナを起動・停止できます。
services: keycloak: image: quay.io/keycloak/keycloak:23.0.6 ports: - target: 8080 published: 8080 protocol: tcp mode: host volumes: - ./dist_keycloak/target/keycloakify-starter-keycloak-theme-6.1.7.jar:/opt/keycloak/providers/keycloakify-starter-keycloak-theme-6.1.7.jar - ./dist_keycloak/src/main/resources/theme/account-v1:/opt/keycloak/themes/account-v1 - ./dist_keycloak/src/main/resources/theme/keycloakify-starter:/opt/keycloak/themes/keycloakify-starter - ./dist_keycloak/src/main/resources/theme/keycloakify-starter_retrocompat:/opt/keycloak/themes/keycloakify-starter_retrocompat environment: - KEYCLOAK_ADMIN=admin - KEYCLOAK_ADMIN_PASSWORD=admin command: - start-dev - --spi-theme-static-max-age=-1 - --spi-theme-cache-themes=false - --spi-theme-cache-templates=false - --features=declarative-user-profileVS Code とは別のターミナルを開いて、docker compose up を実行します。
http://localhost:8080/admin/ にアクセスすると Keycloak のログイン画面が表示されるので、ユーザ名 admin、パスワード admin でログインします。
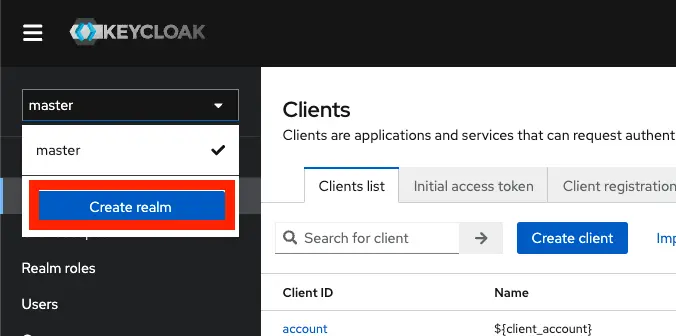
Keycloak の設定
Section titled “Keycloak の設定”ログインした後、画面左上から、Create realm を選択します。 Releam name は myrealm とします。
Realm settings -> Login tab -> User registration を on にします。

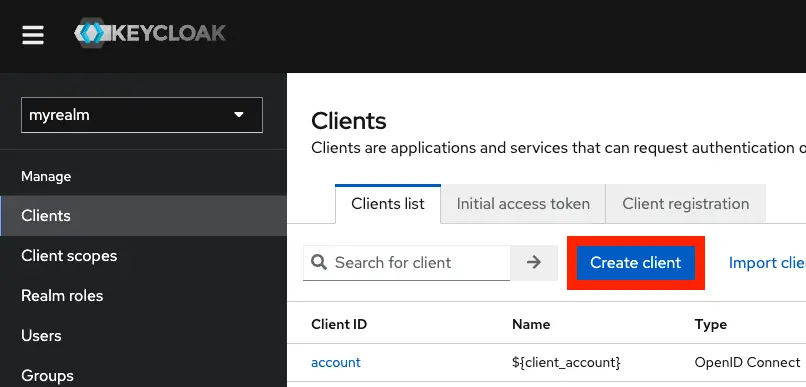
Clients -> Create でクライアントを作成します。
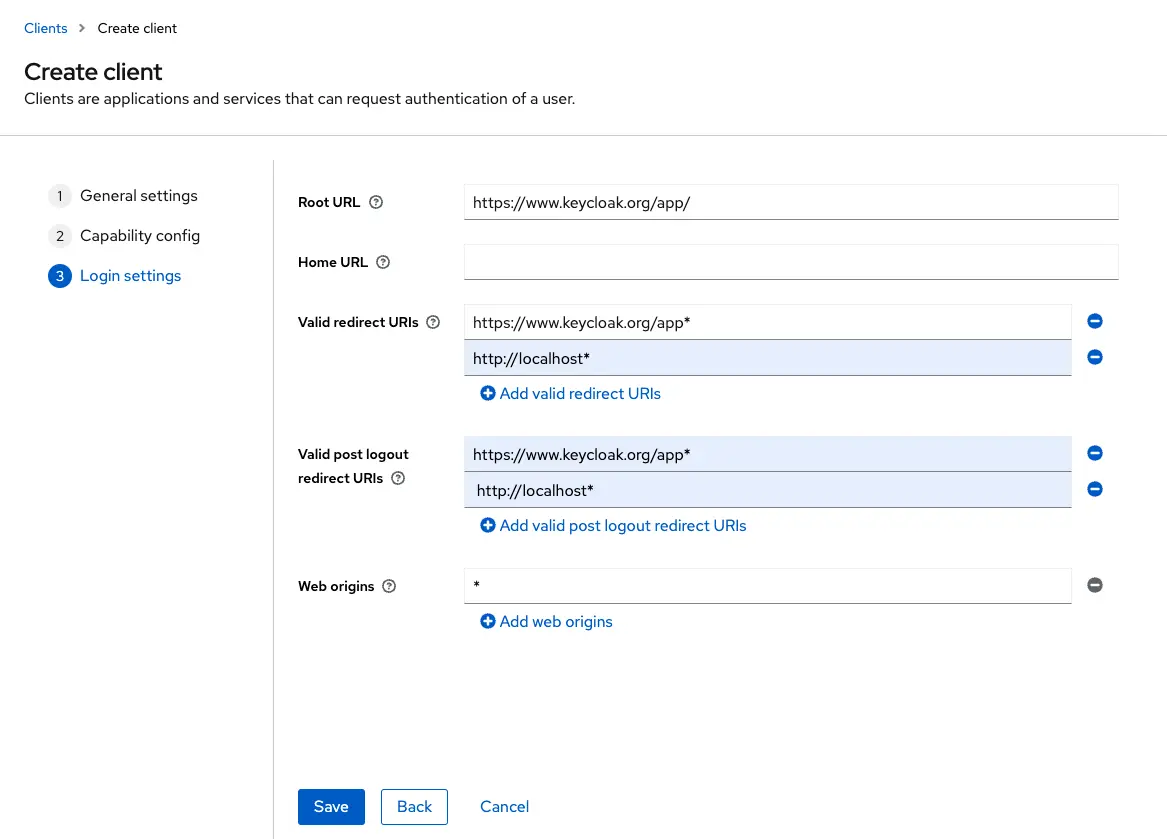
Client ID は myclient、Root URL は https://www.keycloak.org/app/、Valid redirect URIs は https://www.keycloak.org/app* http://localhost*、Valid post logout redirect URIs は https://www.keycloak.org/app* http://localhost*、Web origins は * とします。
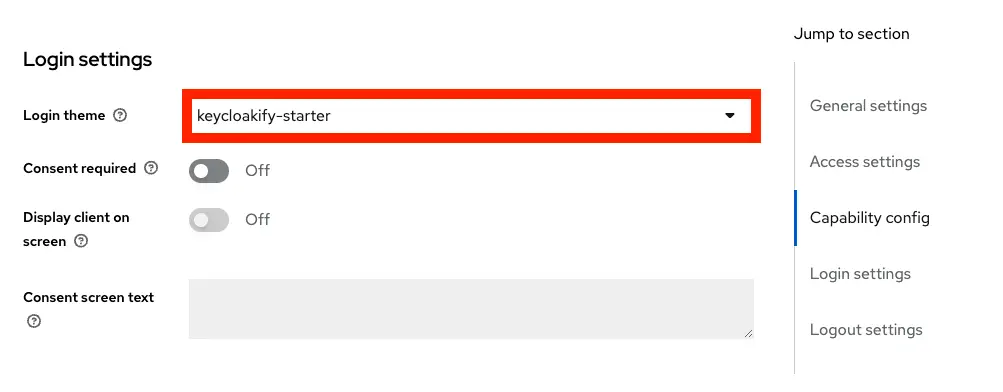
myclient 作成後、左のナビゲーションペインから Clients -> myclient -> Settings -> Login settings にある Login Theme を keycloakify-starter にします。
テーマを確認する
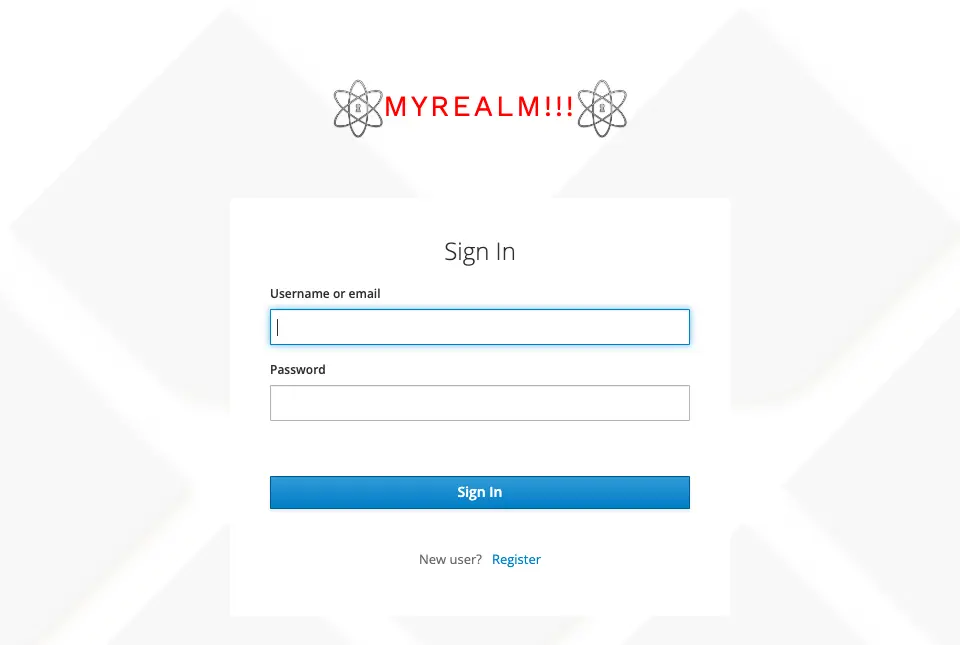
Section titled “テーマを確認する”https://www.keycloak.org/app/ にアクセスした後、Save をクリックします。
その後、Sign in をクリックするとカスタムテーマが適用されたログイン画面が表示されます。
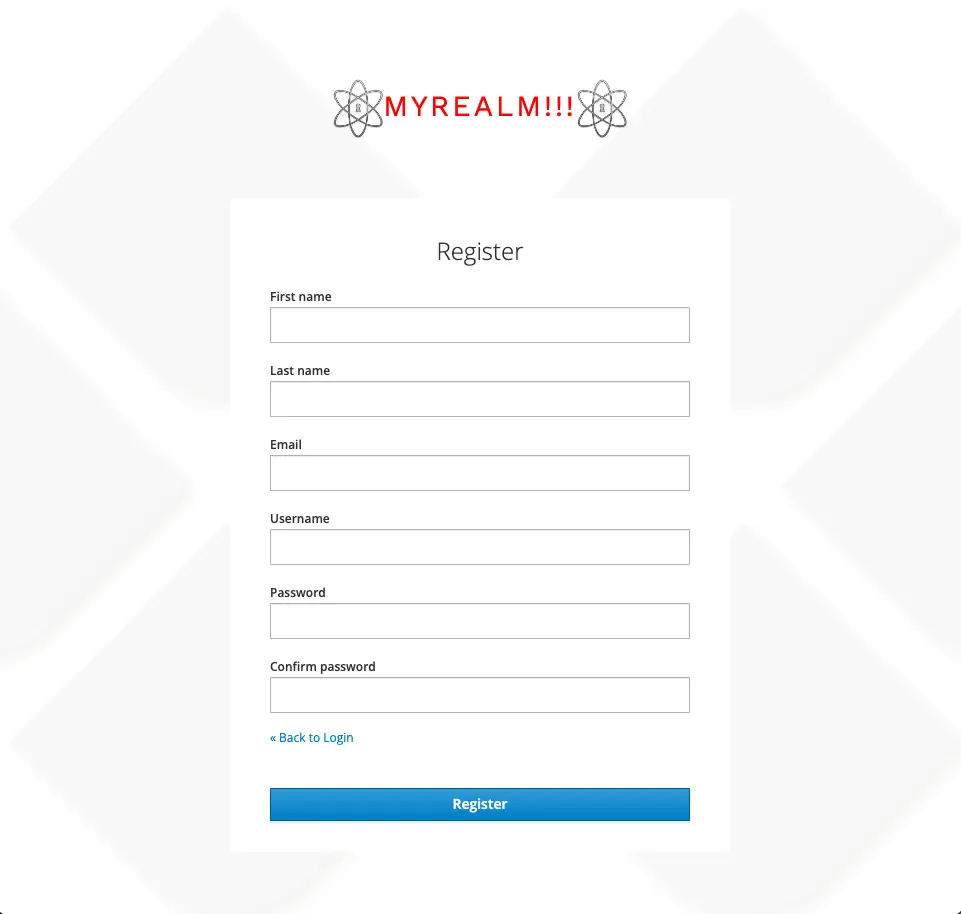
Register をクリックすると、ユーザ登録画面が表示されます。
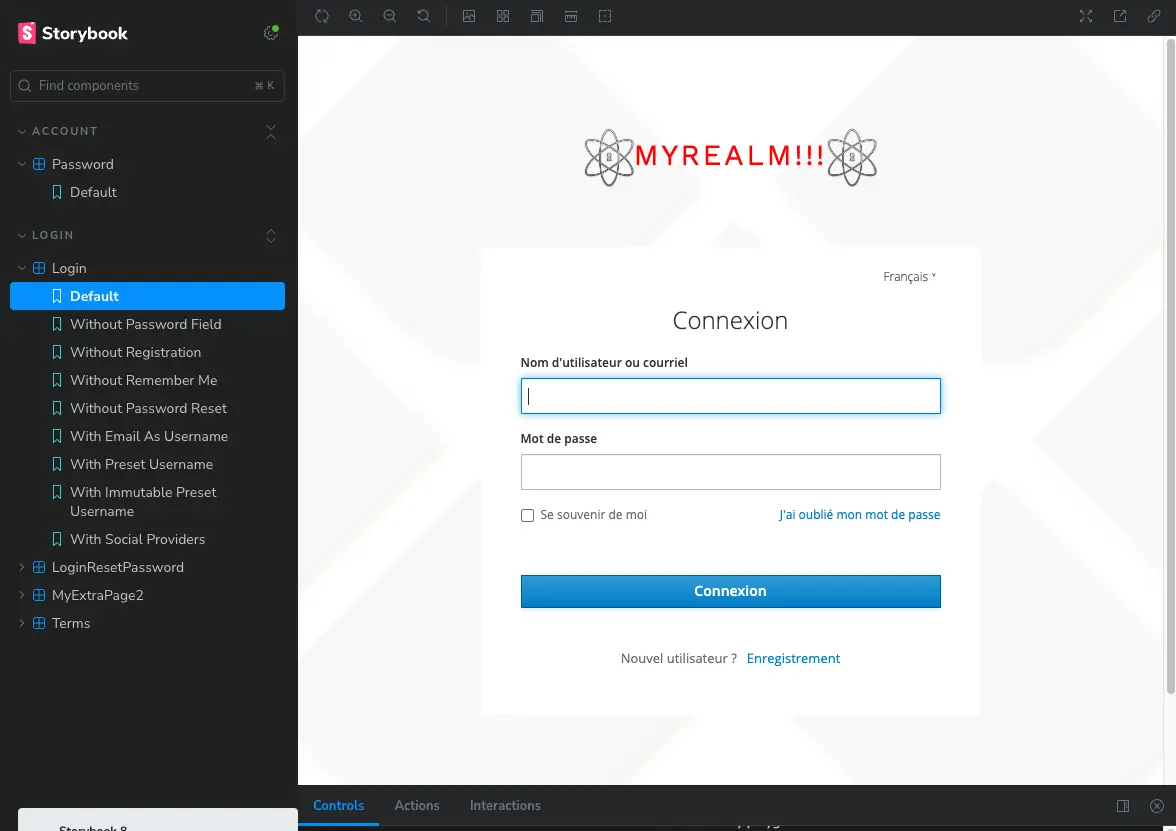
stroybook を起動する
Section titled “stroybook を起動する”VS Code のターミナルで yarn storybook を実行します。
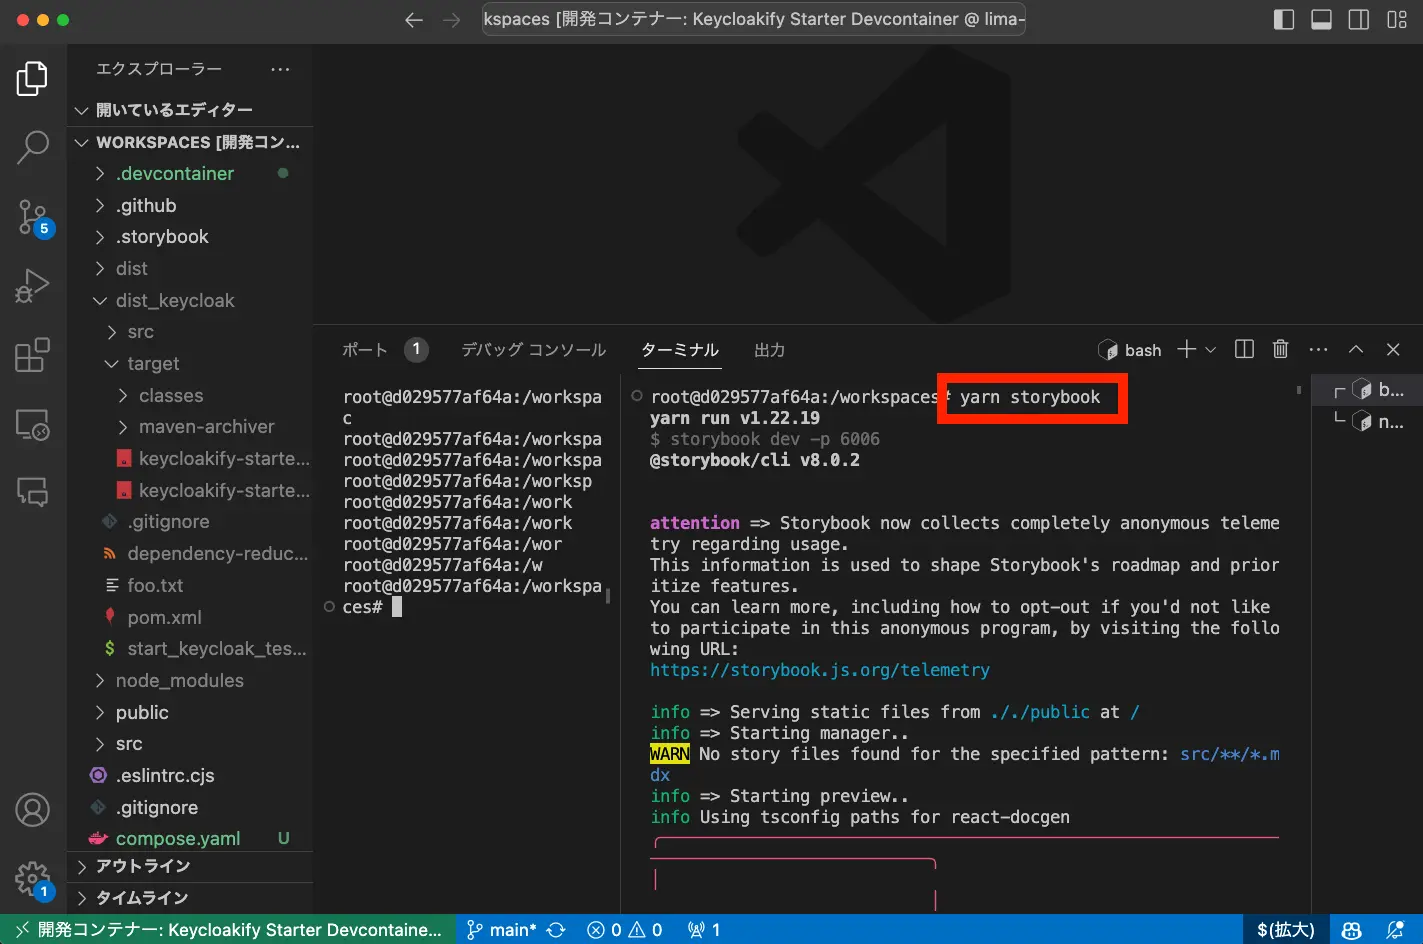
http://localhost:6006/ にアクセスすると、storybook が表示されます。
設定を変更するたびに、yarn build-keycloak-theme の実行と Keycloak の再起動が必要なため、開発するときは、storybook で確認した方が効率的です。