KeycloakとGo言語でAuthorization Code Flowを学ぶ
Keycloakのチュートリアルを実行した結果、レルムやユーザーを作成することはできましたが、これだけでは認証・認可の機能は実現できません。そこで、実際にGo言語でAPIサーバーを構築し、Keycloak と組み合わせてログインフローを実装することで、より深く理解しようと思いました。
今回は学習記録を備忘録として記事にします。
https://github.com/kntks/blog-code/2024/02/keycloak-authorization-code-flow
- Keycloak で OpenID Connect の設定をする
- Go言語でサーバーを起動する
- ブラウザで http://localhost:8080/login にアクセスするとKeycloakのログイン画面にリダイレクトされる
- ログイン完了後、http://localhost:8080/home にリダイレクトされる
| バージョン | |
|---|---|
| Mac | Ventura 13.2.1 |
| Keycloak | 23.0.6 |
| Docker | 25.0.3 |
| Docker Compose | v2.24.5 |
| Terraform | 1.7.3 |
| Go | 1.22.0 |
Terraform と Docker でセットアップ
Section titled “Terraform と Docker でセットアップ”Keycloak を docker compose で起動します。
services: keycloak: image: quay.io/keycloak/keycloak:23.0.6 ports: - target: 8080 published: 8080 protocol: tcp mode: host environment: - KEYCLOAK_ADMIN=admin - KEYCLOAK_ADMIN_PASSWORD=admin command: ["start-dev"]前回記事で書いた、keycloak-providerを使ってみる、と同じ設定を使うため、同じコードで apply します。
cd terraformterraform initterraform planterraform apply -auto-approveOpenID Connect クライアントを作成する
Section titled “OpenID Connect クライアントを作成する”http://localhost:8080/admin から Username: admin、Password: admin でサインインします。
Create client ボタンを押します。
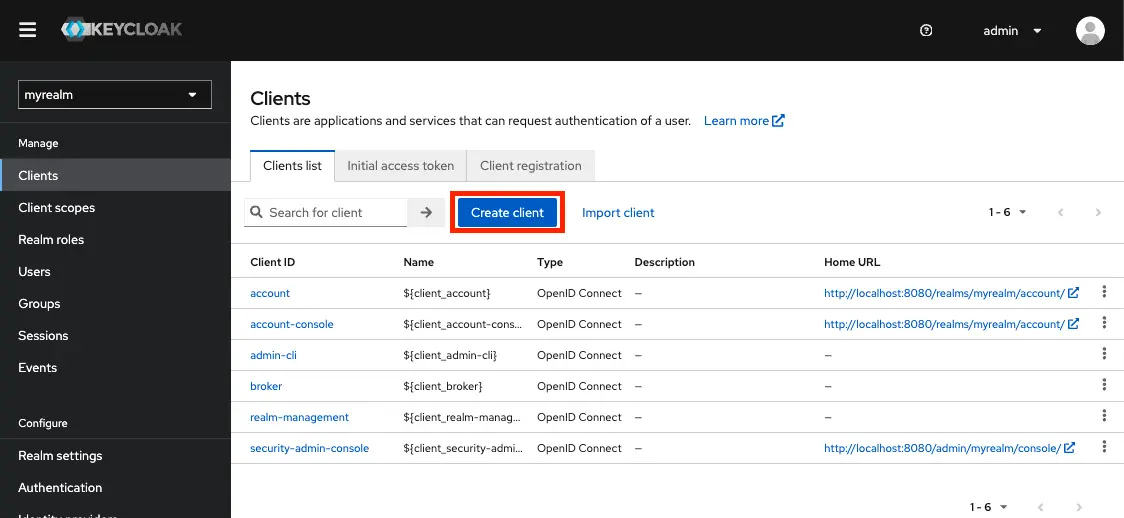
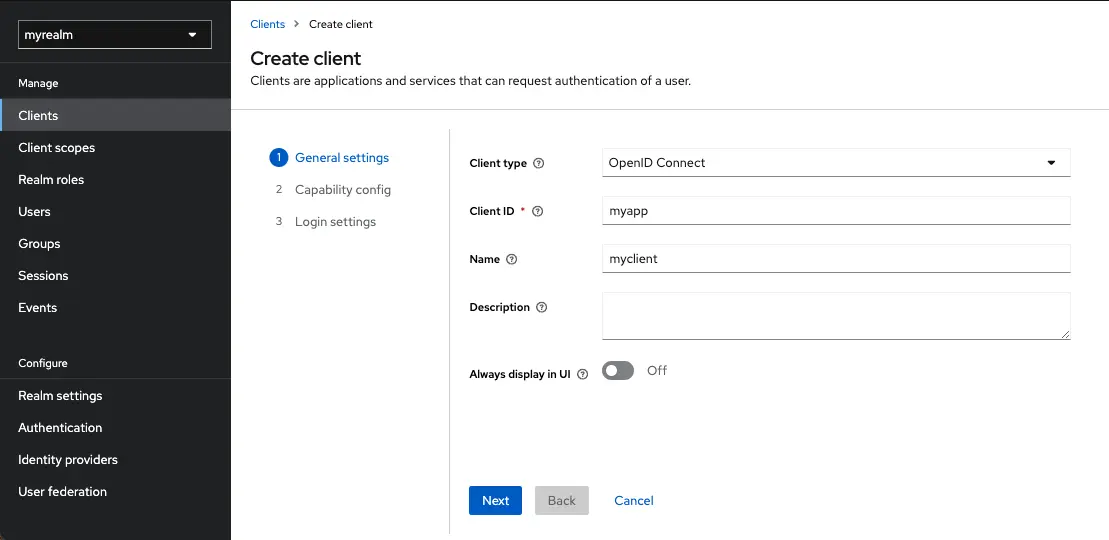
Client type = OpenID Connect、 Client ID = myapp、 Client Name = myclient に設定し Next ボタンを押します。(Client type は後から設定変更できません)
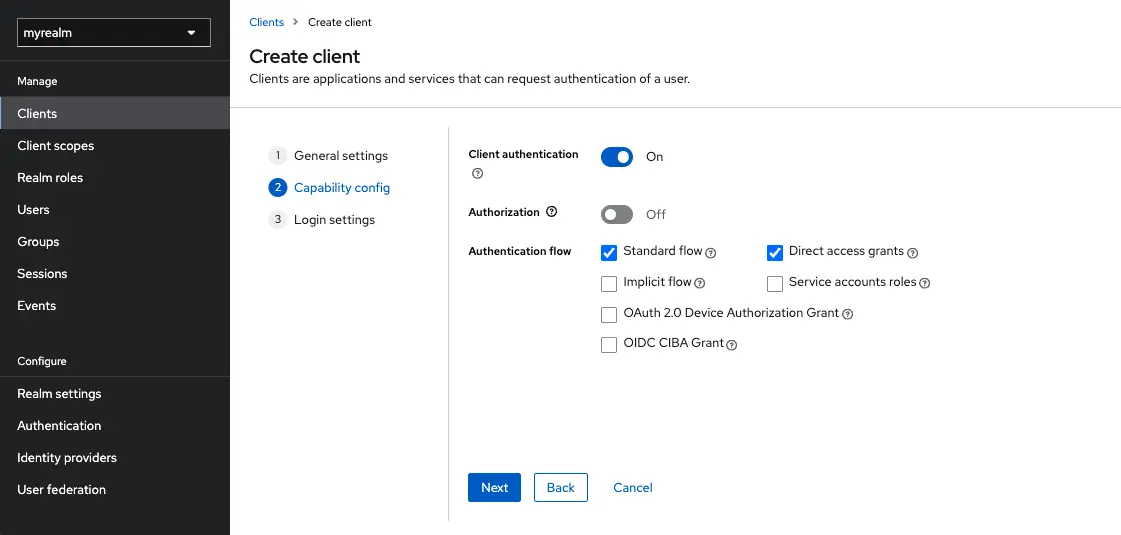
Capability config では以下のように設定します。(後から設定変更できます)
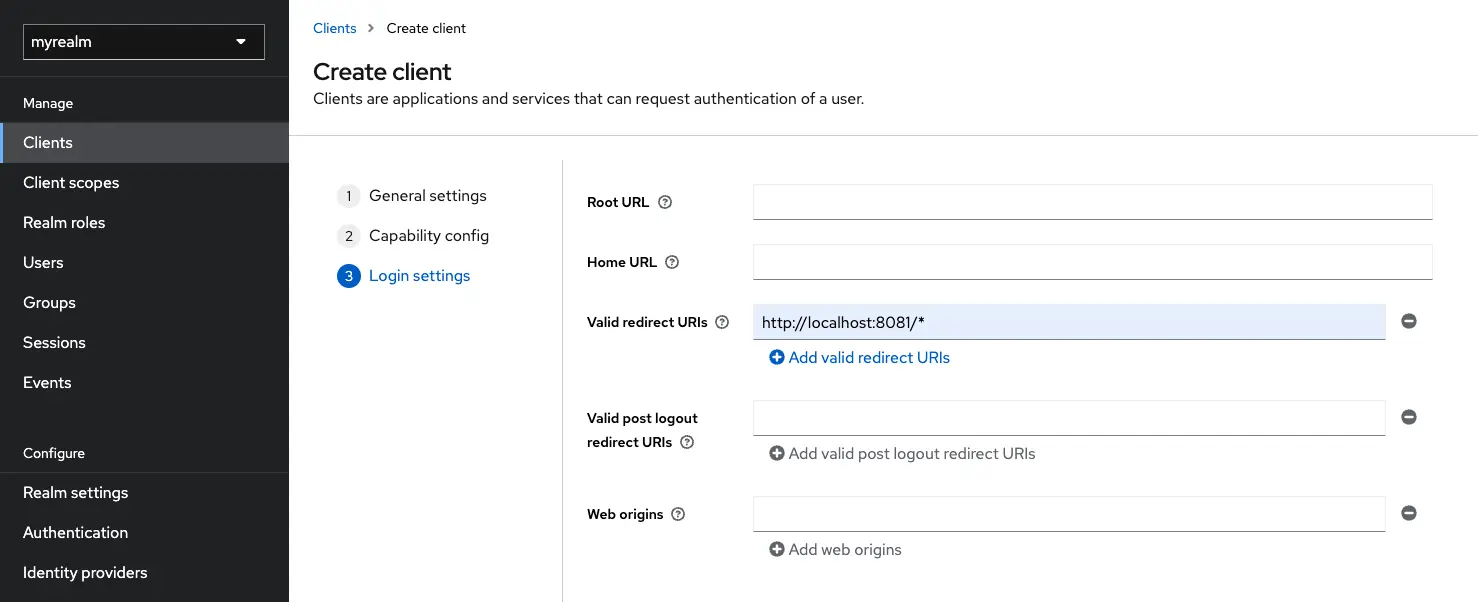
Login settings では以下のようにセットします。(後から設定変更できます)
Managing OpenID Connect clients - Keycloak Documentation
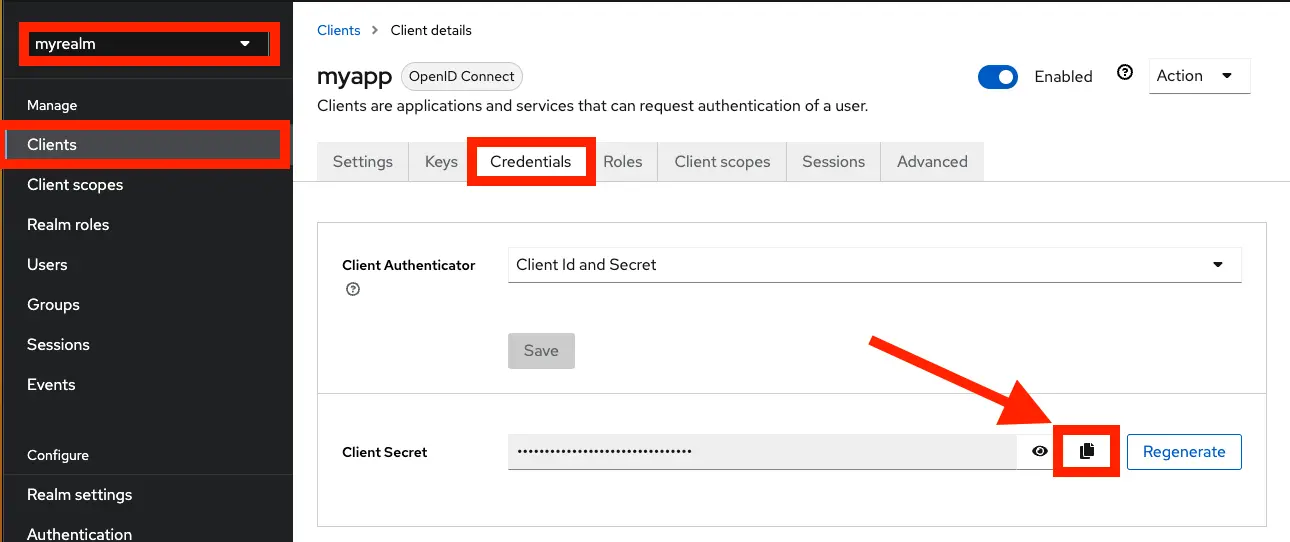
myapp の詳細ページにある Credentials タブから Client Secret を取得できます
OpenID Connect Endpoints
Section titled “OpenID Connect Endpoints”OpenID Connect を使用するとき Keycloak で使用できるパスです。
/realms/{realm-name}/.well-known/openid-configuration/realms/{realm-name}/protocol/openid-connect/auth/realms/{realm-name}/protocol/openid-connect/token/realms/{realm-name}/protocol/openid-connect/logout/realms/{realm-name}/protocol/openid-connect/certs/realms/{realm-name}/protocol/openid-connect/token/introspect/realms/{realm-name}/clients-registrations/openid-connect/realms/{realm-name}/protocol/openid-connect/revoke/realms/{realm-name}/protocol/openid-connect/auth/device/realms/{realm-name}/protocol/openid-connect/ext/ciba/auth
引用:
- 2.1. Available Endpoints - Keycloak Documentation
- Keycloak server OIDC URI endpoints - Keycloak Documentation
エンドポイントを調べる
Section titled “エンドポイントを調べる”実際に /realms/{realm-name}/.well-known/openid-configuration にリクエストすることで使用できるエンドポイントを確認できます。
$ curl -s http://localhost:8080/realms/myrealm/.well-known/openid-configuration | jq -M 'with_entries(select(.key | endswith("_endpoint") or test("jwks_uri")))'{ "authorization_endpoint": "http://localhost:8080/realms/myrealm/protocol/openid-connect/auth", "token_endpoint": "http://localhost:8080/realms/myrealm/protocol/openid-connect/token", "introspection_endpoint": "http://localhost:8080/realms/myrealm/protocol/openid-connect/token/introspect", "userinfo_endpoint": "http://localhost:8080/realms/myrealm/protocol/openid-connect/userinfo", "end_session_endpoint": "http://localhost:8080/realms/myrealm/protocol/openid-connect/logout", "jwks_uri": "http://localhost:8080/realms/myrealm/protocol/openid-connect/certs", "registration_endpoint": "http://localhost:8080/realms/myrealm/clients-registrations/openid-connect", "revocation_endpoint": "http://localhost:8080/realms/myrealm/protocol/openid-connect/revoke", "device_authorization_endpoint": "http://localhost:8080/realms/myrealm/protocol/openid-connect/auth/device", "backchannel_authentication_endpoint": "http://localhost:8080/realms/myrealm/protocol/openid-connect/ext/ciba/auth", "pushed_authorization_request_endpoint": "http://localhost:8080/realms/myrealm/protocol/openid-connect/ext/par/request"}Go 言語で OpenID Connect Endpoints を実行してみる
Section titled “Go 言語で OpenID Connect Endpoints を実行してみる”Keycloak で Client を作成したとき、Capability config の Authentication flow は、Standard flow にチェックを入れました。この設定をすることで Authorization Code Flow にしたがって、ID トークンとアクセストークンを取得できます。
Authorization Code Flow はブラウザベースのプロトコルで、ブラウザベースのアプリケーションの認証と認可に適しています。ブラウザのリダイレクトを使用して、IDおよびアクセストークンを取得します。
Authorization Code Flow は以下の手順で行われます。
- ブラウザでアプリケーションにアクセス(今回は、
http://localhost:8081/login)すると、ブラウザは Keycloak のログイン画面にリダイレクトする - ユーザーが Keycloak のログイン画面に認証情報(ユーザー名、パスワード)を入力する
- Keycloak はユーザーを認証し、1回限りかつ短期間の一時的なコード(Authorization Code)を作成する
- Keycloak は callback URL を使用してアプリケーションにリダイレクトし、callback URL のクエリーパラメーターに一時的なコードを追加する
- アプリケーションは一時的なコードを取り出し、バックグラウンドで Keycloak のトークンエンドポイントを呼び出して、コードとID、アクセストークン、リフレッシュトークンを交換する
- ブラウザはアプリケーション(今回は、
http://localhost:8081/home)にリダイレクトされる
Authorization Code を確認してみる
Section titled “Authorization Code を確認してみる”Keycloak のドキュメントと、先ほどエンドポイントを調べた結果、http://localhost:8080/realms/myrealm/protocol/openid-connect/auth にリクエストすると Authorization Code が取得できることがわかりました。
Authorization Endpoint は、GET または POST メソッドを実装している必要があるので、HTTP メソッドはどちらでも良さそうです。
Authorization Server は Authorization Endpoint において RFC 2616 [RFC2616] で定義された HTTP GET メソッドと HTTP POST メソッドをサポートしなければならない (MUST)
引用:Authorization Endpoint - OpenID Connect 1.0 specification 日本語訳
リクエストパラメーターは以下の通りです。
- scope (REQUIRED)
- OpenID Connect リクエストは scope に
openidを含める
- OpenID Connect リクエストは scope に
- response_type (REQUIRED)
- Authorization Code Flow を使用する場合、値は code
- client_id (REQUIRED)
- redirect_uri (REQUIRED)
- state (RECOMMENDED)
- 一般的に Cross-Site Request Forgery (CSRF, XSRF) 対策の目的で利用される、 ブラウザ Cookie と紐づく暗号論的にセキュアな値を取る
追加で以下のパラメーターも使用できます
- nonce
- display
- prompt
- max_age
- ui_locales
- id_token_hint
- login_hint
- acr_values
参考:
- Authorization Endpoint - OpenID Connect 1.0 specification
- Authorization Endpoint - OpenID Connect 1.0 specification 日本語訳
このセクションでは、Keycloak のサインイン画面から認証し、code を取得します。
package main
import ( "encoding/json" "fmt" "log" "net/http" "net/url")
const ( keycloakRealm = "myrealm" keycloakURL = "http://localhost:8080/realms/" + keycloakRealm clientID = "myapp" clientSecret = "" // Keycloakの管理画面からコピーしたクライアントシークレットをセットする)
func main() { http.HandleFunc("/login", handleLogin) http.HandleFunc("/callback", handleCallback)
fmt.Println("Server is running on :8081") log.Fatal(http.ListenAndServe(":8081", nil))}
// ブラウザでhttp://localhost:8081/loginにアクセスすると Keycloakのログイン画面にリダイレクトするfunc handleLogin(w http.ResponseWriter, r *http.Request) { v := url.Values{} v.Add("scope", "openid") v.Add("response_type", "code") v.Add("client_id", clientID) v.Add("redirect_uri", "http://localhost:8081/callback")
redirectURL, err := url.ParseRequestURI(fmt.Sprintf("%s/protocol/openid-connect/auth", keycloakURL)) if err != nil { log.Println(err) http.Error(w, err.Error(), http.StatusInternalServerError) return } redirectURL.RawQuery = v.Encode()
http.Redirect(w, r, redirectURL.String(), http.StatusSeeOther)}
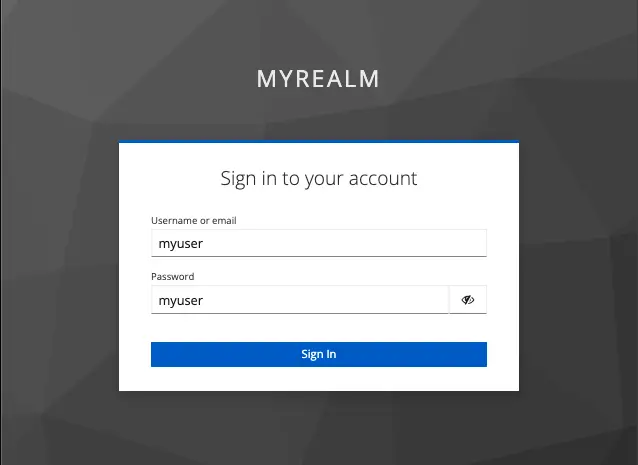
// Keycloak で認証後、リダイレクトされ、この関数が呼ばれるfunc handleCallback(w http.ResponseWriter, r *http.Request) { bytes, err := json.MarshalIndent(r.URL.Query(), "", " ") if err != nil { log.Println(err) http.Error(w, err.Error(), http.StatusInternalServerError) return } fmt.Println(string(bytes)) fmt.Fprintln(w, string(bytes))}Goのサーバーを起動して、ブラウザで http://localhost:8081/login にログインします。
Getting Started からの環境を引き続き使用しているので、Username、Password ともに myuser を入力します。
Keycloak で認証後 callback エンドポイントにリクエストがあったことらわかります。/callback にきたリクエストのクエリパラメータを出力してみると、code という文字が確認できます。
$ go run authorization_code/main.goServer is running on :8081{ "code": [ "b19d5ac6-fec6-4730-baa5-f1b61a06468c.c8b30e5b-2b5c-42c6-85c9-6b4796dd9a4b.42d6d9aa-f232-4bab-8a71-aeaffdc4aff3" ], "iss": [ "http://localhost:8080/realms/myrealm" ], "session_state": [ "c8b30e5b-2b5c-42c6-85c9-6b4796dd9a4b" ]}トークンを取得する
Section titled “トークンを取得する”次にトークンを取得したいと思います。
今回の場合、トークンエンドポイントは、http://localhost:8080/realms/myrealm/protocol/openid-connect/token です。
以下のパラメーターを application/x-www-form-urlencoded フォーマットで POST します。
- grant_type (REQUIRED)
- 値は必ず
authorization_code
- 値は必ず
- code (REQUIRED)
- redirect_uri (REQUIRED)
- client_id (REQUIRED)
RFC 6749 のリクエスト例では、Authorization ヘッダーに Basic <credentials> を設定していますが、Keyclock の場合、client_secret を入れるとトークンを取得できます。
参考:
実際にコードを書いてみます。
package main
import ( "encoding/json" "fmt" "io" "log" "net/http" "os" "strings")
const ( keycloakRealm = "myrealm" keycloakURL = "http://localhost:8080/realms/" + keycloakRealm clientID = "myapp" clientSecret = "xxxxxxx")
func main() { http.HandleFunc("/login", handleLogin) http.HandleFunc("/callback", handleCallback) http.HandleFunc("/home", handleHome)
fmt.Println("Server is running on :8081") log.Fatal(http.ListenAndServe(":8081", nil))}
// ブラウザでhttp://localhost:8081/loginにアクセスすると Keycloakのログイン画面にリダイレクトするfunc handleLogin(w http.ResponseWriter, r *http.Request) { // authorization_code/main.goのhandleLoginと同じ}
// Keycloak で認証後、リダイレクトされ、この関数が呼ばれるfunc handleCallback(w http.ResponseWriter, r *http.Request) { code := r.URL.Query().Get("code")
tokenURL := fmt.Sprintf("%s/protocol/openid-connect/token", keycloakURL)
v := url.Values{} v.Add("grant_type", "authorization_code") v.Add("code", code) v.Add("client_id", clientID) v.Add("client_secret", clientSecret) v.Add("redirect_uri", "http://localhost:8081/callback")
payload := strings.NewReader(v.Encode()) req, _ := http.NewRequest("POST", tokenURL, payload) req.Header.Add("Content-Type", "application/x-www-form-urlencoded")
// v.Add("client_secret", clientSecret) ではなく、Basic認証でもOK // req.SetBasicAuth(clientID, clientSecret)
res, err := http.DefaultClient.Do(req) if err != nil { http.Error(w, err.Error(), http.StatusInternalServerError) return } defer res.Body.Close()
var tmp, out bytes.Buffer teeReader := io.TeeReader(res.Body, &tmp)
// レスポンスからアクセストークンを取得 var tokenResponse struct { AccessToken string `json:"access_token"` } if err := json.NewDecoder(teeReader).Decode(&tokenResponse); err != nil { http.Error(w, err.Error(), http.StatusInternalServerError) return }
if tokenResponse.AccessToken == "" { http.Error(w, "token is empty", http.StatusInternalServerError) return }
// responseをterminalに出力する用 { if err := json.Indent(&out, tmp.Bytes(), "", " "); err != nil { http.Error(w, err.Error(), http.StatusInternalServerError) return } fmt.Println(out.String()) }
// アクセストークンをCookieに保存 http.SetCookie(w, &http.Cookie{ Name: "access_token", Value: tokenResponse.AccessToken, Path: "/", HttpOnly: true, Secure: true, SameSite: http.SameSiteStrictMode, })
// ログイン完了後のリダイレクト http.Redirect(w, r, "/home", http.StatusSeeOther)}
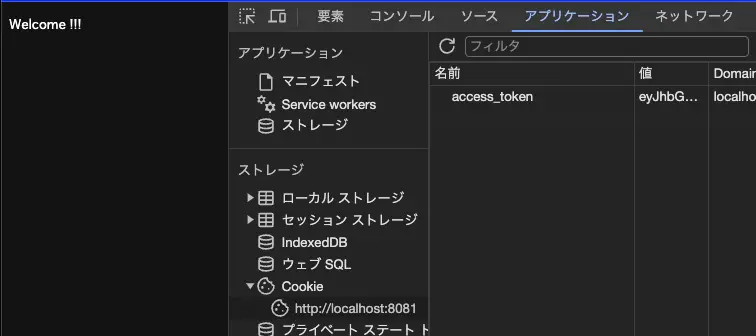
func handleHome(w http.ResponseWriter, r *http.Request) { // 認証が成功した場合の処理 w.WriteHeader(http.StatusOK) fmt.Fprintln(w, "Welcome !!!")}Goのサーバーを起動して、ブラウザで http://localhost:8081/login にログインします。
Getting Started からの環境を引き続き使用しているので、Username、Password ともに myuser を入力します。
(このときブラウザと同じタブで Devtools を開いておきます)
Sign in ボタンを押して、認証が完了するとサーバーを起動したコンソールには、Keycloak からのリクエストボディを確認できます。
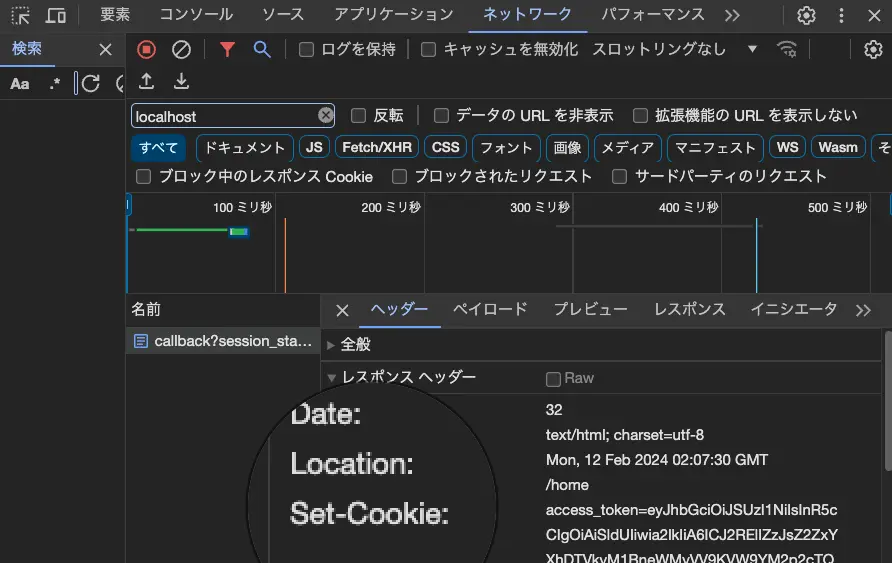
$ go run token/main.goServer is running on :8081{ "access_token": "eyJ...PQA", "expires_in": 300, "refresh_expires_in": 1800, "refresh_token": "eyJ...skk", "token_type": "Bearer", "id_token": "eyJ...ztA", "not-before-policy": 0, "session_state": "61b6a3dc-eb60-406f-985f-3576b7d6c76f", "scope": "openid email profile"}Chrome の Devtools を確認すると、ネットワークタブからレスポンスヘッダーに Set-Cookie があることがわかります。
さらにアプリケーションタブから Cookie を確認すると access_token が設定されていることが確認できます。
ここまでで ID トークン、アクセストークン、リフレッシュトークンを取得することができました。次はトークンの検証を行います。
トークンを検証する
Section titled “トークンを検証する”これで完了ではありません。今のままだと http://localhost:8081/home は認証をしなくてもアクセスできてしまいます。
このセクションでは、access_token と id_token の検証を実施します。
検証のタイミングは、Keycloak からトークンを取得した直後と、localhost:8080/home などのリソースにアクセスするエンドポイントにリクエストが来た直後です。
Go 言語でトークンの検証をするために今回は golang-jwt/jwt/v5 の ParseWithClaims 関数を使用します。
func ParseWithClaims(tokenString string, claims Claims, keyFunc Keyfunc, options ...ParserOption) (*Token, error)第2引数の claims は ID トークン用に拡張した Claims を作成し、ClaimsValidator interface を実装するため Validate メソッドを定義します。
この関数の第3引数にある Keyfunc の戻り値には検証用の鍵(公開鍵)を 1 つまたは配列を指定する必要があります。
The returned interface{} may be a single key or a VerificationKeySet containing multiple keys.
訳)返されるinterface{}は、単一のキーか、複数のキーを含む VerificationKeySet である。
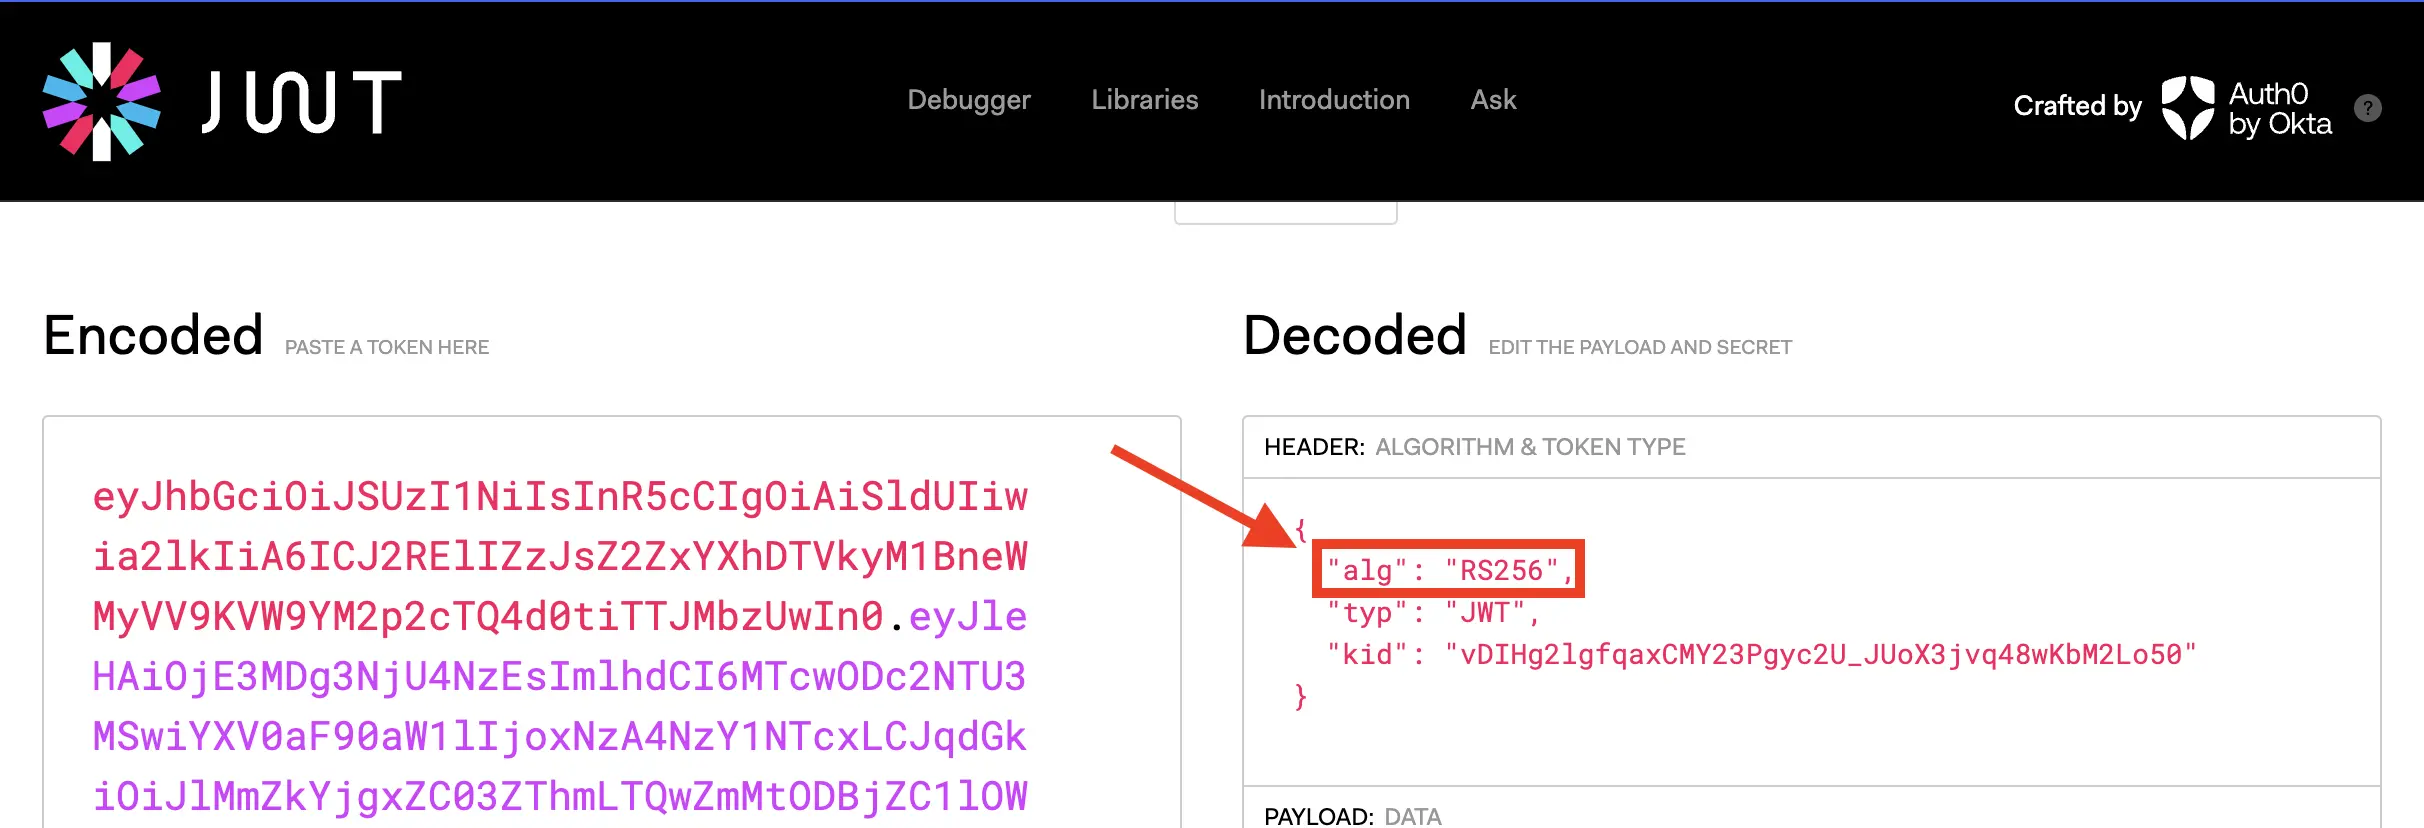
jwt.io にアクセストークンや ID トークンを入れると、alg が RS256 になっているため、RSASSA-PKCS1-v1_5デジタル署名アルゴリズムを使っていることが RFC 7518 - JSON Web Algorithms (JWA) からわかります。
つまり、Keyfunc の戻り値には、Go 言語の rsa.PublicKey を指定すれば良さそうです。
公開鍵を取得するために Keycloak の証明書エンドポイントにリクエストします。(文字列の長い箇所は ... で省略している)
$ curl -s http://localhost:8080/realms/myrealm/protocol/openid-connect/certs | jq{ "keys": [ { "kid": "vDIHg2lgfqaxCMY23Pgyc2U_JUoX3jvq48wKbM2Lo50", "kty": "RSA", "alg": "RS256", "use": "sig", "n": "tce...LR-w", "e": "AQAB", "x5c": [ "MII...qA==" ], "x5t": "RegCA3Hz_CqUp2de2_00aoqGQXQ", "x5t#S256": "Sq13xbN0X6TT6u4hC_2JVWi-zEZACYkS6bt-udY5eYM" }, { "kid": "t5kUQ2UHGJWv9Yuat0ZpRY7cu14i4ipONqjT8xw3KDw", "kty": "RSA", "alg": "RSA-OAEP", "use": "enc", "n": "nu...0HKQ", "e": "AQAB", "x5c": [ "MIIC...VK6Tw==" ], "x5t": "XWywDK-gbDitODuviQ8783sxkho", "x5t#S256": "G0hs1t23wRs8p7eHke2-WeLomWMxS_-ffgupzf0DkJU" } ]}レスポンスの各メンバについては RFC7517 に書いてあります。
rsa.PublicKeyを取得する
Section titled “rsa.PublicKeyを取得する”Go 言語で扱えるように証明書エンドポイントのレスポンスから rsa.PublicKey に変換します。
変換方法には、2通りあるので、それぞれサンプルコードを書きます。
- x5c 文字列から rsa.PublicKey にする
- n、e の文字列から rsa.PublicKey にする
1. x5c 文字列から rsa.PublicKey にする
Section titled “1. x5c 文字列から rsa.PublicKey にする”x5c の文字列から Go 言語の rsa.PublicKey に変換します。
x5c (X.509 certificate chain) パラメータは, 1つ以上の PKIX 証明書 [RFC5280] からなるチェーンを示す. 証明書チェーンは証明書文字列の JSON 配列として表現される.
それぞれの証明書文字列は base64 エンコード ([RFC4648] Section 4 参照, base64url エンコードではない) された DER 形式の [ITU.X690.1994] PKIX 証明書である. 当該 JWK の鍵を含む PKIX 証明書は先頭の証明書でなければならない (MUST)引用:4.7. “x5c” (X.509 Certificate Chain) Parameter - RFC7517 JSON Web Key(JWK)
x5c の文字列から rsa.PublicKey にするサンプルコード
func getPublicKey(x5c string) (*rsa.PublicKey, error) {  dec, err := base64.StdEncoding.DecodeString(x5c)  if err != nil {    return nil, err  }
  cert, err := x509.ParseCertificate(dec)  if err != nil {    return nil, err  }
  publicKey, ok := cert.PublicKey.(*rsa.PublicKey)  if !ok {    return nil, fmt.Errorf("rsa public key %v", publicKey)  }
  return publicKey, nil}
func main() {  x5c := "MII...qA=="
  publicKey, err := getPublicKey(x5c)  if err != nil {    log.Fatal(err)  }  fmt.Println("N =", publicKey.N)  fmt.Println("E =", publicKey.E)}
参考:
2. n、e の文字列から rsa.PublicKey にする
Section titled “2. n、e の文字列から rsa.PublicKey にする”「n」(モジュラス)パラメータには、RSA公開鍵のモジュラス値が含まれています。これは、Base64urlUIntでエンコードされた値として表されます。
“e”(指数)パラメーターには、RSA公開鍵の指数値が含まれています。これは、Base64urlUIntでエンコードされた値として表されます。
引用:
n、e の文字列から rsa.PublicKey にするサンプルコード
func getPublicKey(modulus string, exponent string) (*rsa.PublicKey, error) {  n, err := base64.RawURLEncoding.DecodeString(modulus)  if err != nil {    return nil, err  }  nInt := new(big.Int).SetBytes(n)
  e, err := base64.RawURLEncoding.DecodeString(exponent)  if err != nil {    return nil, err  }  bigInt := new(big.Int).SetBytes(e)
  return &rsa.PublicKey{    N: nInt,    E: int(bigInt.Int64()),  }, nil}
func main() {  n := "tce...R-w"  e := "AQAB"
  publicKey, err := getPublicKey(n, e)  if err != nil {    log.Fatal(err)  }  fmt.Println("N =", publicKey.N)  fmt.Println("E =", publicKey.E)}
ID トークンの検証内容
Section titled “ID トークンの検証内容”トークンの何を検証するかは OpenID Connect の仕様書にある ID Token Validation を参考にします。
| 検証内容 | ||
|---|---|---|
| 1 | ID Token が暗号化されているならば、Client が Registration にて指定し OP が ID Token の暗号化に利用した鍵とアルゴリズムを用いて復号する。Registration 時に OP と暗号化が取り決められても ID Token が暗号化されていなかったときは、RP はそれを拒絶するべき (SHOULD). | ID Token 自体を暗号化してないので検証しません。 |
| 2 | (一般的に Discovery を通して取得される)OpenID Provider の Issuer Identifier は iss (issuer) Claim の値と正確に一致しなければならない (MUST). | 今回の Issuer Identifer は http://localhost:8080/realms/myrealm なので、検証に使用します。 |
| 3 | Client は aud (audience) Claim が iss (issuer) Claim で示される Issuer にて登録された、自身の client_id をオーディエンスとして含むことを確認しなければならない (MUST)。 | 今回の aud は myapp なので、検証に使用します。 |
| 4 | ID Token が複数のオーディエンスを含むならば、 Client は azp Claim があることを確認すべき (SHOULD)。 | 今回は aud が 1 つなので、確認しません。 |
| 5 | azp (authorized party) Claim があるならば、Client は Claim の値が自身の client_id であることを確認すべき (SHOULD)。 | ID Token に azp があるので、client_id(myapp)であることを確認します。 |
| 6 | (このフローの中で)ID Token を Client と Token Endpoint の間の直接通信により受け取ったならば、トークンの署名確認の代わりに TLS Server の確認を issuer の確認のために利用してもよい (MAY). Client は JWS に従い、JWT alg Header Parameter を用いて全ての ID Token の署名を確認しなければならない (MUST). Client は Issuer から提供された鍵を利用しなければならない (MUST)。 | 署名の検証をします。 |
| 7 | alg の値はデフォルトの RS256 もしくは Registration にて Client により id_token_signed_response_alg パラメータとして送られたアルゴリズムであるべき (SHOULD)。 | 今回は Keycloak のデフォルト設定なので、alg は RS256 のはずです。検証します。 |
| 8 | JWT alg Header Parameter が HS256, HS384 および HS512 のような MAC ベースのアルゴリズムを利用するならば、aud (audience) Claim に含まれる client_id に対応する client_secret の UTF-8 表現バイト列が署名の確認に用いられる。MAC ベースのアルゴリズムについて、aud が複数の値を持つとき、もしくは aud の値と異なる azp の値があるときの振る舞いは規定されない。 | このステップは関係ないのでスキップします。 |
| 9 | 現在時刻は exp Claim の時刻表現より前でなければならない (MUST)。 | 検証します。 |
| 10 | iat Claim は現在時刻からはるか昔に発行されたトークンを拒絶するために利用でき、攻撃を防ぐために nonce が保存される必要がある期間を制限する。 許容できる範囲は Client の仕様である。 | Authentication Request(Keycloka エンドポイント:/protocol/openid-connect/auth)の際に、nonce を設定しなかったため検証しません。 |
| 11 | nonce の値が Authentication Request にて送られたならば、nonce Claim が存在し、その値が Authentication Request にて送られたものと一致することを確認するためにチェックされなければならない (MUST). Client は nonce の値をリプレイアタックのためにチェックすべき (SHOULD). リプレイアタックを検知する正確な方法は Client の仕様である。 | Authentication Request(Keycloka エンドポイント:/protocol/openid-connect/auth)の際に、nonce を設定しなかったため検証しません。 |
| 12 | acr Claim が要求されたならば、Client は主張された Claim の値が適切かどうかをチェックすべきである (SHOULD). acr Claim の値と意味はこの仕様の対象外である。 | acr は利用しないので、スキップします。 |
| 13 | auth_time Claim が要求されたならば、この Claim のための特定のリクエストもしくは max_age パラメータを用いて Client は auth_time Claim の値をチェックし、もし最新のユーザー認証からあまりに長い時間が経過したと判定されたときは再認証を要求すべきである (SHOULD). | Authentication Request(Keycloka エンドポイント:/protocol/openid-connect/auth)の際に、max_age を設定しなかったため検証しません |
アクセストークンの検証内容
Section titled “アクセストークンの検証内容”Token Endpoint から取得したアクセストークンを検証するときは、ID トークンにある at_hash を使うことで確認できます
- ID Token の JOSE Header 中の alg Header Parameter のために JWA [JWA] にて指定されているハッシュアルゴリズムにて access_token の ASCII バイト列をハッシュする. 例えば alg が RS256 であれば, ハッシュアルゴリズムは SHA-256 となる.
- ハッシュの左半分を取り出し, それを base64url エンコードする.
- ID Token の at_hash の値が直前のステップで生成された値と等しくなければならない (MUST).
アクセストークンの検証のサンプルコード
package main
import (  "crypto/sha256"  "encoding/base64"  "fmt")
func main() {  atHash := "7mU6G2VXQ0sAyvsEFZZ4gw"
  accessToken := "eyJ...mKw"  r := sha256.Sum256([]byte(accessToken))  hash := base64.RawURLEncoding.EncodeToString(r[:16])
fmt.Println("hash", hash) fmt.Println(atHash == hash)}APIサーバーで公開している各エンドポイントにリクエストが来た場合は、ID トークンとほぼ同じ内容を検証します。
コードが長いので、実装の一部を載せます。コード全体は blog-code/2024/02/keycloak-authorization-code-flow/veryfy_token/main.go にあります。
func handleCallback(w http.ResponseWriter, r *http.Request) {  ...  // KeycloakからCertificateを取得する  jwkset, err := getJWKSet()  if err != nil {    log.Println(err)    http.Error(w, "InternalServerError", http.StatusInternalServerError)    return  }
  // JWKSからjwt.VerificationKeySetに変換する  verificationKeySet := jwkset.ToVerificationKeySet()
  // IDトークンを検証する  var idTokenClames IDTokenClames  token, err := jwt.ParseWithClaims(    tokenResponse.IDToken,    &idTokenClames,    func(token *jwt.Token) (interface{}, error) {      return verificationKeySet, nil    },    jwt.WithExpirationRequired(),    jwt.WithValidMethods([]string{"RS256"}),    jwt.WithIssuer(keycloakURL),    jwt.WithAudience(clientID),  )
  ...
  // アクセストークンを検証する  if c, ok := token.Claims.(IDTokenClames); ok {    accessTokenHash := sha256.Sum256([]byte(tokenResponse.AccessToken))    leftmostHash := base64.RawURLEncoding.EncodeToString(accessTokenHash[:16])    if c.AccessTokenHash != leftmostHash {      log.Println("access token is not equal to the at_hash")      http.Error(w, "InternalServerError", http.StatusInternalServerError)      return    }  }
  ...}
func handleHome(w http.ResponseWriter, r *http.Request) {  ...
  // JWKSからjwt.VerificationKeySetに変換する  verificationKeySet := jwkset.ToVerificationKeySet()
  var accessTokenClames AccessTokenClaims  token, err := jwt.ParseWithClaims(    cookie.Value,    &accessTokenClames,    func(token *jwt.Token) (interface{}, error) {      return verificationKeySet, nil    },    jwt.WithExpirationRequired(),    jwt.WithValidMethods([]string{"RS256"}),    jwt.WithIssuer(keycloakURL),    jwt.WithAudience("account"),  )  ...}
以下のコマンドでサーバーを起動できます。ブラウザで http://localhost:8081/login にアクセスした後、Username、Password ともに myuser を入力します。ログイン後 http://localhost:8081/home にリダイレクトされます。
go run veryfy_token/main.goブラウザの Coookie に access_token があるので、それを削除した後、ブラウザをリロードすると Unauthorized でアクセスができなくなることが確認できます。
参考:
以下は jwt.ParseWithClaims や x509.ParseCertificate の動作確認のために使ったサンプルコードです。
keyfuncにPublicKeyを1つだけ指定した例
package main
import (  "crypto/rsa"  "crypto/x509"  "encoding/base64"  "errors"  "fmt"
  "github.com/golang-jwt/jwt/v5")
const (  keycloakRealm = "myrealm"  keycloakURL   = "http://localhost:8080/realms/" + keycloakRealm  clientID      = "myapp")
type IDTokenClames struct {  AuthorizedParty string `json:"azp,omitempty"`  AccessTokenHash string `json:"at_hash,omitempty"`  jwt.RegisteredClaims}
func (i *IDTokenClames) Validate() error {  if i.AuthorizedParty != clientID {    return errors.New("azp does not match the client ID")  }  return nil}
func main() {  str := "MII...EQ=="
  // 署名をdecodeする  dec, err := base64.StdEncoding.DecodeString(str)  if err != nil {    fmt.Println(err)    return  }
  // byteからx509.Certificateに変換する  cert, err := x509.ParseCertificate(dec)  if err != nil {    fmt.Println(err)    return  }
  // PublicKeyを取り出す  publicKey, ok := cert.PublicKey.(*rsa.PublicKey)  if !ok {    fmt.Println("rsa public key", publicKey)    return  }
  tokenStr := "eyJh...f5Q"
  // tokenを検証する  var idTokenClames IDTokenClames  token, err := jwt.ParseWithClaims(    tokenStr,    &idTokenClames,    func(token *jwt.Token) (interface{}, error) {      return publicKey, nil    },    jwt.WithExpirationRequired(),    jwt.WithValidMethods([]string{"RS256"}),    jwt.WithIssuer(keycloakURL),    jwt.WithAudience(clientID),  )
  fmt.Printf("%+v\n", token.Claims)  if err != nil {    fmt.Println(err)  }
fmt.Println(token.Valid)}今回は手を動かしながら OIDC を勉強することが目的だったため、極力ライブラリを使用しないように実装しました。アクセストークンを取得するフローも複数あったため代表的なフローのみ Keycloak を使って勉強してみました。OIDC を調べていくにあたって、nonce や PKCE など他にもやらないといけないことがあるので、また後ほど Keycloak を使って勉強してみようと思います。
- 実践 Keycloak - O’Reilly
- OpenID Connect - Keycloak Documentation
- Authorization Code Flow - Keycloak Documentation
- 3.1.1. Authorization Code Flow Steps - OpenID Connect 1.0 specification 日本語訳
- 一番分かりやすい OpenID Connect の説明 - Qiita
- OAuth の代表的フロー Authorization Code Flow と PKCE についてまとめてみる - Zenn
- OAuth 2.0 Token Introspection - RFC 7662
- RFC 7662 - OAuth 2.0 Token Introspection 日本語訳
- Session vs Token Based Authentication - geeksforgeeks.org
- API Authentication – Tokens vs Sessions - baeldung
- Session Management Cheat Sheet - OWASP Cheat Sheet Series
- 図解:OAuth 2.0に潜む「5つの脆弱性」と解決法 - ITmedia
- 認証とセキュリティ -Zenn
- セキュリティ視点からの JWT 入門 - Hatena blog
- いまさらLocal Storageとアクセストークンの保存場所の話について - Qiita
- Please Stop Using Local Storage
- どうしてリスクアセスメントせずに JWT をセッションに使っちゃうわけ?
- WebアプリケーションでJWTをセッションに使う際の保存先は(自分なりに説明できれば)どちらでもよいと思います
- OAuthやOIDCのトークン署名、暗号化、HoKについて - Qiita
- セッションを暗号化することになんの意味がありますか?暗号化したとしても、その暗号化したものを使ってリクエストしてしまえばサーバー側で復号してくれるので通ってしまうと思います。 - Quora
- OpenID Connectのstateとnonceの違いがわからなかった - Qiita